"It Happened!" Transom has to be replaced! (NOW W/PICS)

Jcris

Chief Petty Officer
Joined
Apr 23, 2016
Messages
466
I don't recall exactly what drive you have but maybe check
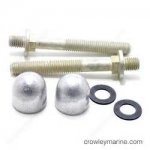
Well I just took a look around and those bolts are available but are pricey as hell
Maybe the anodes can be modified to use a nylock type nut to keep them in place
Drill a hole through the anode and attach it with a nut. That way you don't have to deal with differnet thread sizes on each end of the stud. Or maybe that's a completely stupid idea.:laugh:
I think this is the part number you're looking for [h=1]97-55989A 8 - BOLT ASSEMBLY[/h] Might make your search easier
 
Last edited:

LX Kid

Ensign
Joined
Sep 5, 2008
Messages
993
"Thanks Jcris." I was thinking of using a course thread "square" nut and JB-Weld it on one end about 1/2" down. If it didn't fit exactly in the housing square hole I can just file or grind it down to fit. The length is probably the same as the other studs of 6". The cutting of end threads is not that hard but rather time consuming. "Where there is a need, there is a way!" Yes I had already checked eBay and they run $45 and up in price because they are sold as a kit with new anodes. All I need is the bolts.

UPDATE @ 4:50pm: I just discovered that the bolt and washer are made from aluminum. "Back to the no back-up plan."

Guess I could use aluminum rod in the same manner and thread it. Wonder if it matter if I use a steel nut?
 
Last edited:

LX Kid

Ensign
Joined
Sep 5, 2008
Messages
993
No Title

Got tired of jacking around with the darn anodes bolt kit so I just ordered a kit of eBay for $40 shipped.
 

Attachments

  • photo278487.jpeg
    photo278487.jpeg
    6.9 KB · Views: 0
Last edited:

Jcris

Chief Petty Officer
Joined
Apr 23, 2016
Messages
466
Don't blame you,
That's as good of a price as I saw
 

LX Kid

Ensign
Joined
Sep 5, 2008
Messages
993
Had things to do this morning so didn't work on gimbal housing. Rain is moving in so probably won't get anything done today. Yesterday I installed bearing, water hose, trim sender wires and made sure I have all the parts necessary to complete the gimbal assembly rebuild. Things are looking good so maybe the next day or two I move on over to the outdrive and see if the drive shaft seal is bad. Had a lot of lube grease/oil in the bellows when it was removed. I put a new seal in it about two years ago and am curious about it's possible failure.

Update: 10/6/17---We have mental burn-out so we took the day off for "lack of any other reason!" Could rain, snow or even electric grid might go down! LoL
 
Last edited:

LX Kid

Ensign
Joined
Sep 5, 2008
Messages
993
No Title

All the cursing in the world and this darn gimbal assembly is not together yet!!! All three bellows, trim wires and water hose are on the housing and the shift cable is thru it as well. Tomorrow I'll mount the gimbal ring and hook up the water hose and the other ends of the two bellows. Those grounding tabs really tore up my hands trying to get the bellows on the housing. Seems like the two bellows would rub against each other when triming up and down. "Someone have some cheese to go with my whine?"
 

Attachments

  • photo278745.jpg
    photo278745.jpg
    92.9 KB · Views: 0
  • photo278746.jpg
    photo278746.jpg
    90.7 KB · Views: 0
Last edited:

LX Kid

Ensign
Joined
Sep 5, 2008
Messages
993
No Title

My partner is putting some of the finishing putty work on the transom today getting the final steps done for painting. He has decided he'd like to use gel coat instead of using epoxy rattle can paint. Probably a better idea than mine. After 2 months of everyday work on the boat we are getting pretty worn out. We are however getting closer to going to the "happy fishing grounds" and that's a good thing. (No, I didn't work on the gimbal assembly today. Mental burn out!) Tomorrow will be a better day. Quote from Gone With the Wind.

We did notice, center picture, that when the sun heats up the stern a couple of bubbles bulge out a little. We circled the spots and I guess air is trapped under. Plan on drilling holes in them and shooting some resin to fill the void.
 

Attachments

  • photo278828.jpg
    photo278828.jpg
    163.8 KB · Views: 0
  • photo278829.jpg
    photo278829.jpg
    192.7 KB · Views: 0
  • photo278830.jpg
    photo278830.jpg
    241.4 KB · Views: 0
Last edited:

Jcris

Chief Petty Officer
Joined
Apr 23, 2016
Messages
466
Yeah take a break. Watch some football. Have a brew. They got any decent teams out your way lol
 

LX Kid

Ensign
Joined
Sep 5, 2008
Messages
993
No Title

photo278990.jpg Down time in order for the crew! We have reached burn out and are going fishing with a friend this week. Just gonna kick back and let this project rest for a couple three days. Things are going very good but tired of eating all the fiberglass dust. Cut out the scupper holes is about all I did today and washing down the inside of the boat.

THIS WOULD BE A VERY "NICE" CATCH!
 
Last edited:

Bayou Dave

Lieutenant Commander
Joined
Dec 13, 2012
Messages
1,780
That would be a nice catch. I met her sister, a better fisherman than I. :D
 

Attachments

  • Fisherman.jpg
    Fisherman.jpg
    25 KB · Views: 0
Last edited by a moderator:

LX Kid

Ensign
Joined
Sep 5, 2008
Messages
993
OMG! I hope I don't get banned from iBoats for what I'm "just" thinking! Couple of best pair of catches I've ever seen. (Nuff said.)
 

Stumpalump

Chief Petty Officer
Joined
Dec 5, 2013
Messages
413
Two weeks at ago Canyon lake AZ I pulled up to the ramp dock to pull out and models were doing a photo shoot. Out of all Don Won Donzi dudes, surf boats and 27' Sea Rays the girls wanted my old tin boat and dog as a photo prop.I let them have at it and took a few pics of the professional photographers in case the wife gets curious. True story!

107npnb.jpg


Such a nice lake!


dbmuk6.jpg
 

LX Kid

Ensign
Joined
Sep 5, 2008
Messages
993
OK guys. I know I started it but we need to get back on track here about restoration of boats. Please no more girl pics! Thanks
 

LX Kid

Ensign
Joined
Sep 5, 2008
Messages
993
No Title

Got a little more done on the transom and engine compartment today. My partner added woven raven to the transom, stringers and floor of the engine bay. I continued on with the transom by putting some leveling putty on the joints and will wet sand tomorrow and add the glazing putty. Getting pretty close to final sanding, priming and painting.
 

Attachments

  • photo279098.jpg
    photo279098.jpg
    94.6 KB · Views: 0
Top