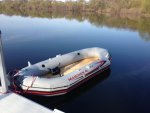
Intex Mariner 4 modifications and Tips

eclipse3gen

Seaman
Joined
Dec 8, 2013
Messages
53
Re: Intex Mariner 4 modifications and Tips

Hello all,
My second question is should i just use the slat floor as a template? Or does someone have good measurements for their own wood floor. I know no two boats are exactly the same, but a rough estimate would save me allot of time.


something i am using to make my floors. if you end up not using the pipe insulation, you can also go with 34-1/2 or 35 for width.

View attachment 229063
 

CopperFox

Petty Officer 2nd Class
Joined
Jan 13, 2012
Messages
169
Re: Intex Mariner 4 modifications and Tips

Eclipse3
I could measure my floor if you still need numbers. I have not used pip insulation and have 15/32". Let me know.
 

flukesofnature

Petty Officer 2nd Class
Joined
Mar 9, 2014
Messages
122
Re: Intex Mariner 4 modifications and Tips

Hello all,

Been reading through this thread for the past 2 days, its absolutely amazing some of the work and ingenuity on the modifications I have seen here!!! I have had my Mariner 4 for 2 years now, and other than the motor mount, a Minn Kota 30 and a battery center i have not done that much to the boat itself. I was mainly using this boat for a yearly trip we take to the Shenandoah River, where we get a cabin and stay for 3-4 days. This will mark the 6th year we have gone and I had both the extra $$ and time to start making some additional modifications. I went to Lowe's and got 2 sheets of 19/32 plywood, a gallon of outdoor deck paint to treat the wood, and the 1/2 inch foam pipe insulators for the edges. I also bought a dry box, a waterproof Bluetooth speaker, 11" seat post with swivel and a John Boat style folding seat for the back.

I want to make a 2 piece floor to make it easier to handle when the boat is in storage. I have seen several people talk about their wood floors but i wanted to see which option is best. Should I, A: Not connect the two pieces at all. B: Hing the pieces together at the middle. C: Use a slat connection with bolts.

My second question is should i just use the slat floor as a template? Or does someone have good measurements for their own wood floor. I know no two boats are exactly the same, but a rough estimate would save me allot of time.

I have looked at several pictures of each of these, I just wanted to get some opinions on setting it up. Will definitely get some pictures up on here as soon as possible, as of now i only have the slat floor out. Thanks for your suggestions and keep up the great work!! :)

This was done for a Mariner3 but the measurement method will work..just use the measurements you get on your boat ****Not exact for Mariner 4*****USE THE MEASUREMENT YOU GET FOR YOUR BOAT***

1..Used OSB 15/32 from H depot
2.I measured the longest line from bow to stern of the inflated floor , (remember to tuck the measuring tape snug under the side tubes and front and rear tube)and found the center of that line( divide distance by 2)
mark this with a small magic marker dot. My length was 96 inches divide by two is 48
3.Repeat the measurement for width at the widest spot of the inflated boat floor ...mine was 27inch (divide by 2 is 13 1/2 ),,mark center of that line at the mark you made for the length. This is exact center of boat.
4.From that point you have 48 inches to the bow , to the stern, and 13 1/2 inches to each side.
5 I took an inch off all dimensions..front, rear, and both sides
6. ask H depot to make the cuts for you when you buy
7. my dimensions that were cut were 24 1/2x 94( extra 1/2 inch off the sides ...fudge factor)
9. have them cut that piece in half=47x24 1/2each piece(mine)
10. find the center point of the two lines, marked on your boat with magic marker.measure up to the first section where the chambers agle inward.
11.measure this distance across and mark this distance on your wood, repeat this measurement up a the next angle(where the chambers angle inward..It is almost a 45 degree angle on each of the two inward angles that the chambers make. This is difficult to describe..but you can see that the wood has to be cut at the angles.
12.measure up from the center point again on the boat, 47 inches on my intex. Measure the length of that line all the way under the inflated side chambers, and then take two inchesoff that line measurement.....mine was 7 1/12 inches wide(9 1/2 minus 2)
This will be the measurement of the very end of each piece of wood. You will now see that this must be cut to this dimension , with the angles. The wood will fit in the boat with 1 inch to spare on the top , bottom and all sides.A skill saw or hand saw will cut the angles easily.
13. Mark and cut your wood ...I had to trim ever so slightly..you may need to also.Better to trim each side a little than to cut alot off one side or the other.
14. when the dimensions are right, with at least inch to spare top,bottom, and all sides.( this is when the extra inch comes in..the pipe insulation will take up this extra inch on all sides)..
I used a file to round all the edges of the wood for splinters..some use a router,sander etc...the pipe insulation will cover all the edges,anyway.
Paint the wood on both sides with a primer sealer..I used white acrylic(about 1 quart will do the job) was told oil based is better...but the drying time and fumes were not worth it to me.
15. let dry for 2 days...repeat paint...this makes a good seal on the wood and all edges
16. You will have to cut a hole in one of the pieces to accomodate the floor valve...about a 2 1/2 in hole...measure location very accurately before cutting...and seal the hole with above primer sealer.
16. I used 3/4 inch styrofoam pipe insulation( the look like pool play toys..and can be found at home depot..they are about 6 foot long etc.split ) open the insulation lengthwise,and slide over the edge of the wood all around..including the bottom of each piece of wood where they will match up and meet in the middle of the floor of the boat. This will prevent any abrasion of the wood against the floor or the side chambers where the floor and sides meet.
This insulation takes up the extra inch on all sides of the boat..making installation very snug.
Last... I used indoor outdoor carpet, with proper indor outdoor carpet cement to cover 1 (ONE)side of the wood.
Cement the carpet first..then attach pipe insulation..over carpet around the entire perimeter of the wood..as note above.
Fit and trim as needed...
you should end up with a nice looking floor, very stable,
Installation instruction...partially inflat chamber 1 and 2...about 1/3 full, ****NOTE MARINER 3 ONLY HAS 3 CHAMBERS***
install each piece of the wood floor, making sure the floor valve of the boat is centered in the hole that was cut in the wood for it(once again..BE VERY ACCURATE WHEN CUTTING THE HOLE IN THE WOOD FOR THE FLOOR VALVE)....
anyway..then fill chamber one and then two, and the fill floor chamber...it may seem more difficult because of the wood on it..but you will see how it works when you do this, In fact..the floor can be left less than fully inflated because of the support of the wood,...But yes ..you can fill the floor also to full. You will see what I mean.The floor section may seem like it is not filling as well, this is the weight of the wood. if you get the floor about 1/2 full, then launch...I use the hand pump to top the side chambers and fill the floor while in the water,,,works easier for me.

** there are many videos on Y T that show this procedure for different inflatable boats....watching one will make the whole thing make sense...

***********NOTE TO FLOOR BUILDERS******** 6/4/14.....See note on june 3.........regarding using OSB
DO NOT USE OSB......IT Loves water too much....Go with 1/2 or 15/32 plywood. All other instructions are good to go.
 
Last edited:

flukesofnature

Petty Officer 2nd Class
Joined
Mar 9, 2014
Messages
122
Re: Intex Mariner 4 modifications and Tips


DROP
does Achilles make the floor boards for sale...I/E 4x8 etc sheets? If we could find a way for a DIY person to get hold of these composite floor materials...I would guess more strength, and a lot less weight..a great solution. I am tracking some info regarding this from a company called "thermo -lite"...composite sheeting...kind of like "trex" decking only in 1/4,1/2 etc sheets. Not sure if cost effective but obviously more strength/vs/ weight.

BTW welcome! Thanks for the above ideas
 
Last edited:

lemondrop9344

Seaman
Joined
Dec 9, 2012
Messages
51
Re: Intex Mariner 4 modifications and Tips

It has been my experience with the Achilles wooden floor inflatable, the floor joint H channel will require the floor to have a routed edge to properly fit the H channel. The same holds true for the stringer. I am not that familiar with the floors of other inflatables, but, I would assume this is the true with them also. It is easily accomplished with a router. When we re-floored my son's Achilles we discovered that not all marine plywood is created equal. Some are measured in metrics and some are measured in inches and the better plywoods can be expensive. If I remember correctly, we used some 1/2" marine plywood.
I initially suggested marine board, but, he thought it was too expensive. I've made some additions to my Achilles with it (pictures attached) and it's much easier to work with than plywood.

IMG_20140506_143829_782.jpgIMG_20140506_143633_596.jpgfront mount.jpgIMG_20130611_110010_282.jpg

The Cutting Board Factory will cut the marine board length wise & width wise saving you some time. Assuming you are doing a complete floor with quality marine plywood and protecting it with epoxy paint the marine board becomes very competitive from a price point and will last forever.
 

eclipse3gen

Seaman
Joined
Dec 8, 2013
Messages
53
Re: Intex Mariner 4 modifications and Tips

It has been my experience with the Achilles wooden floor inflatable, the floor joint H channel will require the floor to have a routed edge to properly fit the H channel. The same holds true for the stringer.

Pictures in these Archilles H-channel seem to have flat edges. I do not see any need for routed edges. Perhaps I am looking at a different h-channel? can you take a picture of your h-channel joints and also the floor board edges?

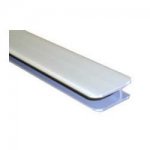
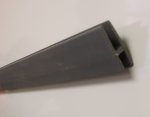
450722.jpg ACHSC392GY.jpg


http://www.*************/product3.jsp?path=-1|294|2345895|2345896&id=158682

http://shop.inflatableboatparts.com/product.php?productid=231
 
Last edited:

eclipse3gen

Seaman
Joined
Dec 8, 2013
Messages
53
Re: Intex Mariner 4 modifications and Tips

Eclipse3
I could measure my floor if you still need numbers. I have not used pip insulation and have 15/32". Let me know.

if not too much hassle, not wasting a lotta time. it would certainly confirm my measurements. 35 is stitch to stitch. I have it marked at 34 for width and 108 for length. i haven't cut my floors yet. wood and carpets are sitting in my garage. i may have it done this weekend. still contemplating if i should go ahead with 2pc or more. if i do 2pc and put them in between the back and front seat, they will push civic interior the door handles by an inch. if i do 3pc they will fit there. i would love to put them in my trunk. I usually have my buddies with me during my fishing and camping trips and will need back seats time to time. my back seat doesn't fold so if i want to put em in the trunk, i will have to cut it in 4 pieces. and that would require some support with some sort of h-channels/joints/hings.
 
Last edited:

flukesofnature

Petty Officer 2nd Class
Joined
Mar 9, 2014
Messages
122
Re: Intex Mariner 4 modifications and Tips

I just googled "marine composite board" and a whole world of possibilities for the Mariner DIY'ers just opened up.
Soon we will will need a group forum for "Mariner Mod-aholics"
"" I am Al and I just 3rd mortgaged my home to re-modify my 11 foot inflatable raft.....""
 

flukesofnature

Petty Officer 2nd Class
Joined
Mar 9, 2014
Messages
122
Re: Intex Mariner 4 modifications and Tips

Eclipse....
I posted some instructions yesterday to measure the floor..to LemonDrop..I am finding that you may need less than stitch to stitch by a minimum an inch in all areas. Although my floors fit in very snug, with the pipe insulation , there seems to be considerable strain at the stitch junctions...and I have a small leak.( non noticeable after 7.hours floating).can't find yet that seems to be in those seam areas. Even with taking an inch off all dimensions before cutting the wood, I am wondering if it is just too snug. My design was to keep the side tubes just slightly over the floor, so they would kind of secure them in place. I think I could lose another inch off the sides and still accomplish that without the added strain.....might be worth a second thought and look as you make your cuts.
 
Last edited:

AKTrout

Cadet
Joined
Apr 10, 2014
Messages
28
Re: Intex Mariner 4 modifications and Tips

Hello all,

Been reading through this thread for the past 2 days, its absolutely amazing some of the work and ingenuity on the modifications I have seen here!!! I have had my Mariner 4 for 2 years now, and other than the motor mount, a Minn Kota 30 and a battery center i have not done that much to the boat itself. I was mainly using this boat for a yearly trip we take to the Shenandoah River, where we get a cabin and stay for 3-4 days. This will mark the 6th year we have gone and I had both the extra $$ and time to start making some additional modifications. I went to Lowe's and got 2 sheets of 19/32 plywood, a gallon of outdoor deck paint to treat the wood, and the 1/2 inch foam pipe insulators for the edges. I also bought a dry box, a waterproof Bluetooth speaker, 11" seat post with swivel and a John Boat style folding seat for the back.

I want to make a 2 piece floor to make it easier to handle when the boat is in storage. I have seen several people talk about their wood floors but i wanted to see which option is best. Should I, A: Not connect the two pieces at all. B: Hing the pieces together at the middle. C: Use a slat connection with bolts.

My second question is should i just use the slat floor as a template? Or does someone have good measurements for their own wood floor. I know no two boats are exactly the same, but a rough estimate would save me allot of time.

I have looked at several pictures of each of these, I just wanted to get some opinions on setting it up. Will definitely get some pictures up on here as soon as possible, as of now i only have the slat floor out. Thanks for your suggestions and keep up the great work!! :)

A couple thoughts for you as I'm almost done with my floor. I used the slat floor that came with it as a start, fit the floor in the boat and trimmed it. Repeat once or twice and you get a perfect fit. The tricky part is the keel valve. It was a pain to accurately mark it, but I marked it twice and cut the hole. I then applied my last coat of poly (two coats should do I think) so I had to let it dry and haven't tested the floor yet since cutting the keel valve hole. I didn't use pipe insulation, I rounded the edges and will wrap with carpet. I had the benefit of using a router though... So that took five minutes. I think the consensus is that hinges are not necessary. Having each piece separate makes installation easier, but I decided I'm going to have one piece of continuous carpet glued to the top. The rubber backing of the outdoor carpet will mildly act as a hinge, but I'm doing it more for looks. Pictures will be posted once finished. It will be this week when I'm off work.
 

AKTrout

Cadet
Joined
Apr 10, 2014
Messages
28
Re: Intex Mariner 4 modifications and Tips

Oh yeah, one more thought dragun. Two pieces would be nice, and I considered it for a moment, but decided I didn't want to add the cost of an extra sheet of plywood when so much would end up as waste (or reused in another project). If you had a full two piece floor, leaving no spot uncovered, each would have to be about 4'6" long. If you can find 12' sheets of ply, that would work. I just did what's common with other floors on this thread: two 4' pieces and a 1' bow piece.
 

eclipse3gen

Seaman
Joined
Dec 8, 2013
Messages
53
Re: Intex Mariner 4 modifications and Tips

Eclipse....
I posted some instructions yesterday to measure the floor..to LemonDrop..I am finding that you may need less than stitch to stitch by a minimum an inch in all areas. Although my floors fit in very snug, with the pipe insulation , there seems to be considerable strain at the stitch junctions...and I have a small leak.( non noticeable after 7.hours floating).can't find yet that seems to be in those seam areas. Even with taking an inch off all dimensions before cutting the wood, I am wondering if it is just too snug. My design was to keep the side tubes just slightly over the floor, so they would kind of secure them in place. I think I could lose another inch off the sides and still accomplish that without the added strain.....might be worth a second thought and look as you make your cuts.

totally agree with you. if you use pipe, i wouldn't go above 34 on mariner 4. since yours is mariner 3 i believe your measurements at 24-1/2 probably right. but regardless you should leave about atleast 1/2inch to an inch for pipe insulation. i also realized from my couple trips out two walmart folding table and original floor that, if you fully inflate the hull it will reduce the boat in width. so you could go another 1/2 inch shorter if you'd like. Original floor slats are at 34-1/4inch without insulation.
 

lemondrop9344

Seaman
Joined
Dec 9, 2012
Messages
51
Re: Intex Mariner 4 modifications and Tips

Pictures in these Archilles H-channel seem to have flat edges. I do not see any need for routed edges. Perhaps I am looking at a different h-channel? can you take a picture of your h-channel joints and also the floor board edges?

View attachment 231361 View attachment 231362


http://www.*************/product3.jsp?path=-1|294|2345895|2345896&id=158682

Achilles plastic floor joints (Achilles Part #SC392GY)

The likely hood you will find a piece plywood or any other suitable material which will fit inside the H channel is very slim....at least based on our efforts. Just to show you how anal we were, I measured the inside distance of the H channel with a digital caliper and called all over the Wilmington, NC area looking for plywood with that dimension. We could not find it. You can't go larger than the H channel as it will splay the ends out. The routing is done on the plywood so it will fit inside the H channel. Apparently this is the way Achilles did it and the routing was clearly visible on what pieces of floor still remaining. They were good for templates and not much else.
It was his boat we did the floor on, not mine. Mine is set up differently and he is on the coast, I'm just north of Charlotte. Don't have pictures. Wish I did.
 

lemondrop9344

Seaman
Joined
Dec 9, 2012
Messages
51
Re: Intex Mariner 4 modifications and Tips

DROP
does Achilles make the floor boards for sale...I/E 4x8 etc sheets? If we could find a way for a DIY person to get hold of these composite floor materials...I would guess more strength, and a lot less weight..a great solution. I am tracking some info regarding this from a company called "thermo -lite"...composite sheeting...kind of like "trex" decking only in 1/4,1/2 etc sheets. Not sure if cost effective but obviously more strength/vs/ weight.

BTW welcome! Thanks for the above ideas

You can buy replacement floor boards for an Achilles. Inflatable boat parts (google them) has the best selection in their on line catalouge. However, they may or may not be in stock and come from Japan. The weight of the marine board is comparable to the same size plywood. It comes in several colors and requires no sealing, painting or what have you. I bought the stuff I used for my bow board from the cutting board factory (google them too). Very helpful in providing me with answers about gluing, resistance to oil/gasoline, machining (routing, cutting to size).

Good luck.
 

eclipse3gen

Seaman
Joined
Dec 8, 2013
Messages
53
Re: Intex Mariner 4 modifications and Tips

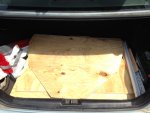
so i am done with cutting the wood and took it out for a test drive. everything worked just perfect. I went with 4pc cut instead of 2pc setup. used 3/4 wood and metal tracks on the sides for support. I also have H connectors coming in, that would make it rock solid.

I wasn't sure how 4pc will stand up on water as no one tried like this on mariner before. but it worked out better than i expected. I just don't have enough space in the back to fit a 54 inch piece and my seats do not fold. now i can put the full boat in the trunk. here are some pictures.

floorboards-5.jpg
floorboards-3.jpg
everything in the trunk.jpg
floorboards-6.jpg
 

AKTrout

Cadet
Joined
Apr 10, 2014
Messages
28
Re: Intex Mariner 4 modifications and Tips

so i am done with cutting the wood and took it out for a test drive. everything worked just perfect. I went with 4pc cut instead of 2pc setup. used 3/4 wood and metal tracks on the sides for support. I also have H connectors coming in, that would make it rock solid.

I wasn't sure how 4pc will stand up on water as no one tried like this on mariner before. but it worked out better than i expected. I just don't have enough space in the back to fit a 54 inch piece and my seats do not fold. now i can put the full boat in the trunk. here are some pictures.

View attachment 231470
View attachment 231472
View attachment 231473
View attachment 231474

Very nice!! Thanks for the picks. So after saying I was going to carpet my 3 piece floor as one... I ended up just carpeting them individually. I hope to take it out for its first voyage this week. Does that edge metal really help to make it feel like one solid piece? Nice thinking of getting the support that way allowing you more portability.
 

dragun23

Recruit
Joined
Sep 20, 2012
Messages
3
Re: Intex Mariner 4 modifications and Tips

This was done for a Mariner3 but the measurement method will work..just use the measurements you get on your boat ****Not exact for Mariner 4*****USE THE MEASUREMENT YOU GET FOR YOUR BOAT***

1..Used OSB 15/32 from H depot
2.I measured the longest line from bow to stern of the inflated floor , (remember to tuck the measuring tape snug under the side tubes and front and rear tube)and found the center of that line( divide distance by 2)
mark this with a small magic marker dot. My length was 96 inches divide by two is 48
3.Repeat the measurement for width at the widest spot of the inflated boat floor ...mine was 27inch (divide by 2 is 13 1/2 ),,mark center of that line at the mark you made for the length. This is exact center of boat.
4.From that point you have 48 inches to the bow , to the stern, and 13 1/2 inches to each side.
5 I took an inch off all dimensions..front, rear, and both sides
6. ask H depot to make the cuts for you when you buy
7. my dimensions that were cut were 24 1/2x 94( extra 1/2 inch off the sides ...fudge factor)
9. have them cut that piece in half=47x24 1/2each piece(mine)
10. find the center point of the two lines, marked on your boat with magic marker.measure up to the first section where the chambers agle inward.
11.measure this distance across and mark this distance on your wood, repeat this measurement up a the next angle(where the chambers angle inward..It is almost a 45 degree angle on each of the two inward angles that the chambers make. This is difficult to describe..but you can see that the wood has to be cut at the angles.
12.measure up from the center point again on the boat, 47 inches on my intex. Measure the length of that line all the way under the inflated side chambers, and then take two inchesoff that line measurement.....mine was 7 1/12 inches wide(9 1/2 minus 2)
This will be the measurement of the very end of each piece of wood. You will now see that this must be cut to this dimension , with the angles. The wood will fit in the boat with 1 inch to spare on the top , bottom and all sides.A skill saw or hand saw will cut the angles easily.
13. Mark and cut your wood ...I had to trim ever so slightly..you may need to also.Better to trim each side a little than to cut alot off one side or the other.
14. when the dimensions are right, with at least inch to spare top,bottom, and all sides.( this is when the extra inch comes in..the pipe insulation will take up this extra inch on all sides)..
I used a file to round all the edges of the wood for splinters..some use a router,sander etc...the pipe insulation will cover all the edges,anyway.
Paint the wood on both sides with a primer sealer..I used white acrylic(about 1 quart will do the job) was told oil based is better...but the drying time and fumes were not worth it to me.
15. let dry for 2 days...repeat paint...this makes a good seal on the wood and all edges
16. You will have to cut a hole in one of the pieces to accomodate the floor valve...about a 2 1/2 in hole...measure location very accurately before cutting...and seal the hole with above primer sealer.
16. I used 3/4 inch styrofoam pipe insulation( the look like pool play toys..and can be found at home depot..they are about 6 foot long etc.split ) open the insulation lengthwise,and slide over the edge of the wood all around..including the bottom of each piece of wood where they will match up and meet in the middle of the floor of the boat. This will prevent any abrasion of the wood against the floor or the side chambers where the floor and sides meet.
This insulation takes up the extra inch on all sides of the boat..making installation very snug.
Last... I used indoor outdoor carpet, with proper indor outdoor carpet cement to cover 1 (ONE)side of the wood.
Cement the carpet first..then attach pipe insulation..over carpet around the entire perimeter of the wood..as note above.
Fit and trim as needed...
you should end up with a nice looking floor, very stable,
Installation instruction...partially inflat chamber 1 and 2...about 1/3 full, ****NOTE MARINER 3 ONLY HAS 3 CHAMBERS***
install each piece of the wood floor, making sure the floor valve of the boat is centered in the hole that was cut in the wood for it(once again..BE VERY ACCURATE WHEN CUTTING THE HOLE IN THE WOOD FOR THE FLOOR VALVE)....
anyway..then fill chamber one and then two, and the fill floor chamber...it may seem more difficult because of the wood on it..but you will see how it works when you do this, In fact..the floor can be left less than fully inflated because of the support of the wood,...But yes ..you can fill the floor also to full. You will see what I mean.The floor section may seem like it is not filling as well, this is the weight of the wood. if you get the floor about 1/2 full, then launch...I use the hand pump to top the side chambers and fill the floor while in the water,,,works easier for me.

** there are many videos on Y T that show this procedure for different inflatable boats....watching one will make the whole thing make sense...

Thanks!! Working on it today hope to get both pieces cut, sanded and painted today. Will have to wait a paycheck or two to buy the outdoor carpeting for it. But if i am able to get everything lined up and inserted easily that will be a great day! Thanks again!
 

eclipse3gen

Seaman
Joined
Dec 8, 2013
Messages
53
Re: Intex Mariner 4 modifications and Tips

Very nice!! Thanks for the picks. So after saying I was going to carpet my 3 piece floor as one... I ended up just carpeting them individually. I hope to take it out for its first voyage this week. Does that edge metal really help to make it feel like one solid piece? Nice thinking of getting the support that way allowing you more portability.

I went with 3/4 wood instead of half in. I tried the floor just by themselves after and they are quite sturdy just by themselves. Metal brackets do make it feel better. Feels like one solid piece. Except that i can feel two pieces on bare foot once i step on the joints. Not sure how it is on two piece floors. I've found the H-Channel/connectors at Orange Aluminum that I've been looking for and ordered them last week. I will add the link if anyone interested below. They should be arriving here this week and that should take away the feel of separate pieces.

H Section Extrusions
 
Last edited:

AKTrout

Cadet
Joined
Apr 10, 2014
Messages
28
Re: Intex Mariner 4 modifications and Tips

I now see the interest in C channel edges. Took my boat out for the first time last night and had a blast! A friend and I landed 4 small rainbow trout an had a blast going around the lake silently with the 55lb Minn Kota. There is a bit if movement at the seams of the floor, so I think I'll join the group looking for some C channel. My only concern would be the hard metal edges being rough on the boat material.
My only other disappointment is that my keel valve hole ended up being just a little off target, but I still think it will work out fine. I'll be going out on the lake again in about an hour with my 3yo son. I'll try to take more pics with my phone. I think I'll use some nymphs or streamers to see if I get any larger fish than last night. We were both using little dry fly mosquitos.

Oh... I was going to post a couple pictures from last night, but I guess I can't do that from my phone. Pictures from last night and any I take today will be up later tonight or tomorrow then.
 
Last edited:

flukesofnature

Petty Officer 2nd Class
Joined
Mar 9, 2014
Messages
122
Re: Intex Mariner 4 modifications and Tips

I now see the interest in C channel edges. Took my boat out for the first time last night and had a blast! A friend and I landed 4 small rainbow trout an had a blast going around the lake silently with the 55lb Minn Kota. There is a bit if movement at the seams of the floor, so I think I'll join the group looking for some C channel. My only concern would be the hard metal edges being rough on the boat material.
My only other disappointment is that my keel valve hole ended up being just a little off target, but I still think it will work out fine. I'll be going out on the lake again in about an hour with my 3yo son. I'll try to take more pics with my phone. I think I'll use some nymphs or streamers to see if I get any larger fish than last night. We were both using little dry fly mosquitos.

Oh... I was going to post a couple pictures from last night, but I guess I can't do that from my phone. Pictures from last night and any I take today will be up later tonight or tomorrow then.

AK
sorry to hear about the floor valve....maybe you can cut a slightly bigger hole to cover the mistake.
Also//they make a rubber paint..that would be used to rubberize handles of tools....I have seen at H depot, W mart, etc...that might cover all corners, edges etc that would protect floor...simpler...just add the pipe insulation,over the C channel during set up. .......I am not I am not obsessed with pipe insulation.....LOL
 
Top