Intex Mariner 4 modifications and Tips

Jiggyjay

Seaman
Joined
Oct 12, 2015
Messages
63
Yeah the one the option I was maybe looking into was the dingy style or the car cover. I wanted the cover that specifically for a rat as our mariner 4 doesn't have the transom on one end I'll probably end up going with the car cover
 

Starkonian

Petty Officer 2nd Class
Joined
Jul 8, 2009
Messages
156
Scottish or anyone- Looking for suggestions. I have an air leak right on the inside of the seam where the tube is connected to the floor on the inside of the boat. Tricky spot. I'm leaning towards a llight sanding,cleanup with alcohal and a light bead of Marine Goop but not sure. Let me know...
 

ScottishScript

Petty Officer 3rd Class
Joined
Oct 19, 2014
Messages
79
Scottish or anyone- Looking for suggestions. I have an air leak right on the inside of the seam where the tube is connected to the floor on the inside of the boat. Tricky spot. I'm leaning towards a llight sanding,cleanup with alcohal and a light bead of Marine Goop but not sure. Let me know...

I fixed my own recent water leak and tested boat yesterday, all is good.

First off, have you figured out how your air leak in that location came about? Based on your description it sounds like it could have been caused by your flooring, perhaps when you put it in place? I'd check every inch of the floor edge to make sure as you don't want it buggering any repair you make.

For air leaks, I would try the following. Buy some of these transparent, self adhesive bicycle patches. This is the brand I use on the boat and they work well, I never leave shore without them.

http://www.amazon.com/Park-Tool-Pre...464675818&sr=1-2&keywords=Self-Adhesive+Patch

Clean area, sand a little if you like, press on patch and apply weight evenly, leave for an hour or so. I use a Beanie Baby for this part as it's tiny beaded innards spread the weight out nicely.

The above should deal with most small air leaks. You can even apply a tiny spot of goop directly on the hole before applying the patch.

I'm confident this should work. If not, get back to me and we'll discuss grander solutions.

Good luck.
 

Starkonian

Petty Officer 2nd Class
Joined
Jul 8, 2009
Messages
156
I fixed my own recent water leak and tested boat yesterday, all is good.

First off, have you figured out how your air leak in that location came about? Based on your description it sounds like it could have been caused by your flooring, perhaps when you put it in place? I'd check every inch of the floor edge to make sure as you don't want it buggering any repair you make.

For air leaks, I would try the following. Buy some of these transparent, self adhesive bicycle patches. This is the brand I use on the boat and they work well, I never leave shore without them.

http://www.amazon.com/Park-Tool-Pre...464675818&sr=1-2&keywords=Self-Adhesive+Patch

Clean area, sand a little if you like, press on patch and apply weight evenly, leave for an hour or so. I use a Beanie Baby for this part as it's tiny beaded innards spread the weight out nicely.

The above should deal with most small air leaks. You can even apply a tiny spot of goop directly on the hole before applying the patch.

I'm confident this should work. If not, get back to me and we'll discuss grander solutions.

Good luck.


Hey Scottish-

Yes, the floor was too tight where it bevels back towards the stern. I trimmed 3/4" off both sides where the boards bevel inwards. On one side the tune to floor seam there where several pin type holes which where leaking water. On the inside location of the seam there was a small tear in the tube, maybe a mm or less. The water leak is an easy fix. The air leak, not so much. It's impossible to apply a patch because right at the base of the seam. I don't see how I could apply a patch with the proper overlap requirement due to the seam. What I ended up doing was apply several layers of Goop, after surface prep of sanding and alcohol wipes, I haven't inflated it yet but the real test will be to use the boat and put the area through the stress of being loaded etc. I'm cautiously optimistic but we'll see. I've read the best to do this type of repair is apply glue so it peddles on the inside of the tube/hole. I don't want to even think of the logistics of attempting that unless all else fails. I hate self inflicted problems and this is totally my fault as I was too lazy to correct a problem I recognized but procrastinated on.

On another note, the Minn Kota replacement inner/outer handles did squat. It pulls right off as usual. I sent them an email asking what they are going to do about it. I think unless they send me a new motor and one of higher torq for my trouble, I'll consider them a big fail. Never again.

I used the new Weedless Wedge and found it has less than stellar performance. The motor has a higher vibration, probably due to poor balance. Also, the speed/power is way down. I'm not dealing with any weeds where I fish this year. Wind is the main obstacle so I put the original prop back on and will carry the Wedge as a backup.
 

Starkonian

Petty Officer 2nd Class
Joined
Jul 8, 2009
Messages
156
I still have the spring but not the ball bearing. Next week I will look into finding a bearing that fits, place it over the spring and trial various methods to hold said bearing in place, like a thing strip of duct tape. Will let you know how I get on.

You tried the Weedless wedge yet? Notice more thrust?


I'll send you my spare inner handle if you want to cover shipping. Just double check if it's the same part #. I suspect it may be.
 

ScottishScript

Petty Officer 3rd Class
Joined
Oct 19, 2014
Messages
79
Hey Scottish-

"What I ended up doing was apply several layers of Goop, after surface prep of sanding and alcohol wipes, I haven't inflated it yet but the real test will be to use the boat and put the area through the stress of being loaded etc. I'm cautiously optimistic but we'll see."

If I have your description right, I'd try this.

Cut a patch of vinyl from one of the inflatable seats they give with the boat. Say two inches wide and four inches long.

Next step you can do one of two ways. Fold the patch evenly length ways, then place in a container of hot water folded, and place a weight on it to keep it folded. After a while take it out and keeping it folded, run it under the cold water tap (fawcett) so that the material hardens and keeps its folded shape. Or two, you can use an iron to press it while folded then run under cold water.

This 'seamed' patch will now slide neatly in to between the inflatable section and the floor. The idea being it will be glued on either side the boat seam. And you can make this patch twelve or even thirty inches long if you want to beef up the overall strength of the seam.

Before applying the pre folded patch, fill the puncture with your goop and let it dry. Then apply patch dead center over puncture area and use super glue to do it, pressing either side of the folded patch to the side wall and the floor.

However!

As I have said before on the forum, I've used super glue to no ill effects, it's my go to adhesive. However there's no guarantee all 'supers' are the same. So take a small patch of the boat vinyl - cut from the inflatable seat - and test your super glue of choice on it first, before putting it on your boat. This is the method I used to seal my recent water leak on the floor seam. I've used it on air leaks on my first boat too and it worked fine.

"I used the new Weedless Wedge and found it has less than stellar performance. The motor has a higher vibration, probably due to poor balance. Also, the speed/power is way down. I'm not dealing with any weeds where I fish this year. Wind is the main obstacle so I put the original prop back on and will carry the Wedge as a backup."

Surprised to hear this as I had the opposite result. You're positive it's the right wedge for your engine model?

Thanks for the offer of a spare engine inner you received, however I suspect if pushed I will just buy a new engine, already looking at a 55lb thurst Endura Max.

Why would I buy ANOTHER Kota after recent events? Well I am yet to identify another brand that has incremental throttle control which I would really miss. My friend has the standard 5 speed notch of regular motors and it drives him nuts, as like me his preferred trolling speed is between the notches.

Tell me if your fix works.
 

Starkonian

Petty Officer 2nd Class
Joined
Jul 8, 2009
Messages
156
Hey Scottish-

"What I ended up doing was apply several layers of Goop, after surface prep of sanding and alcohol wipes, I haven't inflated it yet but the real test will be to use the boat and put the area through the stress of being loaded etc. I'm cautiously optimistic but we'll see."

If I have your description right, I'd try this.

Cut a patch of vinyl from one of the inflatable seats they give with the boat. Say two inches wide and four inches long.

Next step you can do one of two ways. Fold the patch evenly length ways, then place in a container of hot water folded, and place a weight on it to keep it folded. After a while take it out and keeping it folded, run it under the cold water tap (fawcett) so that the material hardens and keeps its folded shape. Or two, you can use an iron to press it while folded then run under cold water.

This 'seamed' patch will now slide neatly in to between the inflatable section and the floor. The idea being it will be glued on either side the boat seam. And you can make this patch twelve or even thirty inches long if you want to beef up the overall strength of the seam.

Before applying the pre folded patch, fill the puncture with your goop and let it dry. Then apply patch dead center over puncture area and use super glue to do it, pressing either side of the folded patch to the side wall and the floor.

However!

As I have said before on the forum, I've used super glue to no ill effects, it's my go to adhesive. However there's no guarantee all 'supers' are the same. So take a small patch of the boat vinyl - cut from the inflatable seat - and test your super glue of choice on it first, before putting it on your boat. This is the method I used to seal my recent water leak on the floor seam. I've used it on air leaks on my first boat too and it worked fine.

"I used the new Weedless Wedge and found it has less than stellar performance. The motor has a higher vibration, probably due to poor balance. Also, the speed/power is way down. I'm not dealing with any weeds where I fish this year. Wind is the main obstacle so I put the original prop back on and will carry the Wedge as a backup."

Surprised to hear this as I had the opposite result. You're positive it's the right wedge for your engine model?

Thanks for the offer of a spare engine inner you received, however I suspect if pushed I will just buy a new engine, already looking at a 55lb thurst Endura Max.

Why would I buy ANOTHER Kota after recent events? Well I am yet to identify another brand that has incremental throttle control which I would really miss. My friend has the standard 5 speed notch of regular motors and it drives him nuts, as like me his preferred trolling speed is between the notches.

Tell me if your fix works.


Thanks, interesting idea.

Fyi, I've people add the variable speed option with a PWM switch. "You can also use this. It Is a PWM, pulse width modulation, the same as the old maximizer. hook your battery to the input and the motor to the output. Leave speed setting on the motor on High and use the PWM knob to change speed. you will have infinite speed control from 0 to 100%"


ScottishScript

Petty Officer 3rd Class
Joined
Oct 19, 2014
Messages
79
Thanks, interesting idea.

Fyi, I've people add the variable speed option with a PWM switch. "You can also use this. It Is a PWM, pulse width modulation, the same as the old maximizer. hook your battery to the input and the motor to the output. Leave speed setting on the motor on High and use the PWM knob to change speed. you will have infinite speed control from 0 to 100%"


Cool, I did not know that. The ones I just saw on Ebay look exposed to the elements, as in not encased in a waterproof case. How do you set this up against rain and lake water etc.?
 

Jiggyjay

Seaman
Joined
Oct 12, 2015
Messages
63
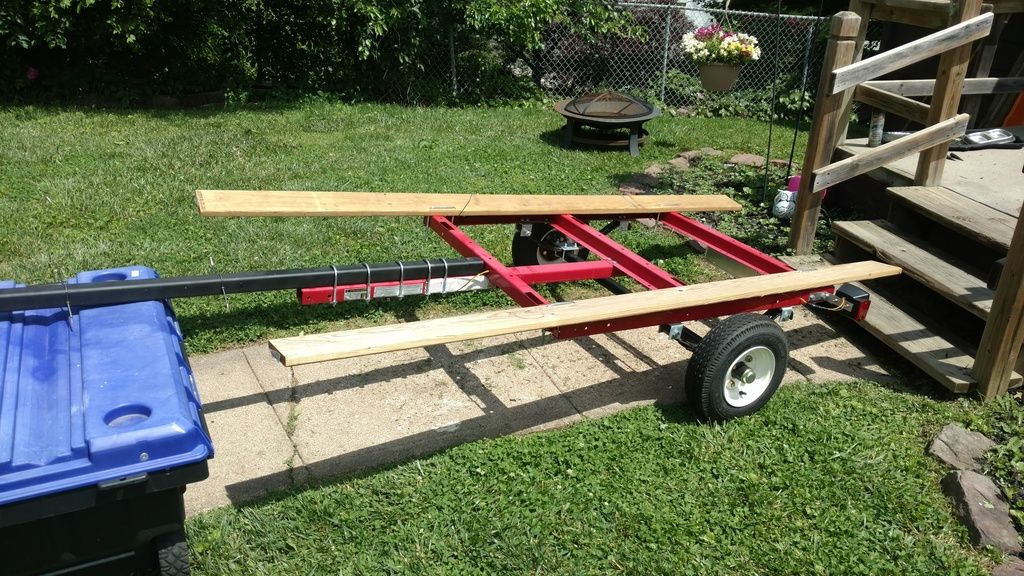
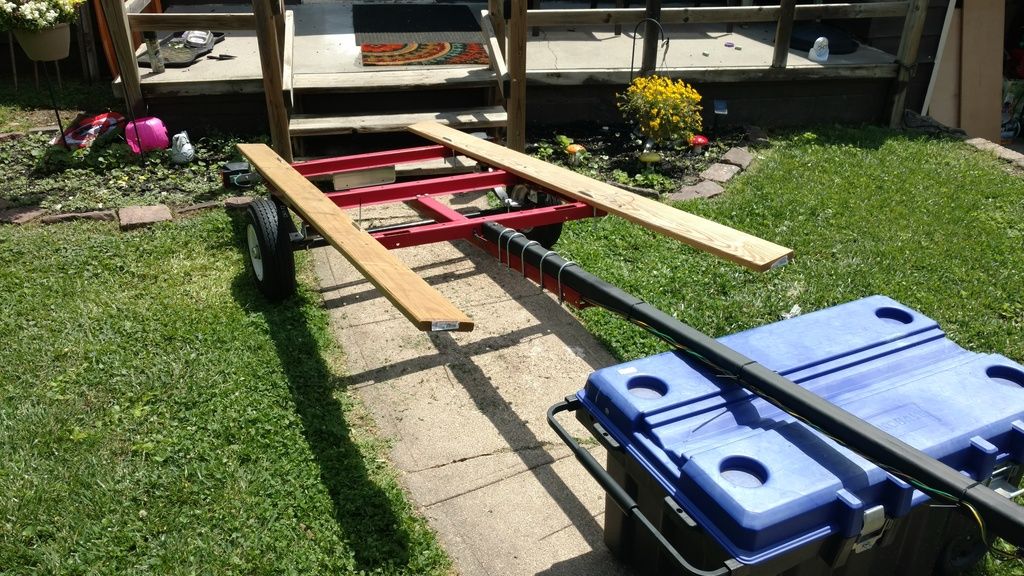
Hey guys, I decided to make a trailer for my sea eagle foldcat, however, this could be very easily rearranged and modified to work on a mariner. It's the harbor freight mini trailer, I used 2x2 square tubing to extend the tounge, and 1x6 for bunks. Extended the wiring and you're done! All in around $225


Where did you get the tube steel? I'm looking into extending my tongue so I don't have to back my car into the water.
Hers my trailer setup


https://youtu.be/Qf3nLkkSUwk
 
Last edited:

mrdrh99

Senior Chief Petty Officer
Joined
Feb 1, 2013
Messages
756
Where did you get the tube steel? I'm looking into extending my tongue so I don't have to back my car into the water.
Hers my trailer setup


https://youtu.be/Qf3nLkkSUwk

Hey man.... Pretty much any metal shop should have it... Just call around. I got mine for around $35, you'll need to paint it pretty quick because it'll rust. I did 2 coats of rustoleum metal primer then 3 coats of black spray. Drilled through the metal and tounge and put a couple grade 8 bolts in, all of the u bolts are just extra assurance. Extended the wiring for about $20. All done in an afternoon
 

Jiggyjay

Seaman
Joined
Oct 12, 2015
Messages
63
Any reason you just didn't weld the extension on it? I was thinking of asking them to just weld it..
 

Rainbow123

Recruit
Joined
Jun 3, 2016
Messages
3
My Mariner 4 is shipping today!
Thinking about the plywood floor mod mostly. Could I get away with just putting a hard floor in the middle square section of the boat, and ignoring the end tapered parts of the boat? I may need to do something quick in time for my vacation is the reason, and this would be easier.
Also, anyone tried using thinner plywood, maybe 3/8" or 1/4" on top of the original slatted floor?
 

Jiggyjay

Seaman
Joined
Oct 12, 2015
Messages
63
The original floor isn't too bad if you're in a rush I would just stick either that. Plenty of people use the original floor + hardwood floorboard. I went with just plywood floor since I didn't want to deal with setting up the original floor as well.
 

mrdrh99

Senior Chief Petty Officer
Joined
Feb 1, 2013
Messages
756
I tried 1/4..... Don't do it..... I'm a big guy, but wouldn't do less than 15/32
 

IN Mariner4

Petty Officer 2nd Class
Joined
Apr 8, 2016
Messages
104
Took it out on the Wabash River yesterday to explore a few metal detecting spots that are only accessible by going on the river. 10 mile run on a single battery, granted half was down stream and I only ran at about 30 going there (Minn Kota Endura Max 55). Had a few places where the current was semi-strong but it ran good in most spots (had to almost get out and pull in one strong current but I zig zaged up it.. I thrashed the boat pretty hard going through a couple of creeks and it held up fine! I did eat the prop up pretty bad hitting a lot of unseen rocks but it is still good (got the weedless prop yesterday and will use it on Monday when I go back there again). Debating on getting a gas engine due to the currents on parts of this river. Overall, it was a good day on the river, found the hidden spot I have been looking for and took a couple of quick dives. I also caught 5 large mouth bass (smallest 7 lbs) and 4 small mouth. Even had a couple of guys asking about the boat and where they could get one. Only drawback of the day was loading the boat back into the truck. The boat is heavy with the wood floors and the TM still on it, but that was because I was worn out from diving and climbing etc... for 8 hours lol. I can usually load the boat by myself without problems but yesterday...I guess I was exhausted, dehydrated and getting old lol.

Tomorrow I am going to work on the dolly. I am also going to finish the bow board/platform (to hold the scuba gear on). I am also going to mount lights on the boat for running at dusk and dark. I want to spend as much time at the dive spot so it will be getting dark when I return. Also thinking of adding a few other electronics.
 

IN Mariner4

Petty Officer 2nd Class
Joined
Apr 8, 2016
Messages
104
I tried 1/4..... Don't do it..... I'm a big guy, but wouldn't do less than 15/32


I am not that big of a guy but I also used 15/32. I figured 1/4 would be too flimsy unless you are using the full OEM floor under it. I also wanted it sturdy so that when I threw the scuba tanks in it wouldn't crack etc...
 

coldclearwater

Recruit
Joined
Jun 6, 2016
Messages
5
So glad I found this thread! My M4 just arrived yesterday, and I'm coming off an Intex Seahawk 400 that I took a lot of places including some fairly intense moving water with a lot of fallen trees sticking out of the water. I only got one hole in 6 years but that was in an awkward spot. Still managed to patch it though.

Hoping you guys could answer a few questions. My apologies if they've been repeated a lot in the thread, I'm only on page 26.

1. I can hear a leaking sound on all four of my Boston valves, they go away after closing the cap, but the #3 valve is quite loud. I never experienced that with the Seahawk. Should I be concerned about slow leaking?

2. The floor slats look sharp at some points. Could they cause damage to the boat?

3. The slatted floor is heavy! I swear it weighs as much as the boat itself. I know this has been asked before, but would you keep the original underneath, or just put in a thicker plywood?

4. Has anyone bothered getting better, longer ores? I know a lot of people use the trolling motor, but sometimes it's nice to go for a paddle. Also, I noticed the plastic ore locks feel cheap. I wonder how likely they would break.

Thanks in advance. I'll be sure to chime in every now and then with my own advice / pics. I already love this boat, and I loved the Seahawk as well. Pure bliss out on the water in a decent boat that can fit in a small car!!
 

mrdrh99

Senior Chief Petty Officer
Joined
Feb 1, 2013
Messages
756
I'll let someone else talk about the valves, the floor situation.... Yes the full OEM floor weight is about 40lb.... And I think the boat is 82lb with it. A lot of people are putting in a ply floor and only leaving a couple slats of the original floor in. Def sand down that sharp spot. As far as oars, I only ever kept one in the boat and extended it using the second, so i had a really long one that I used almost as a polling staff, it really helps in skinny water.

Are you using a motor on yours?
 

Starkonian

Petty Officer 2nd Class
Joined
Jul 8, 2009
Messages
156
Cool, I did not know that. The ones I just saw on Ebay look exposed to the elements, as in not encased in a waterproof case. How do you set this up against rain and lake water etc.?


Scottish- I don't know how it's waterproofed. I had read about them a while back and your post made me think of them. Searching the web I see it's pretty popular to do and I'm sure many of those folks are fishing in the rain so there must be a particular brand or a mod to make it work...
 

mrdrh99

Senior Chief Petty Officer
Joined
Feb 1, 2013
Messages
756
Any reason you just didn't weld the extension on it? I was thinking of asking them to just weld it..

Just saw this....

I want to be able to unbolt it and stand it up against the wall in the garage during winter. Our lakes are generally frozen by Thanksgiving thru March. So i don't have it in the way for 5 months of the year.
 
Top