Starkonian
Petty Officer 2nd Class
- Joined
- Jul 8, 2009
- Messages
- 156
No Title
This is a write up I did elsewhere...
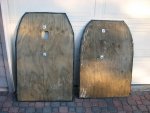
"I've read some complained about using 1/2"; too thick/heavy. I used 5/8". It's rigid enough with a tiny bit of flex. I use two sections. I use the original floor still with all the slats removed but the center slat. The boards are cut so they rest on the center OEM slat. I followed the recommendations of someone who experimented with all different configurations; three plywood sections, no OEM floor, all slats kept in the floor etc. He said the configuration I use has caused the least amount of wear/issues with leaking. Also, using only one slat sheds a lot of weight from the boat. I used pressure treated plywood (marine grade) and did not have to treat the plywood with water proofing coatings. Carpeting is not necessary and saves weight should they get wet. I drop the boards in the water and rinse them off after most trips and they are rock solid after 20+ trips. I use the boat in fresh water so don't know if I'd rinse them off in salt water. I suggest you use the oem floor as a template noting where the center slat location is and cut the plywood so it evenly falls on the center slat. Make sure you cut out a hole for the keel valve. I then sanded the boards lightly including slightly beveling the board edges and used a wood filler to fill in any cracks which are common in plywood sheets. That really made the boards more rigid. I then put two strips of duct tape around the outside edges to protect the boat . Once that is done, fit the boards and inflate the raft and determine how much trimming you have to do around the edges so the boards slightly tuck in under the side tubes but don't ram into the floor seams. It took me a couple times to make cuts till I was satisfied with the fit. Once you have a wooden floor, there's no going back. It feels like a real boat you can actually walk around in."
...
I folded the oem floor in two and picked the pocket closest to the middle for the one slat. Not sure I understand you second question but here's how I assemble it. I inflate the side tubes 3/4 and then install the oem floor. I install the front board pushing it forward til it lays on the front half of the one slat. I then install the rear board and slide it back til it's mated evenly with the front board on the slat. I make sure the boards as even as possible width wise and front to rear to prevent over loading a floor seam. Once I'm happy everything looks even, I inflate the 1-4 chambers fully and mount the motor mount. I then slide the boat into the water with a foot or so still on shore. I then inflate the keel chamber just to the point the boat starts to lean off to one side a little. I don't like to inflate it too much. I extended the trolling motor wires 8' or so and I place the battery in the middle of the boat over the board junction. The rest of my gear goes in the middle around the battery leaving the front and rear seating areas clear. I read it's best to distribute the weight around the boat as much as possible to lessen the chance of overloading and tearing open a floor seam in one spot. Using the floor boards with only slat distributes the weight load more evenly on the floor seams. I've never had the boards shift out of place yet. Also note, a sheet of plywood is about 8" or so shorter than the floor of the boat. I've seen some cut a couple pieces to to fill in these two areas but I didn't bother. It doesn't make much of a difference to me. Btw, I looked long and hard for a cheap. light weight, maintenance free seat and found these. They weight next to nothing and although they are plastic, they are big and molded and I can sit in them all day comfortably. I'm 6'5" 215 lbs . Here's the link:http://www.academy.com/.../marine-raider-molded-bucket.


