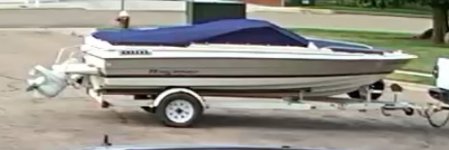
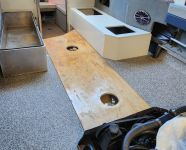
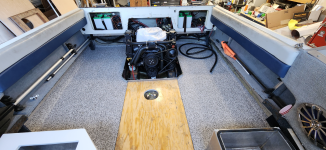
I'm back with a 1994 Islander 221V!

classiccat

"Captain" + Starmada Splash Of The Year 2020
Joined
Dec 20, 2010
Messages
3,412
As I'm getting ready to start on the deck floors.
What is the new go-to epoxy?

I have used west system in the past with good results.
But this time I'm leaning more towards trying to restore some of the flooring vs replacing and sealing.

I still have quite a bit of west system on hand, but it's a few years old.
last time I mixed some up it didn't fully harden, so either I had the mix way off or it's just getting old/expired.

I see this "Total boat" brand on amazon, one is a "penetrating" epoxy.
Thinner might be better for trying to restore this decking...

I've used West Systems on a prior build (BlueFin Seahawk) & used ALOT of US Composites (3:1 mix) on my '75 18' SS. No complaints about the US Composites!
 

Gibbles

Commander
Joined
Nov 14, 2009
Messages
2,027
And over the weekend I decided I wanted to take the Jeep for a drive since it has been a while.

I was greeted with this wonderful view.
The lake near me is completely full!
I see water is up to the road in some areas.
All of the water lines on the shore are covered.

It's going to be a wonderful boating season.
FullPineview.jpg
 

Gibbles

Commander
Joined
Nov 14, 2009
Messages
2,027
I also read that Bear Lake is full as well.
Almost no beach is what the report said, so they said to expect limited space this summer.

The boat should make life much easier for the family.
No space on the main beach?
No problem, we have a boat! :cool:

Pineview beaches get crazy as well, and unless you really like mariachi music, a boat is a must. :geek:
Lots of little private Nooks if you can float out there.
 

Gibbles

Commander
Joined
Nov 14, 2009
Messages
2,027
Heads have been swapped out over the weekend.
Fresh oil change and I'm still seeing some steam coming out, not from the crankcase vents but plenty when I have the oil fill cap open.

I'm thinking its two things.
The intake is cracked too. :sneaky:
Or it's just residual water from the last run.

so, a can of sea foam was put into the oil, and I ran it with fresh oil and a filter, then sucked the oil back up and a fresh filter went back in.
With the block drained, I also flowed the oil through the engine the best I could w/o burning up the water pump impeller.

I have one last part to change out at this point, the intake!

I'm also still running diesel oil 15w40, that stuff is supposed to have lots of zinc, and it's supposed to be a good overall engine oil for gas engines.
It's also super cheap and easy to find, so it's perfect whilst I keep changing parts out. :ROFLMAO:


I swear, it's a curse.
I try and buy something nice, and it turns into a big project.
At least the seller made it somewhat worth my time with a partial refund. 👍
I'm really trying to not keep track of the overall cost of this boat at this point.

But I'm thinking I'll probably need to have the intake checked/welded out or try my luck at a used intake.
If I went for the later Heads, I have a plethora of intake manifolds to choose from. :cautious:

My dad also pitched in some coin into the "Boat fund", so now I have to have this sorted by July.

There is a good chance that if I get picked up by a different company, I may not be able to make the family outing.
So, I'll need it as close to 100% as I can, and then I'll need to teach my dad how to operate the boat.

And I'm taking this as a learning experience to share with others.
Cracked block?
get a long block, don't screw around with it.


Right now, there is a nice complete outdrive (4.3) from a later MerCruiser.
$4800 and it comes with everything, engine, transom mount, outdrive, exhaust, everything.

More than I need, but the spares would be nice to have, too bad I already went the hard route. :ROFLMAO:
 

Gibbles

Commander
Joined
Nov 14, 2009
Messages
2,027
Chatting with a friend, it was suggested to try a smoke machine to possibly see if that intake is leaking before the next run attempt.

I understand that I can make my own smoke machine by using some mig welding wire and some tiki wick, wet with baby oil in the bottom of a can, apply 12v to the wire to get it smoking.

Using a inlet air supply and an outlet air supply, it should carry the smoke out.

But then I'm wanting something that could possibly pressurize 10-20psi to check that intake/cooling system on the boat.

so, I start thinking about taking one of my AC flushing bottles to modify.
But then I came to my senses thinking it's way too much effort.

So, I just ordered one.
I found a cheapie that at a minimum should give me a good base to work with.

the can says it's rated for 40psi, and that should allow me to get creative with it.

I'll do the basic test to start, probably just smoke up the crankcase and see if I can get some smoke coming out of the water inlet port in the intake.
If that checks out, then I'll make something for the NPT threaded port on the intake water inlet.

Then try giving the cooling system a little pressure with the distributor removed and my inspection camera shoved in the hole to see if the intake starts smoking anywhere.

I don't know how well this will work.
But one issue I have with this early style intake, I can't find any new units.
Only used ones.
 

Gibbles

Commander
Joined
Nov 14, 2009
Messages
2,027
My smoker came yesterday, so far it looks good.
I should be able to modify it later if I see a need.

$69 with a coupon clipped via amazon.
I went with the 2l size.

It did not come with the oil, but I also have some baby oil that should give the engine a nice lavender sent. :ROFLMAO:
 

Gibbles

Commander
Joined
Nov 14, 2009
Messages
2,027
I have also been using this stuff to treat the old and new wood, so far it has been soaking into the wood nicely.
Almost too well, seems like I really need to lay it on thick, and follow it up with a spreader after every 20min or so.


Once the wood is saturated, it starts to float on the top as it should, from there I just coat with some wax paper and spread it out as even as possible to allow a nice solid cure.

the wax paper will show the imperfections, and I'm finding I still need to check on it after 30min or so and even back out with the spreader.

The main decking is still soaking in epoxy, I started working back as much as possible to get it saturated.

I plan on using some west system for the final coat on that stuff, it goes on a bit thicker and it's easier to control.

Pictures to come soon, hopefully before I cover with vinyl.

And I'm still trying to figure out what I want to do with the engine cover.
I figure the lower part is an easy win to cover with vinyl.

the top hinged part is a bit harder, if I were to cover it before assembly it would work out to cover with vinyl.

But I kind of want to make it one solid piece, epoxy and reinforcements.
I would like to be able to have my chunky nephews being able to climb on it.
Also, I doubt I'm going to be able to stop them. ;)
Figuring the lower sheet metal part, I'll reinforce with aluminum to prevent crushing. :unsure:
 

Gibbles

Commander
Joined
Nov 14, 2009
Messages
2,027
Also have this an anti slip tape via amazon.

The white one is clear when it goes on.
It's also a nice mild texture, should be easy on bare feet.

I tried the black one and found it's much more aggressive.
Too aggressive to use deckside, especially where the snap-on cover rides.

I found that stuff is perfect for my trailer, so I have the fenders coated and areas on the front of the trailer where I figure I'll be climbing over and up onto the boat.

The clear stuff is perfect for topside use, it matches whatever color is there, but it has the side affect of also showing any imperfections.
Such as left over adhesive from what was there before.

So that just means lots of prep work for now.
Later task to really remove the rest of the remaining anti slip, for now focusing on engine and deck.
 

Gibbles

Commander
Joined
Nov 14, 2009
Messages
2,027
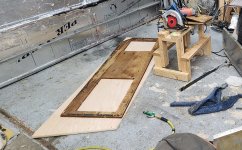
I'm making some good progress on the ol islander.

With the starboard bench removed, it was clear that the top wood was toast.
So a new one is being made and sealed with epoxy.

IslanderSeat1.jpg

Pieces cut out and more epoxy going on.

I also decided to take the starboard bench support and sand it, prime with etching primer, and paint it white.

I'm planning to do the same with the top of the bench.
Reason is I'm not sure how much flooring material I'll have left over, so this will give me options.

epoxyPaint.jpg


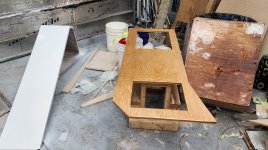
The engine cover is nearly done as well, so much epoxy has been flowed into this thing.
I hope I don't need to do any more adjustments since it's pretty much one solid piece now.

IslanderTopEngineCover.jpg
 

Gibbles

Commander
Joined
Nov 14, 2009
Messages
2,027
A neighbor brought home a glasser the other day.
ImATrendSetter.jpg
I joke with the wife "I'm a trend setter!"
Next more neighbors need to get boats for the trend to take hold. :unsure:

This guy used to get really pushy for me to help him fix his stuff.
I think last year or the year before he started acting like a total creep, so I politely ended that ****.

Looks like a Volvo Penta maybe?
I heard him fire it up for a few secs until it stalled, 2 stroke.
I would guess a 3 or 4 cylinder from the sound it made.

I also didn't hear any water from muffs dripping down.

It looks like a nice boat overall from what little I saw.
I don't know anything about the outdrive, all I know is to avoid any outdrive that isn't a MerCruiser. :geek:

It also means I don't see any "future me" parts sitting there. :cautious::ROFLMAO:
 

Gibbles

Commander
Joined
Nov 14, 2009
Messages
2,027
Well we pulled the tank over the weekend.
the trick seemed to be to drill out the rivets on the front tank support/wall and flex it out of the way.

And the starboard center floor support was removed.
The port side floor support has solid rivets, so we didn't touch that.
With the filler tube loose, and the fuel outlet hose off the tank lifted out and the filler tube slid off.

Under the tank we found a single 6-8in wide piece of 1/2in marine ply that did not look great.
It also looked like the rear half had been bent and pushed off of a support?!
It looked like the rear half of the tank had some very limited support.

I removed that, copied it, and it's currently being coated with epoxy.
I'm hoping I'll have everything coated and painted by this weekend.
I need this thing back together badly!

I also found on the fuel sender; the PO had redone the connections with non-marine grade connections.
So, I'll be fixing that while I'm in there.

the little piece of wood for the fuel tank support also had pop rivets that were not recessed.

I found some marks on the bottom of the tank that don't appear to be puncture marks.

So, the new piece will be countersunk to allow the rivets to sit lower and not contact the $$$ tank.
I also have some 1/8in rubber mat on order; I'm thinking about bonding that to the plank.
But the more I think about it, I'm not sure if the tank needs to be supported by anything else in there, and adding an extra 1/8in might have some side effects?

I can't find much on pictures in the other islander restore threads.
So far, the most detailed ones I can find are for the ones from the 70's.
Those are a totally different layout.
 
Last edited:

Gibbles

Commander
Joined
Nov 14, 2009
Messages
2,027
Also, on the fuel sender I noticed a green wire going from the ground.
I believe it goes up to the fuel filler neck.

I haven't looked at it too hard yet, but I'm wondering if I should remove that.
In a way it seems like a good idea, but somehow, I don't think it's original.
 

Gibbles

Commander
Joined
Nov 14, 2009
Messages
2,027
Apparently, Muller the maker of the plastic tank says this,

WARNING IMPORTANT
to avoid a dangerous build-up of static electricity in your fuel
system, make sure to employ an earth to ground hook-up to your tank. Likely
grounding sites may include metal surfaces on your engine mount or outdrive. Grounding wire should
not be attached to a painted surface and should be checked regularly for corrosive build up

Also doing some internet searching, I see the green wire is correct.
Goes from the filler to the level sender, then another ground going to the battery.
So that answers the question, I'll keep it connected.
 
Last edited:

Gibbles

Commander
Joined
Nov 14, 2009
Messages
2,027
A little more progress over the weekend.
The new center flooring piece has been mostly completed.
I have a light epoxy coat on the upside, and a heavy coat on the underside.
Completed with a light coat of primer and white epoxy paint to keep it nice and sealed.

It looks like I didn't get an image of it, however for the fuel tank support there is a single piece of 1/2 board.
I found that piece was in poor shape, but good enough for a template.
That board I believe was resting on a little shelf at the rear of the compartment.
That board had slipped off at some point and was no longer supporting the tank.
The concern was some damage may of occurred to the tank because of this, but the tank looked fine.

So, a new board was made, installed, and I added two rivets to the rear support to prevent it from coming off again.

With the tank installed, the two boards that appear to hold the tank down now fit correctly without any modification.
The PO also appears to have done some re-crimping of the fuel sender connections.
The positive was nice and solid, but still not a marine fitting.
the negative side with the filler neck ground only took a light tug to get the old connector off.
So I redid that as well.


Test fit with the new vinyl applied.

We believe the original center board had been modified in order to clearance the carpet.
1719247239447.png

1719247655786.png


I got a little further than this last night.
But we did confirm here that the height spacing of the center floor with 3/4in board was a perfect match to the outside 1/2in boards after the vinyl was installed.
That's with some overlap on the mounts, and overlap where the center board will have the vinyl stapled on the underside.


more to come later.
 

Gibbles

Commander
Joined
Nov 14, 2009
Messages
2,027
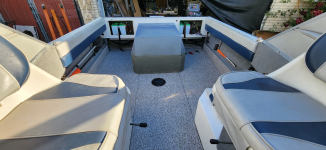
Over the weekend, we got her back together.
I still have some rear trim pannels that need to be wrapped with vinyl, and I need to flow some epoxy into the rear seat mounts.
then get them wrapped with fresh vinyl.

but this is good enough to start the engine break-in and to verify that the intake is actually good.

Screenshot 2024-07-01 104411.png

Screenshot 2024-07-01 104542.pngScreenshot 2024-07-01 111335.png


The upper engine cover is nice and solid at this point, and it cannot be disassembled due to being pretty much one solid piece.

the only original wood used was the top and the front of the engine cover, along with the angled pieces where the new sides attach.

it was really hard to get this perfect, it seemed that much of it was wrong.

The lower aluminum part of the engine cover I have stripped and cleaned.
Then I hit it with some aluminum etching primer to keep the shine down to a minimum.
Also in my mind, it should help the vinyl glue stick to the panels.

For the upper part, it got primer to keep the sun off of the epoxy, and to hopefully help body filler stick to it later on.
The plan is to smooth it out and make it look nice enough for some paint like I did to the front benches.
Otherwise, I'll probably cover it with some short marine carpet.


Also to help anyone else later down the road.
The live well was a little tricky since even the original carpet hid the screws.
The lower bench is also assembled differently than the other side because of it.

For the top of the lower bench, there are through bolts that screw directly through the aluminum on the borders.
the LiveWell itself has through bolts that come in directly into the live well.
Once it's free the top comes off.

I reassembled in the same manner, but counter sunk the screws on the top, and installed with some 5200, and coated the top to hide the screws in the white bench. (y)

Luckily years ago I read someone's thread where they were trying to figure it out.
That memory came to me one night, and sure enough it was the easier of the two sides to disassemble in the end.


When reassembling the LiveWell seals to the bottom of the bench, there is a black rubber seal that was in decent shape, but it did have a little gap where the ends met.

So, I sealed that with a nice fat bead of 3m 4300.
Idea being that it won't ooze as much, and one can only take so much 5200 staining their hands. ;)

I also pulled the outdrive once more to confirm I didn't have an exhaust blockage that I could see.
I stuck my inspection camera down the lower, and up through the prop exit, all looks clear!

On the side I found a leak from the water inlet O-ring was putting water into the bellows. :cautious:
I had issues getting that O-ring to stay put when assembling it my self.

This time i had a second set of eyes helping me, and I was able to locate my transmission assembly lube.
a little coating of that stuff and the o-ring stuck there nice and solid.
Much better than using grease.

a fresh gasket in place, hopefully it goes better this time around.

I pumped some fresh grease into the gimball bearing, and I plan to do that after every outing until I pull it apart again...

I also have new rubber fuel lines installed for both the trolling engine and the main engine.
And I installed it with some high quality fuel shut off valves from summit racing that use -AN for the main engine and the trolling engine (after the T fitting).

After I installed everything I found the box of -AN fittings that I have been collecting for years.
I always buy too much before I jump into a weekend project, always better to have too much than too little!
In that I found a much better fuel splitter, using a high flow Y instead.
Really it's too much but using -AN I get a better seal that's very easy to deal with in the field.

For now, it's good enough for its first splash this weekend!

Thing to do still,
I need to install a couple stainless rivnuts to help keep the engine cover in place.

Figure out where to mount the fuel lines and shut off valves so they are easy to deal with.
I'll probably just zip tie them somewhere for now.

And the big one
I still need to set/confirm the base ignition timing for the engine before I put load on it.
 

Gibbles

Commander
Joined
Nov 14, 2009
Messages
2,027
And hopefully I have some time later today or tomorrow.
I need to take the boat down to the gas station to get it filled up with some pure gas.

I'm not sure what the current prices are, but a quick internet search suggests $3.50 a gallon.
times that by 52 gallons = $182! :whistle:

But that should last me for a while in this boat.
 

Gibbles

Commander
Joined
Nov 14, 2009
Messages
2,027
Well, the station I went to had pure gas for $3.80.
so that makes it a little over $200 bucks to fill.

I went with a quick 20 gallons to ensure everything checks out before I go with a full tank.

And last night I stuffed about 4 of these GM cooling system sealing tablets into the block cooling system.
AC Delco PN: 10-108

Recommended for a fresh engine build or major repairs to ensure its sealed tight (in cars).
usually, it's one or two per engine, but with it being a boat and going out of the exhaust I added a few more.

There is a port next to the thermostat housing that was perfect to get it down in the block bypassing the thermostat.
Stuffed them down the hole and ran the engine on a hose.

In my mind this would give it a little time before it starts venting out of the block as the engine reaches temp.

I finished it off by draining the block and the manifold drains.
I'm tempted to toss the last pellet into the intake before the first outing for good luck. ;)

While running the engine I also finally set the base ignition timing.
In my mind I remembered it being 6 degrees, but I'm sure it's something like 8.

A future me problem, this is good enough to get it running, plus I liked where the idle was with the base set at 6 degrees. :unsure:

I'll reset the timing after confirming what it's actually supposed to be when I do the next oil change.
 

Gibbles

Commander
Joined
Nov 14, 2009
Messages
2,027
I also changed the distributor cap and rotor with an OEM mercury set before doing the timing.

I found the PO had put on an aftermarket cap and rotor, with no markings to indicate the brand.
It seemed to run fine, but the rotor had a ton of slop on the distributor shaft.
seemed like it would lead to some sloppy timing.

Installing then new set, it was clear of the quality difference.
No slop whatsoever!
 

Gibbles

Commander
Joined
Nov 14, 2009
Messages
2,027
A little more done on the boat last night, I finally took a picture of it.
Battery covers are installed, and I got the lower trim pannels covered and installed.

I'm not 100% sure that they are in the correct position since I had issues lining up the holes, but it's good enough for now.


Screenshot 2024-07-03 150723.png
 

Gibbles

Commander
Joined
Nov 14, 2009
Messages
2,027
Boat splashed on the 4th!
I meant to get pictures of it in the water, but there was just too much going on.

The boat ramp only had a single tiny dock coming out from the ramp, and a huge line waiting for me.
Weird configuration this year...

I bought a season pass to all of the local docks at just under $200!!!

I hope some of that money is going towards more docks.

Just ran the boat for a few hours for that first break-in run with load.

I had to really keep an eye on the rpm to keep it under 3k.

The boat ran great, fired up on the first turn of the key.

I also have a "system" figured out where i believe i can launch and retrieve the boat on my own.

The hi five prop sucks in reverse still, it almost made me need to put the trailer in deeper.

This was just with the 15 pitch hi five, i still have a 21 or 23 pitch spare to try out.


I really want to get a nice 3 bladed prop for it, but i have no idea what i should order.
 
Top