I'm back with a 1994 Islander 221V!

Gibbles

Commander
Joined
Nov 14, 2009
Messages
2,027
Well today the plan is to yank the old engine out, then i can start making plans.

I also received the new short block.
Some slight disappointment afterwards.
I'm planning to tear it completely apart since i question how well it was assembled...

After i got it on the engine stand, i noticed a rattle when rotating it.
Cause was an old freeze plug left in the cooling jacket... lol

Then i can't really turn the engine over by hand, i don't have a bolt in the crank yet so it might loosen up.

But the engine was also filthy.
Cam bearings have a nice dirt film, so I'm going with the tear down, inspect, clean, verify clearances, and re assemble.

The seller might earn himself his first negative ebay feedback on this one.

All depending on how he handles it.
A few hundered bucks back and I'll probably forget it happened... lol
 

Gibbles

Commander
Joined
Nov 14, 2009
Messages
2,027
Also, the hull anode.
That should be against bare metal or over paint is ok?

It looks like it's over the paint right now.
 

Gibbles

Commander
Joined
Nov 14, 2009
Messages
2,027
Engine is out!

The lifting setup worked great.
But it was about 4 to 6in shy of clearing the back of the boat.

We ended up disconnecting it from the truck, jacking it to the highest position, deflated the trailer tires, and then i used the winch on the jeep to pull the trailer forward to clear the engine.

To reinstall it will be a bit more complex, unless i want to install a winching ring at the back of the garage some how... lol

I'm thinking the bell housing and the oil pan will be installed while it's above the boat and clear of the transom.
 

Gibbles

Commander
Joined
Nov 14, 2009
Messages
2,027
Here soon i need to start tearing into the old and new engine.

I want to do some compare of them as well.

Some concerns i have with the new engine are the orientation of the connecting rods.

It almost looks like the left and right banks have them in different directions.

Looking through my mercruiser manual i didn't see a direction reference, so it's probably fine...

I'm leaning towards picking up a second engine stand to make this easier.

Looking at harborfreight, they don't seem to have the $50 stand any longer, now they seem to start at $100.

Over the weekend, my father-in-law and i got the engine pulled, put the tools on my work bench, and the wives took us to a local brewery for beer and dinner.

This week as time allows will be me cleaning up my work bench and start using my ultrasonic cleaner on the new lifters and pushrods.

Once organized, I'm tearing apart the new engine.
Partly to ensure it's put together correctly, but mostly because i need to clean it.

I decided the crank needs to be removed so i can wipe the cam bearings down, check oiling hole orientation, and camshaft install is easier if i can guide it in from inside of the block.

Then i can verify what crank and rod bearings they used and the clearance.

I'll probably replace them for good measure.

I also didn't see the paint marker on each bolt, normally i expect to see a series of marks as the builder verifies his/her work, so good to verify everything.
 

Gibbles

Commander
Joined
Nov 14, 2009
Messages
2,027
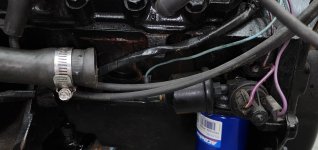
Well, I took some pictures of wiring and crap before I start the disassembly of the old engine.
I found something on the port side, an even bigger crack!!

BiggerCrack.jpg

this one is much longer and goes up under the cylinder head. (n)

I don't know how I would have missed that if it was there before.
so, I pulled the drain plug, I didn't get anything but a few drops of boat and rv antifreeze.

Makes me think I didn't fully drain the engine, exp with the red antifreeze gummed up on there.

Oh well, but this means I'm probably replacing the cylinder heads too.
 

Gibbles

Commander
Joined
Nov 14, 2009
Messages
2,027
Also a no so nice little surprise from the engine builder.
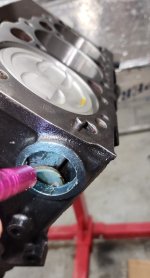
I kept hearing rattling when rotating the new engine on the stand, then I found it.
a fkn freeze plug was left inside of the engine!!

FreezePlug.jpg


I messaged the seller, I didn't get much from him.
I also expressed my feelings that I don't trust how this thing was assembled if this little detail was missed.

I got assurances and ****, i don't trust the builder now.
it would be a massive pita to send it back, so I'm just going to deal with it.
If the seller doesn't return some of my $$ he will get his first negative review.
 

Gibbles

Commander
Joined
Nov 14, 2009
Messages
2,027
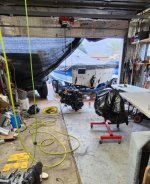
and a nice image of my hoist setup.
Worked out pretty well if I say so myself.

Hoist1.jpg
 

Gibbles

Commander
Joined
Nov 14, 2009
Messages
2,027
The adventure with the new engine is happening here. (y)
 

Gibbles

Commander
Joined
Nov 14, 2009
Messages
2,027
Well the adventure continues.

Looking at the old block with a flashlight, hoping to see a crack clearly showing me where water was getting int he oil.

I noticed a ton of dirt, crud, etc at the bottom of the block.
Plus, I noticed that even though I thought i had the block fully drained.
When flipping it over during disassembly lots of that red antifreeze came out of it.

The skeg also suggests that it might have been on a beach or ran through some ground at some point in it's life.

So my thoughts are now that the prior seller did the exact same thing I did, drained, poked, looked good and called it a winter.
but the block wasn't fully drained because of that **** in the block.
(insert scary music)

I'm thinking that me adding a drain that's easier to open like a ball valve would make it a little easier to get water flowing while the boat is on a hose or before I pull it from the lake.
In theory it might help prevent sediments from building up... :unsure:
 

Gibbles

Commander
Joined
Nov 14, 2009
Messages
2,027
Just finally getting over whatever sickness thing i had, still coughing up some goo though... lol

Over the weekend in got the engine fully assembled, all major concerns have been addressed.
I have it ready to go for next weekend, oil pan off for now, and I'll yank the oil pump in order to clear the back of the boat.
Hopefully we won't need to deflate the tires this time around.

Once it's over the boat we will complete the install of the oil pump, oil pan, flywheel, bellhousing, and starter.

Luckly, I found my oil pump priming tool for SBC, confirmed it mates up nice and clean to the oil pump shaft.


Over the weekend we also pulled the hull anode, cleaned the sealant from it and reinstalled with fresh hardware.
confirmed that it sits against bare aluminum, so it's likely original.
It had a little seal that pretty much looked like a piece of electrical tape.
I dumped that in favor of a dab of 5200 around the bolt holes.

I'll probably put a small bead of 5200 around it later on for good measure.
 

Gibbles

Commander
Joined
Nov 14, 2009
Messages
2,027
I also pulled the bilge pump out and took a look at it.
This thing was working as of last year.
800gph, I forget the brand.

we had the task of removing the gulvit or whatever sealer the prior owner used in is wild goose chase trying to locate and stop the water leak.

since it was under the engine, it looks like he opted to just pour the stuff in the bilge.

in some areas it's closing in on a 1/4in thick towards the back. :ROFLMAO:

Much of it is separating from the aluminum and making it easy to chip away, other parts require some careful prying.

I'm opting to leave most of it out for now, but the future concern would be it flaking and plugging up the bilge pump.
I also don't know how I would chip it out w/o risking damaging the aluminum.

And onto the bilge pump, while I'm running out of time, I went ahead and ordered a Rule 1500gph bilge pump and their heavy-duty float switch.

this is an engine out task to replace it later on, so I'm planning to upgrade while I'm at it.
 

Gibbles

Commander
Joined
Nov 14, 2009
Messages
2,027
I also had been planning to pull the transom assy from the boat, replace the seal and reinstall.
but that fizzled out, but I still had the exhaust y seal on hand.

I found the transom assy was so loose the washers could be spun by hand!
so, I tightened that down, and pulled the exhaust Y to get to the lower bolts, also finding those bolts were finger tight. :p

I'm also half tempted to leave the current working 800gph bilge pump installed as a backup, but I don't know how that would work out. :unsure:
 

Gibbles

Commander
Joined
Nov 14, 2009
Messages
2,027
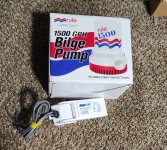
New bilge pump and switch to go in before the engine gets dropped back in.
BilgePump.jpg
 

Gibbles

Commander
Joined
Nov 14, 2009
Messages
2,027
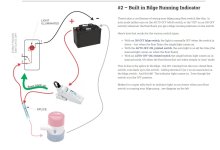
I'm thinking I want to wire this one with an on/off/auto switch that also includes a status light.

Like so,
BilgePumpWiring.jpg

Source: https://newwiremarine.com/how-to/wire-bilge-pump-switch/

Hard part is trying to find a switch that matches the 94 StarCraft flip switches.
This boat also has a bilge pump switch that doesn't appear to do anything.
but it's a straight on/off.
The 800gph bilge currently is straight wired so it's always ready.
 

MNhunter1

Lieutenant Junior Grade
Joined
May 12, 2014
Messages
1,058
The on/off switch is all you need. Wire the float switch direct to the battery as indicated and spliced in with your on/off for manual operation. The float switch is your auto. Even with the toggle in the off position, the float switch will complete the circuit and activate the pump if needed.
 

Gibbles

Commander
Joined
Nov 14, 2009
Messages
2,027
I'm thinking the idea is if the float switch doesn't work for some reason the manual switch would act as a bypass.

I found rule has a switch that looks pretty much identical to the starcraft ones.
It would be pretty slick If I could slip it in there.
 

Gibbles

Commander
Joined
Nov 14, 2009
Messages
2,027
Also, as I'm handling this float switch.
the contact is a little stiff, so it got me thinking about the whole bypass on/off/auto thing.
 

Gibbles

Commander
Joined
Nov 14, 2009
Messages
2,027
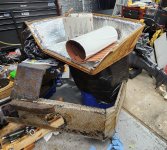
And this is the doghouse with the PO's carpet stripped from it.

Vinyl sides with carpet upper, directly on the wood.
The wood didn't fair well over the last 30 years.

The image shows the distortion of the sides, I'm pretty sure I'm replacing the wood to fix it. šŸ˜•
I'm expecting the same sort of distortion to the upper part of the main doghouse.

DogHouse.jpg
 

Gibbles

Commander
Joined
Nov 14, 2009
Messages
2,027
the doghouse's vinyl is also a long piece and less than 2ft wide.
looking at about a solid 2x10 piece needed to complete it.

that would be expensive if I went with marideck, so I'm trying to find another idea.
Maybe I'll just run with EVA foam. :unsure:

I'm guessing my main deck is at least 8ft wide, I still need to measure it.
So, using leftovers is probably out.
 

Gibbles

Commander
Joined
Nov 14, 2009
Messages
2,027
Well over the weekend I made some big progress.
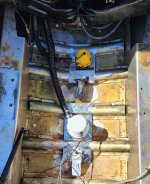
First the new bilge pump was installed into the boat.

That 1500gph rule pump was both heavy and tall.
That made it so it wanted to rock with a thin aluminum sheet mount.
So I went to the hardware store to see what sort of options I had.

I pretty much needed a street sign type of thickness to make it work, and they didn't have much other than the extruded aluminum pieces that were a bit too thick, and some diamond plate.

I also bought a saw blade for my Dewalt 12in compound miter saw a bit before this.
It calls out brass, copper, aluminum and soft woods.

Cutting through aluminum was like a hot knife through butter.
The cuts look better than what the factory ends look like, amazing!

the sliding part of the saw also made it so I could chop the diamond plate piece, long enough to make it in a solid piece.

I used a vice and some eye balling until I had a shape I liked, and then ran with it.
Hammering the diamonds out flat also helped save me some grinding time.

bilgeinstall.jpg


I totally spaced getting pictures after this.
but on Saturday we connected the wires to the start of what will be the loom for the new pump installed a corrugated sleeve and zip tied it to the bilge hose to keep everything tidy.

Engine dropped in with about 2 inches to spare!

I used the MerCruiser alignment tool to check that the drive shaft would fit into the coupler and sent the outdrive in with a fresh gasket.

Soon I'll start connecting everything and get the engine primed.

Still on the list, I need to drain the old fuel from the gas tank.
I'm hoping it's less than 20 gallons.

Figuring I'll use some 5-gallon buckets for now, and then figure out if I want to use the old fuel in something else or take it to the dump for proper disposal.
 
Top