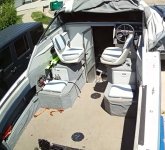
I'm back with a 1994 Islander 221V!

Gibbles

Commander
Joined
Nov 14, 2009
Messages
2,027
also notice the yellowing stuff in the bilge.
This was the PO chasing a goose in the form of a hull leak.
Some of that stuff is thick!!!
We did our best to chip it up, but the really thick parts are in there.
 

Gibbles

Commander
Joined
Nov 14, 2009
Messages
2,027
I spent a little time measuring and disassembling some things on the boat.
I have the new flooring ordered, and hopefully I have enough to also wrap the doghouse/engine cover once I rebuild it.

the PO glued carpet on all of the side panels, i really do believe it's indoor carpet by the way the back of it feels.

pulling the carpet off of the side pannels is leaving this black crap from the carpet backing everywhere, and if it by chance does come off cleanly, it will still have the glue left over.

I also see that the old vinyl flooing is still there in the corners and sides.
It looks like the vinyl was cut and removed, and this carpet put in it's place.

The before picture.
Deck_before.jpg

I ended up putting much of the carpet back down as it looks like I need to fully dissasemble the storage areas under the seats to replace the carpet.
I also found rot to some of the wood, so I'll need to assess that as well.


I opted to keep with what appears to be the original flooring color.
Marideck.jpg
I have a 17ft x 8.6 foot piece coming soon.
 

Gibbles

Commander
Joined
Nov 14, 2009
Messages
2,027
and I pulled a little over 30 gallons of fuel out of that islander tank.
The gauge said it was about 1/2 full when we had it out last year.

So that's about right.

The fuel is still "good", it's just double treated with Stabil, but still, it's 2+ years old.
I'll have a solid year + supply of mower fuel.
I plan on disposing of 10 gallons of it due to using dirty buckets and possible water.

I'll go get a tank of pure gas this weekend once I confirm I'm good with the fuel tank.
Afterwards I'll be ready to fire up the new engine!

(y)
 

Gibbles

Commander
Joined
Nov 14, 2009
Messages
2,027
I also have a set of these, both in 1/2 and 3/8in
Mostly it's a guess on the fuel line size, so we shall see how it goes.

https://www.amazon.com/dp/B09TT4BVB5

Plan is to run one after the T on both the kicker and main engine.
Hopefully that will prevent it from pulling air/fuel from the other.
 

Gibbles

Commander
Joined
Nov 14, 2009
Messages
2,027
Flooring came today, soon I'll make that interior not ugly. :cool:
But I'll probably end up boating first.

the check valves I bought also came, I found them too restrictive and took them apart to do some modifications.
I'm hoping it works but if not, I'll probably just put a shut off ball valve on the trolling motor fuel line.


And apparently the carburetor to spark arrestor/air filter looking thing has a thread pitch of 1/4 x 28 pitch.
A few attempts via trial and error.

I also found online it was 6mm x 1.0, but that's a big negative.
 

Gibbles

Commander
Joined
Nov 14, 2009
Messages
2,027
More fun today, motivation isn't there.
But the tank is empty and I wanted to look over it before I go get fresh gas.

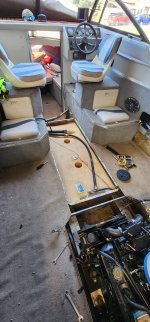
I finally pulled the center floor to take a look.
The little loose wood piece, Well I figured out where it goes.
A nut fell off, and I happened to find it in the bilge while the engine was out.

it was a perfect fit to the through bolts that retain the rear piece of wood.

20240518_151928.jpg

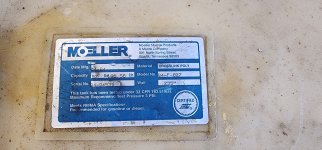
I also got the fuel tank tag, for a minute there it looked like it was a 57 gallon tank.
but i now clearly see that's a 2 not a 7.

20240518_153051.jpg
 

Gibbles

Commander
Joined
Nov 14, 2009
Messages
2,027
I had a little bit of rot on the front starboard side of the center flooring section.

I thought I might be able to just epoxy the corner back in place and coat the rest of the wood while I'm at it.
but I see it's pretty spongy at this point.

The port and starboard floors have the same feeling when walking on them, so I'm calling them toast as well.

That carpet that the PO installed really killed the floors from the looks of it.

The original stuff was that marideck vinyl flooring that also served to protect the deck.

At a minimum applying some spar varnish could have saved the floors.
Oh well, I'm planning to replace the floors before I wrap it with fresh vinyl.

Now to get the motivation to remove those seat boxes so I can access the rest of the floor... :cautious:
 

Gibbles

Commander
Joined
Nov 14, 2009
Messages
2,027
I think I want to pull the tank up to take a good solid look at it.
It looks like the wood pieces are to keep the tank from bouncing, but the foam or whatever pad is pretty much gone.

I'm assuming there should be something under the tank as well.
And the little side pieces for the flooring mounts are riveted on there, they are also pretty loose so I think this is a good time to put some fresh rivets in there while I'm at it.
 

Gibbles

Commander
Joined
Nov 14, 2009
Messages
2,027
Over the weekend I finished installing the manifolds, and using a little gas can of pure gas, I filled the fuel/water separator up and connected a little lead of fuel line to the inlet.

The engine fired right up with using my timing marks I made with a paint pen during disassembly.

I let it run keeping the rpm up and doing my best to vary it for a solid 15min.
Then I saw steam and water dripping from the crankcase vent lines.

The biggest thing I wanted to check was how smooth the engine was.
If it was bad I would have probably gone with a different engine or tried a different/original rotating assembly in the block.

But it wasn't bad at all, calling it good enough for me!

Now to replace those heads!
Clearly there is a crack.

Now I get the hard decision of going with the same style of heads or to fork out $$ for the vortec head upgrade + manifold.

There is a nice set of heads for sale that have already been machined that I'm thinking about.

Plus, I'm getting laid off in a month or two, so the cheaper way out seems to be the best right now. :cautious:

If I went with vortec head and intake upgrade, I'm also looking at rejetting the carbs, and probably an electric choke upgrade.

Nickle and diming me to death!

So I think the answer is clear to me.


Next issue,
while running the engine on a hose and the rpm up, the freaking exhaust Y to the transom assy is leaking water pretty good?!

I'm thinking I probably got the exhaust too hot and it melted the brand-new freaking O-Ring/seal i installed.

And of course, it wasn't a mercury branded one, so I'm guessing it was the wrong material.

Or I overheated the exhaust during the first run and it cracked the Y maybe?

What sucks is it's an engine out service, luckily, I have a setup for that now but damnit!!

two steps forward and one step back. :poop:
 

Gibbles

Commander
Joined
Nov 14, 2009
Messages
2,027
And I'm planning to do some work on the floors here over week or two.

I have the driver/starboard seats fully removed, and the lower box nearly fully removed.
The passenger side is a little different, there is a big LiveWell tank in there blocking access to the bolts and screws holding it in place.

I can however feel the mounting bolts for the tank it self. :unsure:

I'm guessing those need to be removed and hopefully the LiveWell will drop down and let me access the other bolts?

I have a feeling that it's going to be more complex than that. :ROFLMAO:
 

Gibbles

Commander
Joined
Nov 14, 2009
Messages
2,027
Well I scored a set of heads for the 4.3 last night for $335.
Not the later heads, but they have been resurfaced, guides, and fresh springs.

Soon,
giphy.gif
 

Gibbles

Commander
Joined
Nov 14, 2009
Messages
2,027
As I'm getting ready to start on the deck floors.
What is the new go-to epoxy?

I have used west system in the past with good results.
But this time I'm leaning more towards trying to restore some of the flooring vs replacing and sealing.

I still have quite a bit of west system on hand, but it's a few years old.
last time I mixed some up it didn't fully harden, so either I had the mix way off or it's just getting old/expired.

I see this "Total boat" brand on amazon, one is a "penetrating" epoxy.
Thinner might be better for trying to restore this decking...


1985 Century Mustang

Chief Petty Officer
Joined
Mar 9, 2023
Messages
532
It has been a while since I have posted here.
but I'm back baby!

Last week I ran across my dream boat, and it was in actually in my state!
The boat: Islander 221V!!!

I wasn't sure if it was a V or not, but I see those "V5" ribs, but searching I saw references that the V in the later islander meant that the reinforcement structure was inside of the hull?

I picked it up last night, it has a thumping stereo system, MerCruiser 4.3 v6 and the Alpha One Gen 2 out drive.

It's actually a pretty nice boat, it could use a paint job, but it runs great, I don't see any obvious transom rot, and the floors seem to be in good shape.
But it still has carpet... Eww. :poop:

View attachment 389398

This side shows lots of dock rash, I also didn't see that the seller had any dock bumpers...
I see signs of a few impacts on that side, but overall, it's a really nice boat and ready to fish.

The starboard side looks like a fresh coat of wax and a polisher would bring it back, but that port side looks its age.

This also has a dual battery setup, I'm not sure how that works, but I guess the first place to start is a basic wiring diagram so I can wrap my head around it (for some emergency lake repairs), and to get the impeller replaced, and the lower gear oil replaced in both the Yamaha 4 stroke kicker that it came with, and the stern drive.

ALso if anyone knows a good lead for a service manaual for that 4.3l engine and stern drive, that might be helpful.


I'm also not sure how I'm supposed to change the oil on the engine, I assume I'll want to suck it out?

*I just noticed this is an older thread.

I have a Merc 3.0 and mine has a drain plug. I put two thick clear bags underneath the engine, I remove the drain plug and let it drain into the bags, carefully I pick up the bags cut a hole and let it drain into am empty plastic gallon and then bring it to recycle at my local gas station. it worked for me pretty good.
 

Gibbles

Commander
Joined
Nov 14, 2009
Messages
2,027
*I just noticed this is an older thread.

I have a Merc 3.0 and mine has a drain plug. I put two thick clear bags underneath the engine, I remove the drain plug and let it drain into the bags, carefully I pick up the bags cut a hole and let it drain into am empty plastic gallon and then bring it to recycle at my local gas station. it worked for me pretty good.

With the engine pulled I found the drain plug pointing towards the port side.

If this was an inline, it would be easier to use the drain plug, but with the exhaust manifolds on both sides, it blocks access.
That is unless I position myself so I can reach my arms underneath from the front of the engine, I can sort of work.

But just using the dipstick to suck it up works good enough, I pulled the pan off after doing the suction trick and it did remove pretty much all of the oil.

I have one of these, it does both punematic function and the pump handle.
https://www.amazon.com/gp/product/B07N7YV5GN/ref=ppx_yo_dt_b_search_asin_title?ie=UTF8&psc=1

Since I have air, I have never tried the pump handle to generate the vacuum.
 

Gibbles

Commander
Joined
Nov 14, 2009
Messages
2,027
Well, it rained all day yesterday (Saturday), plus I did something to my back on Friday that had me laying down watching tv all day on Saturday.
So nothing got done.

Today the plan is to start cutting some wood for the new center flooring section, and to wood to repair the engine cover.

I did pick up some of that total boat epoxy and some mixing cups, the side flooring pieces might be repairable since the wood isn't totally falling apart yet so I figure I might as well give it a try.

There also appears to be a piece of wood under the fuel tank that could use a coat, and since I'm figuring some rivets probably fell down there from the PO, it's worth a good look.


During the week I also managed to do some work on the tolling motor mount.

The holes in the transom did show some very light rot, so I cleaned them out with a 3/8in drill bit and a rifle brush to get the old sealant out the best I could.
Then I went for two coats of epoxy.

While the second coat was still setting up, I used some of those wood thread inserts with the backing plate that contain 3 spikes to grip into the wood.

My thoughts were that the port side holes were so close to the edge of the transom it might be a good idea.
Plus, it's easier to tighten things down by myself using those. :geek:

I ended up having to use a slide hammer to get them started, and I found they went in easier after sharpening the little prongs.

And that decision was after one of those lost the little stainless prongs while I tried to draw it in with a bolt and washers.
That made it challenging to remove it. :ROFLMAO:

I let the epoxy setup with a bolt tightened down on some large washers, soon I'll start the install of the trolling motor bracket.

There was also some damage to the back side of the transom from the trolling motor mount being bolted there.

I believe much of that damage was from too small of a washer being used, but mostly the way that the mount was installed.


The way I see it going down,
the PO spent over a grand on a remote trolling bracket.
Only to find out where they wanted to install it had a transom bolt in the way.

So instead of modifying the bracket they opted to use some spacers/washers to keep the bracket over the bolt.

Not terrible, but I did see some signs of flex on the transom aluminum skin, resulting in some warping/dents, and some light cracking at the top port bolt.

I drilled little holes on the ends of those cracks in hopes to stop it there and used some JB marine weld to fill the holes.

I then followed up by modifying the port side bracket so it can sit flush against the transom, and since that bracket was also bent, I straightened it up the best I could.

That install method also led to some very light water intrusion into the transom due to the flexing and compression that happened.

On the backside of the transom, the washers have some really big dents from being pulled in.

So stainless inserts that have a nice epoxy backing, and I'll follow up with some better support on the backside.

Will that be some 1/4in aluminum, or thick stainless washers? I haven't decided yet.
Maybe a combo of the two. :unsure:
 

Gibbles

Commander
Joined
Nov 14, 2009
Messages
2,027
Also, the fuel line setup,
I spent some time thinking about how to tackle it.

The issue: the fuel line for the kicker engine runs off of a T on the main fuel line.

I saw some signs that they had possibly had some issues by some white sealant that had been put on the fuel filter seal.

I found when messing around with the boat that the little fuel connector end for the Yamaha kicker was indeed sucking in air.
Likely if that line was connected it was also pulling a vacuum on the carb on that little kicker.
It makes me wonder if the same thing happened when the kicker was running, pulling a vacuum from the main engine. :unsure:

So, I have a set of those cheap one-way check valves.
But those take a little force to open.
I picked up a brand name one from Summit Racing that listed 3psi to open the valve.
Blowing through it I still wonder if it's just too much.

With that order, I also picked up two fuel line shut off valves.
Figuring that if all else fails, I can open and close the lines keeping the other engine out of the circuit.

These all use AN fittings so I can play a little "legos", likely I'll just convert a section of fuel lines to AN, but I am tempted to go all in. :sneaky:
I still have a big box of leftovers that I'll need to go through, if I'm lucky I'll have enough to adapt the tank side and the fuel filter inlet side.
 

Gibbles

Commander
Joined
Nov 14, 2009
Messages
2,027
I had a neighbor name Jen that I attempted to talk to about some difficulty I have been having with her kids and their friends last year.
She went full Karen on me, made it all about her, and now she calls the city on me for every single thing. :poop::ROFLMAO:🤣

Music too loud?
Cops come by and see "oh he's just working on stuff again"

Parked something on the front lawn, city called for a code violation.
Blocked sidewalk, yup you guessed it!

So, my tailer that I bought just for getting plywood is clear across the valley at my dad's, making this difficult until I get the other boats out of my yard. :ROFLMAO:

Karen got Drunk (again) over the weekend and reported me for having a car blocking the sidewalk over the weekend while I shuffled cars around. :ROFLMAO::LOL::sneaky:

They came by and saw all was good this morning.
So, it's just a reminder for me to keep the front yard as organized as possible until I made more room in my backyard.

My front yard is pure chaos right now with the addition of one 22ft boat, so that's not helping right now.
:ROFLMAO::geek:
 

Gibbles

Commander
Joined
Nov 14, 2009
Messages
2,027
last night I started some work on the flooring on the islander.
The new middle section of the floor has been made at my fathers-in-law place, and he will deliver it this next weekend.

He might treat it with some spar varnish, depending on if he remembers or not.
Otherwise, I'll coat it with epoxy before it goes down.

What I really wanted to do is to do my flooring like @66Holiday924 is doing with his islander, but this was kind of a surprise to find the flooring needed help + I have limited time.

I'm already regretting yanking up the carpet, but it wasn't staying down.
I just saw another twisted ankle or worse happening if i left it.

Then I found the wood was pealing up badly due to having trapped water against it.

so last night I applied the first coat of that penetrating epoxy on the worst of the two side flooring pieces.
and I have to say,
Oh boy does that stuff penetrate!

I'm finding it doesn't go very far with how bad the side floors are.
I also had some warpage on the inner corner near the engine bay, I used a piece of aluminum angle and a couple short wood screws to pull it flat with the rest of the floor.
Then proceeded to apply epoxy to that area.

Hopefully this stuff is like west system and adds a bunch of structure to the floor.

I'm still planning to apply a nice coat of west system in order to really smooth that flooring out.
I'm just hoping the vinyl flooring doesn't show all of the imperfections.
I'm guessing I'm going to see a little warpage.


I know I really should have dealt with the mechanical issues, then did the flooring later on.
😏
 

Gibbles

Commander
Joined
Nov 14, 2009
Messages
2,027
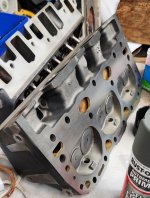
And then we come to the "new" heads for the 4.3.
I found these locally, the seller told me he was planning to put them on his boat, but then he found a cracked block.

At first he told me that they came off of that 4.3, sent them out to get checked and rebuilt, but then found his block was done.

My cringe came out thinking I'll just have the same problem if he had a cracked block, but he then backed up and told me they came out of a S10 blazer he bought for parts, and then had those refurbished.

He said, New seals, guides, springs, surfaced, and bead blasted.
I like that I see the sharpie marks are still on the valves, ports look very clean and ready to use.

Looking at the cooling ports, that sure looks like the standard GM's Dexcool residue and not freshwater.
So, I'm thinking he was telling the truth about that part.

He also told me that they had been sitting around for about 3 months, but the Ad suggested longer, with a note that they might need new valve seals before installing.

I need to remember to save online Ads before I buy something. 😁

I'm probably going to pull two valves to get an idea of condition and what was done, and then install as is.

Seals look pretty good so far, so I'm not too concerned at this point.
These are also not the later Vortech heads, they are the same as what's on the boat currently with a 1995 date on the casting, matching the new engine.

Right off the bat I noticed they just needed one thing.
the combustion chambers had this nice sharp edge from the resurfacing.
So I have that chamfered, the idea being that doing so will reduce the possibility of a "hot spot" and pre-detonation

I also hate working on anything with sharp edges 🤓

A while back I picked up this wonderful chamfering tool, it made quick work.
Made by "AFA Tooling"
Link: https://www.amazon.com/AFA-Tooling-Deburring-High-Speed-Removal/dp/B07RM1D6WD

I also found a good use for this tool on the engine cover aluminum surround removing the edge.
Working on the engine, so far this has probably saved me from some stitches. ;)
 

Gibbles

Commander
Joined
Nov 14, 2009
Messages
2,027
forgot the image of the new heads.
"Scored" for $335
Heads.jpg


I'm still wondering if it was a good deal or not, I probably could have gotten a set of later Vortech heads for the same price or less.
But then it's a Jetting kit for the Weber, Intake, a different set of intake gaskets, etc.

But I'm going with,
Assuming My intake isn't cracked, this should be the fastest way to get back on the water.
No tuning needed, just set timing, finish breaking engine in, and go fishing/playing!
 
Top