I'm back with a 1994 Islander 221V!

Gibbles

Commander
Joined
Nov 14, 2009
Messages
2,027
Another thing was the speedometer.
The seller told me that everything worked except that when I was looking at the boat.

I had a theory that the hose might have been pinched when he had the outdrive off for the bellows.
So in my spare time I watched a few youtube videos related to the outdrive and engine removal and reinstallation.

Then I ran across a video talking about the speedometer not working.
That video noted that there is a little hole on the front of the lower unit for the speedometer and explained that it's common for that to get plugged.

the fix is to run a little drill bit in there to clear it out.
In the video it showed water being trapped up in there, that made me a little concerned since I thought about cracking of the lower if water was trapped in there.

I ran outside with a drill bit and ran it into the hole by hand.
and 100% that little hole was clogged, and no water came out. :geek:

I'm feeling pretty certain that the speedometer has a very good chance of actually working this summer.
 

Gibbles

Commander
Joined
Nov 14, 2009
Messages
2,027
Tossing this in here so I can find it later,
I also put it in the craigs list thread, but not the full AD.

Edited to remove the seller's son's face, and his contact information.

IslanderAd.jpg


For my records, I believe paid $7200 for it as "turn-key"
then refunded some of that money, making it $3800 once I found a crack in the engine block.

Hopefully it starts to warm up here soon, I want to start working on the boat.

It's like an itch that I want to scratch.
but then every time I think about working on the boat, it's either colder than I anticipated, or the dark clouds make me loose interest quickly. :sleep:

:ROFLMAO:
 

Gibbles

Commander
Joined
Nov 14, 2009
Messages
2,027
And while I'm on the subject.
I need to get some images of the controller thats in this boat.
One issue I had with the controller is that the idle/rev up isn't working.
Like there should be a disconnect for the shift allowing me to throttle up during starting.

Messing around with-it last year I couldn't get it to work.
Hopefully something just needs a little grease.
The trim up also didn't work well, I already fixed that, the cause was a bent contact.

I just need to figure out how to get the console apart and that controller removed from the boat.

Chatting with my father-in-law a few weeks ago, he is under the impression that it would be best to yank the top windshield in order to back it into the garage.

That would give me access to the lifting points in the garage ceiling, also making sure we are feeling comfortable with it's ability to support the weight of the engine, and ensuring we can raise the engine high enough to clearance the back of the boat.

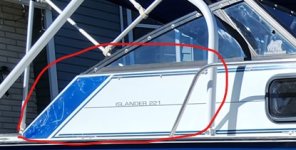
That would also allow me to look at some of the structure of the "Walls" on the side, where earlier it felt like the rivets had loosened making the side of the top feel floppy.

Since I'm not using the correct words, this is the part where it feels "floppy/loose".
Floppy.jpg

Taking this apart will give me access to the windshield mounting bolts, the controller, and the interior trim for a vinyl refresh.

Seems like a no-brainer, so many things at once will be accessible.

Plus, I would like to redo the cabin roof panels, much easier to deal with when it's removed from the boat...
Ugg! :ROFLMAO:

Flooring is also coming up since I want to recover and add an access hole/hatch or two for the livewell fittings..

Starting to feel more and more like a restore, when I just want to go fishing.

Another thing I might tackle is a paint job.
I'm leaning towards a paint strip for the stern, and then rough the paint up and freshen it up on the sides and top of the boat.

To do that I would need to remove the vinyl decals.
Then I need to find a replacement source to keep this thing looking "factory". :cautious::unsure:

Also, with the windshield off and the engine out, that opens a possible partial support of this boat from my garage ceiling.

I could use my engine hoist to lift the front of the boat up, that would make a paint refresh on the bottom of the hull much easier.

What don't know is how heavy this hull is?
I'm guessing it has to be at least twice as thick as my chief?
I think that thing empty and gutted was right around 600lbs.
 

Gibbles

Commander
Joined
Nov 14, 2009
Messages
2,027
I'm planning to buy a nice long uni strut for the garage ceeling to use with the engine removal tasks.

I'm figuring it will be difficult to get the boat in the garage just perfect for engine removal and installation tasks.
So i'm thinking about using some uni-strut to give me some side to side movement.

I already have an electric hoist at the back of my garage using a 8ft piece of uni-strut.
Allows me to pull the hard top off of the jeep, and allows me to push it off to the side of the garage.

Thinking I want to use the same hoist, but not pull the rollers out of the channel for the engine pull tasks.

So I found my self looking at some new rollers for that hoist.

On one of the reviews, I see this little Jem!

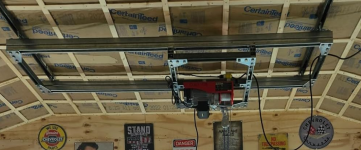
1709751833006.png

Several uni-strut pieces to allow the hoist to move side to side and front to back!!

Brillant!

I'll spend a little time thinking how/if I could make this work for me.

I suspect it might take up too much of my garage ceiling for my tasks. :unsure:
But a version of it could work for me.
 

MNhunter1

Lieutenant Junior Grade
Joined
May 12, 2014
Messages
1,059
I'm planning to buy a nice long uni strut for the garage ceeling to use with the engine removal tasks.

I'm figuring it will be difficult to get the boat in the garage just perfect for engine removal and installation tasks.
So i'm thinking about using some uni-strut to give me some side to side movement.

I already have an electric hoist at the back of my garage using a 8ft piece of uni-strut.
Allows me to pull the hard top off of the jeep, and allows me to push it off to the side of the garage.

Thinking I want to use the same hoist, but not pull the rollers out of the channel for the engine pull tasks.

So I found my self looking at some new rollers for that hoist.

On one of the reviews, I see this little Jem!

View attachment 395156

Several uni-strut pieces to allow the hoist to move side to side and front to back!!

Brillant!

I'll spend a little time thinking how/if I could make this work for me.

I suspect it might take up too much of my garage ceiling for my tasks. :unsure:
But a version of it could work for me.
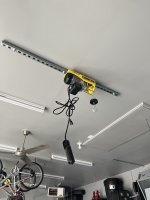
I installed a hoist in my garage as well, primarily for processing deer, but works great for mounting outboards as well. Didn't go to the extent of the rollers and trolley, but sure beats the 4x4s and ratchet straps across the joists I used to use. I do have storage trusses in my garage, so they are rated for the extra load.
Hoist.jpg
 

Gibbles

Commander
Joined
Nov 14, 2009
Messages
2,027
Right now I'm thinking I want to try the same "under the garage door when opened" idea.

That would also allow me to install some lights for when I'm not hoisting things.

Researching it seems like the 12ga unistrut that's sold at homedepot (super strut) can handle over 1000lbs w/o being supported/reinforced!

So I'm seeing a unistrut on the wall hitting the concrete on the foundation, bolted in place, then the unistrut spanning the distance under the garage door.

The bad part is I can't find anything in the 20ft length that I need, so I'm probably going to weld two 10ft sections, and then brace it with more welding.

So I picked up 5 10ft pieces of 12ga 1 5/8 unistrut
Two for the wall, two will be butted together.
The extra piece is if I decide I want to weld a unistrut to the middle to further brace it, but I'm thinking some 1/4in thick bar or angle will do the trick.

Of course, this stuff is galvanized so I got a couple 3m respirators meant for painting cars.
I'll grind off as much of the coating as possible, and still weld it in the driveway with a fan blowing on the piece/me to prevent damage to me.
 

Gibbles

Commander
Joined
Nov 14, 2009
Messages
2,027
once I get around to tackling this task, I also still have a stripped 5.3 cast iron engine block and crank.
I'll do a rough load test before I try pulling anything over the boat.
 

Gibbles

Commander
Joined
Nov 14, 2009
Messages
2,027
Pictures of it soon, but I have two of the two wall mounted unistruts installed, before installation I ground off the galvanizing at the top.
I'm planning to do a couple plug welds on the side of a bracket when I'm happy with the adjustments.

I have a pair of these on order,

Figuring I'll plug weld at least 4 holes on each bracket (sides).
Depending how i feel about it once installed that is.

Reading this stuff should be able to support over 1,000lbs with just the special nuts they use in the channels...

To do the install I had to do some cleaning of my garage, removed some shelving that will probably be replaced with more Unistrut for some sturdy shelving options.

I'm also looking forward to having some lights installed under the garage door when opened, something that has bugged me since I have like 6 lights that get blocked when I open the garage door. (y);)
 

Gibbles

Commander
Joined
Nov 14, 2009
Messages
2,027
Hoping this weekend I can get the middle section of the railing installed, and then some load testing.

I have a few weeks before my father-in-law is planning to head over in order to start tearing into the boat.

Once i have the engine pulled, I'm planning to do some assessment of the boat.
Part of what I need to do is to replace the livewell inlet and outlets.
Plastic and they look their age.

I was planning to go with stainless steel, but reading up they say it's a bad idea since it could corrode the transom skin.
Plus, I'm planning to strip the paint off of it...

I'm making an assumption that it will be 3/4in, but I don't know if they are straight or have an angle or what.

It's also a good opportunity to freshen the LiveWell up, I thought the pump seemed a little weak, but then again, I don't know how it's supposed to be since this is the first boat I have had that had one.

So, I'll likely replace the LiveWell pump while I'm in there, maybe upgrade it? :unsure:

All new stuff for me.
 

Gibbles

Commander
Joined
Nov 14, 2009
Messages
2,027
Last night I welded together a pair of 10ft sections of Unistrut.
Making it a nice 20ft single section.
The weld is solid, but I'm not liking how much flex I get in the 20ft piece.

So, I'm doing a second Unistrut, and I'm going to weld them together, right on top of each other.

Planning to weld the backs together, channel open on the top and the back.

Then I have to cut off a good 10+ in off of the ends, so I'll stagger the weld joints up a bit to added strength.

Nothing quite like welding galvanized metal.
I ground of as much as possible, and welded while there was a nice wind, and I still wore a respirator under my welding mask. :geek:
 

Gibbles

Commander
Joined
Nov 14, 2009
Messages
2,027
I'm getting closer to being able to yank the engine.
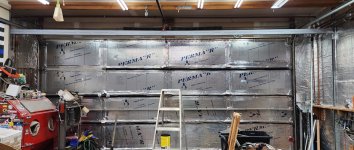
I welded this up over the weekend and installed it.

Truss.jpg

I welded up two 10ft 12ga pieces of unistrut, then decided I wanted to give it a little extra backbone to take out most of the flex.
I staggered the two ends so the welded joints don't meet, then I welded on a plate on both sides.
Staggered some holes for each side for some plug welds, and welded the ends up so they don't meet up on the other side...

This thing was super heavy, I had to raise it up and bolt it in by myself. :poop:
Just a few inches shy of 20ft long!

And of course, I forgot to put the trollies in the channel the first time, so I had to do it twice! 😑

Not in the picture, I have a chain fall hoist pushed off to the side on it's own trolly, I tested it by hanging from it.
Later I'll test with an old LS I have, but so far I'm feeling pretty good about it.
 

Gibbles

Commander
Joined
Nov 14, 2009
Messages
2,027
As I'm planning for the upcoming work on the boat, i realized that adding some trim tabs might be easier with the engine out.

But me trying to pace my spending makes me want to go with the adjustable vs hydraulic type.

Is anyone aware of a trim tab that can be upgraded later on?
I would pefer to start with the manual ones, and then later upgrade.

Thought about doing it now vs later is because i need to completely strip everything off of the back.

A great time to install the trim tabs and then relocate things like the fish finder and the hull anode if needed.
 

Gibbles

Commander
Joined
Nov 14, 2009
Messages
2,027
And as for my lifting setup, I'm thinking about one more 20ft section to span across the top of the wall mounted unistrut.

That one would screw into the ceeling studs, and either bolt into the unistrut, or I'll weld them together.

In my head that would prevent the two wall mounted unistruts from being ripped from the walls should the big beefy unistrut bend and flex while hoisting.

In reality i don't think that would happen, but a little extra insurance for a measly $80-$100
 

MNhunter1

Lieutenant Junior Grade
Joined
May 12, 2014
Messages
1,059
And as for my lifting setup, I'm thinking about one more 20ft section to span across the top of the wall mounted unistrut.

That one would screw into the ceeling studs, and either bolt into the unistrut, or I'll weld them together.

In my head that would prevent the two wall mounted unistruts from being ripped from the walls should the big beefy unistrut bend and flex while hoisting.

In reality i don't think that would happen, but a little extra insurance for a measly $80-$100
For cheap insurance, you could just cut a couple of 2x6, 4x4, or whatever your flavor is to use as vertical braces on either side of the motor while hoisting. Just wedge them into place during the lift and remove when completed. Should at least give you an idea of whether you need to add additional reinforcements if you plan to use it long term, while saving some coin/labor in the short term.
 

Gibbles

Commander
Joined
Nov 14, 2009
Messages
2,027
For cheap insurance, you could just cut a couple of 2x6, 4x4, or whatever your flavor is to use as vertical braces on either side of the motor while hoisting. Just wedge them into place during the lift and remove when completed. Should at least give you an idea of whether you need to add additional reinforcements if you plan to use it long term, while saving some coin/labor in the short term.

I need to buy more unistrut for shelves anyways, but I could go with the idea of having a single cut to the right height, and then that way I can also bolt it up to the other unistrut since this stuff is like legos!


:unsure:
 

Gibbles

Commander
Joined
Nov 14, 2009
Messages
2,027
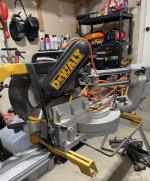
Well last night i pulled out the old trusty dwalt mitre saw, 13 years ago i paid about $60 for it at a pawn shop.

I think a bunch of construction workers got laid off, and his shop had like 10 of those saws.

He saw me looking at one and offered me a fantastic deal on the ugliest one in the shop!

Fantastic saw, i ran that thing pretty hard, even cutting steel with it.

One day i needed to make some brake caliper adapter brackets for the vette, the plans i had called for 9/16in mild steel.

The saw could do 1/4in steel all day long, but that 9/16in steel really challenged the saw.

It did it, but it never sounded the same afterwards!
It also melted most of the plastics that came in contact or close contact..
Including the sawdust collector... lol

I ran that saw for years after, but later the blade brake failed, and it had a new sound to it.

Last time i used it, the blade retaining bolt started to strip out, and the blade was spinning a little under load since i couldn't torque it down.

As I'm getting ready to cut that piece of teakwood, i attempted to change the metal blade for a wood one.
The bolt just spins, i can't even get it out using vice grips.

So it's time to call the saw done i think.
I'm not about to cut the teakwood with a hand saw, i want it perfect.

So i decided it waa time to go pick up a new to me saw.

This time i wanted a chop saw that has the sliding function to handle wider pieces.

So last night i scored a dewalt 708 with stand for $200.

It's an older saw but it seems like it's in great condition.

I'll get some pictures of the new setup in a bit, last night I left it in the jeep since the wifes car was in the driveway.
It's one heavy sob.
 

Gibbles

Commander
Joined
Nov 14, 2009
Messages
2,027
Picture from the AD last night,
Dewalt.jpg

I'll probably throw a fresh set of brushes at it, then use it until it breaks.
 

Gibbles

Commander
Joined
Nov 14, 2009
Messages
2,027
all righty,
The hoist looks good and I have a support coming down to the ground on one of the sides.
I'm feeling pretty good about it.

And I now have the boat on the other side of the driveway, ready to start backing it in here soon.

Supposed to rain this weekend, so yard work I had planned is out, so I'm leaning towards getting the outdrive and swim platform removed finally.

As I'm looking at the back of the boat and the ugly mess of gulvit type of a epoxy dripped everywhere, I know that needs to go.

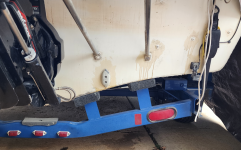
The plan is to remove all of the hardware once the engine is out, and then possibly use a paint stripper to clean up the transom skin.

One Issue I noticed is my pretty powder coated trailer, lights, and the bunks underneath the transom.
My concern is when I start using the stripping gel, it will also damage the trailer.

I'm figuring I can jack the back of the boat up possibly using a block of wood and a floor jack, then insert something like a tarp or something like that.

But that has me wondering, what the heck do I use to protect the trailer?!
I'm thinking a tarp will probably melt?

Thoughts?

transom.png
 

Gibbles

Commander
Joined
Nov 14, 2009
Messages
2,027
Well it looks like the good old airplane paint stripper was killed by the epa in 2019 or 2020.

That stuff was awesome.
I had some issues with it melting plastics, and even melting those black rubber/latex gloves.

Reading up they reccomended plastic sheeting, and I'm to expect a short life span.

Doing some quick reading, the non methocloride (spell fail) isn't nearly as good.

The company that makes the replacement suggests sanding prior to trying to strip paint.
Also no brushing, thick apply using a spatula, and plastic sheeting to help hold it in place.

I might just resort to sanding, priming, and painting instead.

I also looked at some vinyl wrap for the sides of the boat instead of painting for now.

Materials alone would be about $300.

Even if i went with fresh paint instead, it might be a good option to play with some two tone affect.


I dunno... lol

Now if i were to paint the transom, do i want to try and match the off white, or go for a nice navy blue and try to match the sides of the boat?
 

Moserkr

Chief Officer + Starmada Splash Of The Year 2021
Joined
Nov 23, 2020
Messages
869
From my experience, citrus stripped worked better than the other stuff I used. Still, yes, cover and wait. If you have gluvit or coat-it to remove, I found that no paint stripper will work. It has to be sanded to remove. Plastic would protect the trailer from the "paint removers" since they are not that strong compared to the stuff of the past.

As far as trying to match a paint, its not going to be easy but white would probably be easier to get close.
 
Top