i386 Boat Restoration. (Crosby Sled)

Tail_Gunner

Admiral
Joined
Jan 13, 2006
Messages
6,237
Re: i386 Boat Restoration. (Crosby Sled)

I am not sure if i am reading this right...but if you intend to cut down the fianl finish you will be dissapointed. Perfection forms some kind of film when it dries hard, I have wet sanded the final finsih with 1500 and was never able to bring back that original mirror like finish. Glossy yes but not near the luster the orignal paint has.
 

Stoutcat

Petty Officer 2nd Class
Joined
Aug 6, 2008
Messages
180
Re: i386 Boat Restoration. (Crosby Sled)

Hi,

The following is going to sound crazy, but here goes...

Keep in mind that I've never done this with paint (only varnish, poly, poly/oil, and poly/wax), but I'd bet dimes to donuts it will work. You probably will need to thin, but my guess is that it will work.

First get on a base coat in the usual fashion (brush 2 -3 coats primer; 2-3 coats final...) Get it to the point where you're comfortable with a 220 grit sanding. Next sand with even a higher grit. (I jump right to emery cloth.) That done, clean thoroughly. Surface must be dust free. Finally, instead of a brush, foam, or roller, put on a pair of quality latex gloves and dip a clean, thin cotton rag (I use a piece from a withered old t-shirt) and wipe the paint/finish onto the surface. It's crucial that the coat is as thin as you can make it, and that you hustle. Once the cotton is saturated, your hands will feel what your eye can't see. (Until of course you're out on that reflective water. Sunlight bouncing off water shows all sins.) After that sets completely, hit the hull with finer steel wool and repeat. You'll know when to stop.

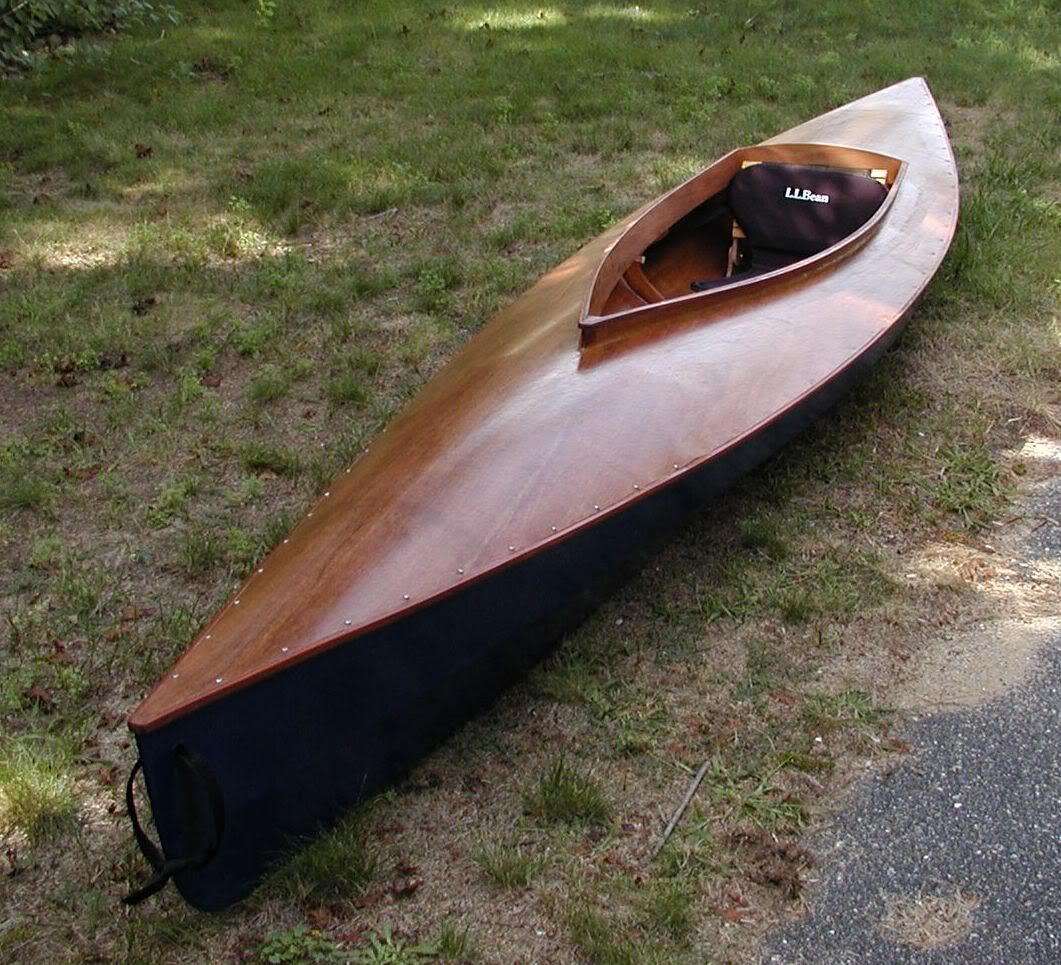
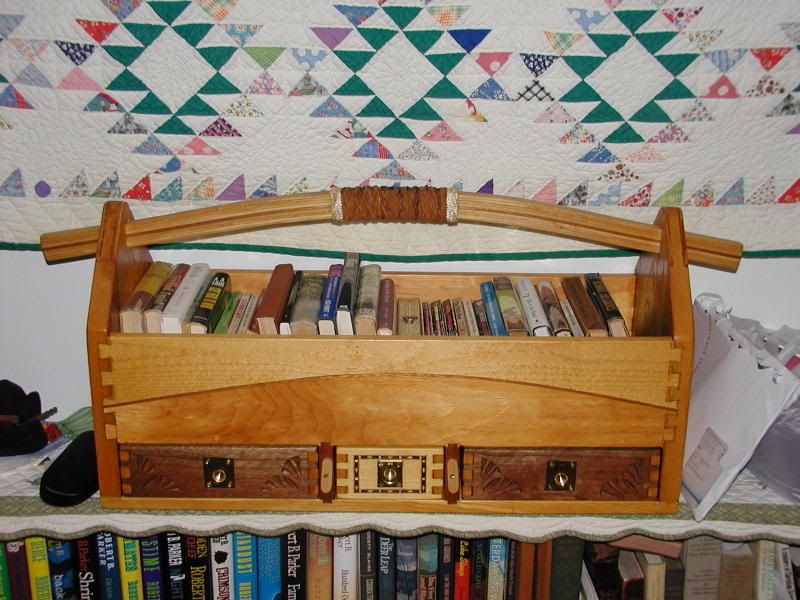
I used this technique on the foredeck of my wife's kayak and on the toolbox/bookbox below. (Satin finish both.) The final finish is something like a Martin guitar.

1yak2a.jpg


P2042336.jpg


I learned this trick from an article by cabinetmaker Sam Maloof. It takes time, experimenting, and practice, but if you really want a smooth surface...

Curious to see how it works with paint...

Alan
 

i386

Captain
Joined
Aug 24, 2004
Messages
3,548
Re: i386 Boat Restoration. (Crosby Sled)

I am not sure if i am reading this right...but if you intend to cut down the fianl finish you will be dissapointed. Perfection forms some kind of film when it dries hard, I have wet sanded the final finsih with 1500 and was never able to bring back that original mirror like finish. Glossy yes but not near the luster the orignal paint has.

Yea, I'm starting to think the same thing. I'm sure the clay, which isn't an abrasive will take care of it. If not it not that big of a deal. You have to get right down on it to notice.
 

i386

Captain
Joined
Aug 24, 2004
Messages
3,548
Re: i386 Boat Restoration. (Crosby Sled)

Hi,

The following is going to sound crazy, but here goes...

Sounds similar to the french polish technique used in stringed instrument finishes.

I don't think the paint I'm working with would work with that technique. The paint actually gives a great finish just following the instructions. The only little problem I have is that I'm doing it outside and the dust in the air sticks to the paint.

Nice kayak btw.:)
 

Stoutcat

Petty Officer 2nd Class
Joined
Aug 6, 2008
Messages
180
Re: i386 Boat Restoration. (Crosby Sled)

Hi i386,

Excellent points both... It is like a french polish. And yes, outside would probably not work because of dust.

I'll fuss with it in paint when I can. (Still don't know if it will work, but under the right conditions I think it will...)

It's tough to explain the difference between using a brush and applying by physical hand. I guess the best analogy I can come up with is the difference of spraying PAM on a cookie sheet vs. spreading margarine by hand. With the hand you can simply feel the "thick" and "thin" areas of finish.

Anyway Mike, you've done an amazing job on the Sled, and I've posted a link to your album on one of the wooden boat building forums I moderate... It's one thing to build from scratch, and an entirely (and much more difficult) to resurrect from the dead - and you have done just that. Take a bow dude... you've earned it.

Alan

P.S. I've just been reading through your entire thread, and back in Aug of 2004 you wrote,

I think some call it a reality check. It's still a little ol' 15' fiberglass boat with an antique 33hp engine on it. It's going to be fun, rewarding all that. But it's not going to be "the one" that I'm gonna go nuts on. I'll start looking for that one when I'm done. I still wanna build one from scratch.

If you still want to go ahead with a wood boat, check out the forum on instantboats.com. We're not just "Instant Boats" guys and Bolger freaks. There are folks there who are really dialed in to the art of wooden boat building. I think you'd like the crowd.
 

JG_2-Stroke

Cadet
Joined
Aug 21, 2008
Messages
24
Re: i386 Boat Restoration. (Crosby Sled)

Wow, glad to find this thread. I fixed up a couple of outboards and needed something to run them on. So, here's what I'm starting with...picked it up last Friday 10/17/08... took it on the river Sunday.....with my '56 Johnson 10 hp and a floor full of waterlogged foam it ran 15.5 on the GPS... I also have a '56 Johnson 15 hp to run on it.
Check out my pictures..... i386, what did you do with those 'triangles'? There was a fish finder mounted on the one aft, and I was thinking of flattening the one forward and making it into a cup holder. Coincidence, I have a bottle of Lite in my picture!!..

http://picasaweb.google.com/Jim1613/Crosby#slideshow/5259764366324504786
 

Stoutcat

Petty Officer 2nd Class
Joined
Aug 6, 2008
Messages
180
Re: i386 Boat Restoration. (Crosby Sled)

Hi JG,

Thoughts...

* You might want to start your own thread on this one... (And it would make for a great thread too!)

* If your neighbors don't like what they see, that just proves that they don't know how to look - that's a beautiful boat! The lines are fantastic. Some work and they'll be asking for a ride, and you can take that to the bank.

* Great Johnson Sea Horse... My wife has taken to classic boat motors and if she sees that one, I'm doomed I tell you... Doomed! :)

Lastly, just stick with the folks on this forum, and you are all set!

Alan
 

JG_2-Stroke

Cadet
Joined
Aug 21, 2008
Messages
24
Re: i386 Boat Restoration. (Crosby Sled)

Alan,

Thanks! I'm a noob at rebuilding motors, boats, and forums! Better not let the wife see my first motor restoration, it's the bigger brother of the 10 hp.
It pushed a friend's 14 ft fiberglass trihull gamefisher 23.7 on the GPS, so I'm hoping for the same when it's on the Crosby!
 

Attachments

  • FD-10 before.jpg
    FD-10 before.jpg
    76.6 KB · Views: 0
  • FD-10 after.jpg
    FD-10 after.jpg
    96 KB · Views: 0

i386

Captain
Joined
Aug 24, 2004
Messages
3,548
Re: i386 Boat Restoration. (Crosby Sled)

Wow, glad to find this thread. I fixed up a couple of outboards and needed something to run them on. So, here's what I'm starting with...picked it up last Friday 10/17/08... took it on the river Sunday.....with my '56 Johnson 10 hp and a floor full of waterlogged foam it ran 15.5 on the GPS... I also have a '56 Johnson 15 hp to run on it.
Check out my pictures..... i386, what did you do with those 'triangles'? There was a fish finder mounted on the one aft, and I was thinking of flattening the one forward and making it into a cup holder. Coincidence, I have a bottle of Lite in my picture!!..

http://picasaweb.google.com/Jim1613/Crosby#slideshow/5259764366324504786

DSC00652.JPG


That's a pretty one.:D

On my boat, the aft triangle is what the console is mounted to. My guess is that a configuration was offered with the same console mounted forward.

I'm planning on removing the one near the bow to make room for a casting deck.

You'll need to remove the cap (top part) to replace the deck. Don't cut the *** end off like I did. I found out after the fact if I'd been a little more persistent I could have got it out in one piece.:rolleyes: I had no problems rejoining it, but it was just more work.

Once you get the rubrail off, run a handsaw, chisel, etc... between the cap and the skin at the stern (It's not "glued" anywhere else) to separate the two. Then pry the cap up from the bow until the back end pops out. Be careful not to tear the outer hull. Ideally, tie the bow eye to the trailer then hook a rope and pulley to the cap at the bow and lift it until it pops.

Try not to damage the rubrail. I think I'm going to have to reuse mine.
 

JG_2-Stroke

Cadet
Joined
Aug 21, 2008
Messages
24
Re: i386 Boat Restoration. (Crosby Sled)

Hi i386,

Thanks for the tip. I was worried about getting the top off after I saw your pictures...but now it sounds a little less difficult...or at least putting it back on! It seems that most of the information, although limited, I find is about a 15 footer. I have a 67 and the title says 14 ft and that's what I get when I measure it stern to bow. It has the exact same capacity plate as the one pictured in this thread - 40 hp and 950 lbs. Since I got 15 mph with my 10 horse, I think yours will really scoot with that 33 :D

Jim
 

i386

Captain
Joined
Aug 24, 2004
Messages
3,548
Re: i386 Boat Restoration. (Crosby Sled)

No problem, there's definitely things I would do different if I had to do it all over.

Cutting the cap is one of them.

Cut your deck plywood as accurately as you can. Yes you can fill the edges, but you'll waste a lot of resin and filler in the process.

Those are the really big two for me. Both just cost more time and money.

I'll be tickled if the 33 will get her up to 25mph.

This boat has no stringers, so that does simplify things compared to others. The transom design is not like most of the boats you see on here. Take lots of pictures and measurements as you get further into tearing it down.
 

JG_2-Stroke

Cadet
Joined
Aug 21, 2008
Messages
24
Re: i386 Boat Restoration. (Crosby Sled)

Mike,

OK, here come the questions! I'm rather 'tool use challenged', so how does one go about removing those rivets? Are you re-riviting the top and hull back together? or do you think I could use stainless bolts and nuts? Also, my high school geometry class was 2 years before that Crosby was built :eek:, so I'm not remembering how to figure the volume under the deck for foam? Since you've 'been there, done that'.. just how many cubic feet of foam did it take?
Thanks!

Jim
 

i386

Captain
Joined
Aug 24, 2004
Messages
3,548
Re: i386 Boat Restoration. (Crosby Sled)

Mike,

OK, here come the questions! I'm rather 'tool use challenged', so how does one go about removing those rivets? Are you re-riviting the top and hull back together? or do you think I could use stainless bolts and nuts? Also, my high school geometry class was 2 years before that Crosby was built :eek:, so I'm not remembering how to figure the volume under the deck for foam? Since you've 'been there, done that'.. just how many cubic feet of foam did it take?
Thanks!

Jim

I drilled them out. They're made of soft aluminum. You CAN use bolts, but you don't want them too long or you'll get hurt on them. I am still trying to find the best and most cost effective way. If I use solid aluminum rivets I'll end up buying some pretty specialized tools that I will never need again. If blind (Pop) rivets will work I might even use those. I'll need to find the correct size in aluminum
I used a spring loaded center punch to dimple the center of the rivets, then drilled them out. The dimple keeps the drill bit from walking off center (usually). Some required knocking out with a round punch and hammer. It took me a single evening after work.

I got the 16lb/8 cubic feet kit of foam here: http://www.shopmaninc.com/foam.html

In order for this to yield enough foam you must do this part on a very hot day (85 degrees or higher) or pre-heat the components in a bath of hot water. I barely had enough. No need in ordering a larger kit though. That's plenty if you get the temp right. If you have any left over, you'll know you did well.

By the way, I found it necessary to put the cap back in several times. I secured it temporarily with wire ties. A tapered punch or similar tool is very useful to align the to parts. Just put the tool through the hole ahead of the one you're putting the wire tie in. When it's time to remove them, just cut them with some cutting pliers (dykes).
 

Stoutcat

Petty Officer 2nd Class
Joined
Aug 6, 2008
Messages
180
Re: i386 Boat Restoration. (Crosby Sled)

Concerning i386's point about cutting the deck to minimize resin and filler... The process i'd suggest is "spiling". Basically, Spiling is no more than transferring curvature or awkward angle to templates using fixed planes.

To start you cobble together two rough copies (top and bottom) of the surface you want to deck. (See: http://sendthemnorth.blogspot.com/2008/09/patterns-and-spiling.html)

Once you have the rough copy, you can use a compass to transfer the curvature of the actual hull to the copy and then cut the copy to the exact shape of the hull... Be sure to test fit, and be sure to use a consistent longitudinal line for reference!

So why two spilings? The first spiling will be made of thin cardboard (I use opened and flat 30 pack boxes) and will represent the underside of the deck panel. The second spiling will be made of scrap that has the same thickness as your deck to be. Again, keep a close eye on that reference line and use whatever means to make the spiling stay in place while you're drawing with the compass level with the scrap.

Once you're done with the steps above you should have two copies of the outline of the deck. One for the top surface of the deck panel, and one for the bottom surface of the deck panel. These are no more than templates.

Now that you're sure that you've got everything hunky dory (reference lines etc.) cut out your deck piece to the "larger" of the two templates.

Finally, using your reference line, place the smaller template (typically the cardboard unless you're dealing with a torpedo hull) on the underside of your freshly-cut deck material and mark - that's the line you'll need to cut/sand/grind to in order to bevel the deck to fit.

Notes:

* Ideally, you can just do the port side because the two sides should be mirror images.

* Always keep the compass at 90 degrees to the surface being scribed.

* Don't worry if you're off a little... Epoxy likes small gaps! In the pic below, I probably cut this one a little too close when I scribed the coaming into the "arrowhead".

P7300871_resized.jpg


* Spiling is like riding a bicycle... Once you "get it" it's fast and fun - almost second nature. But until then, it's misery. In other words... Practice, practice, practice! Practice cutting a piece of wood to fit a wine glass. Practice on any curved surface. But practice before the "Big Cut".

All that being said, I know I've completely mangled the description of spiling. (Trying to explain spiling by typed word is like trying to explain balance on a bicycle.) Google is a good thing.

Anyway, I hope this helps a little...

Alan
 

JG_2-Stroke

Cadet
Joined
Aug 21, 2008
Messages
24
Re: i386 Boat Restoration. (Crosby Sled)

Thanks, guys! Today I'm doing easy stuff...stripping the 2 layers of paint off of the hull... there is a black outer layer, royal blue under and then finally a real pale blue that I think is the original gel coat color. Looks like I won't be doing any foaming until next spring. I doubt if there will be any really hot days here in the midwest until then...oh, besides, I need to have a new deck built and installed before I worry about the foam!:D

OK i386, it's your thread... so I'll try not to butt in too much... thank you for your help and keep those pictures coming, I can only dream mine will someday look nearly as nice as yours!

Jim
 

i386

Captain
Joined
Aug 24, 2004
Messages
3,548
Re: i386 Boat Restoration. (Crosby Sled)

3rd coat of paint is done. 4th and final coat goes on Saturday morning. It doesn't need another coat as far as coverage goes, but I might as well use up the rest of it. No point in posting pics. It still looks the same.
 

ezmobee

Supreme Mariner
Joined
Mar 26, 2007
Messages
23,767
Re: i386 Boat Restoration. (Crosby Sled)

If the motor runs and the trailer rolls it was definitely worth it. Heck even if they don't it is. Start your own thread for your restoration questions.
 

i386

Captain
Joined
Aug 24, 2004
Messages
3,548
Re: i386 Boat Restoration. (Crosby Sled)

Cool, yet another variation I haven't seen. Looks to be in much better shape than mine was. I'd say you got a great deal.
 

bigjig

Recruit
Joined
Dec 12, 2009
Messages
1
Re: i386 Boat Restoration. (Crosby Sled)

:) Hello everyone! ... I did the complete restoration of my 1967 Crosby and FORCE 35 HP engine like a hobby... I have many videos in youtube ... these are some of them ... i386, do you have photos of the final result of your Crosby Sled proyect? ... thank you! ...:)

http://www.youtube.com/watch?v=Zn2hxwT79eQ

http://www.youtube.com/watch?v=sucDiAszkKo

http://www.youtube.com/watch?v=HiS7Z3gZ1Yk

http://www.youtube.com/watch?v=LBzq3ONWi24

http://www.youtube.com/watch?v=2OjCg2_KSTM
 
Top