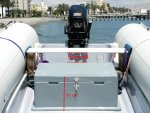
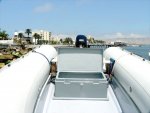
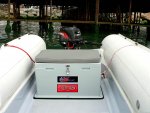
I swear...

Sea Rider

Supreme Mariner
Joined
Sep 20, 2008
Messages
12,345
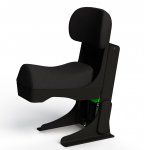
Continuing with my on line search for those nice hydraulic jockey seats have found a Canadian supplier : Shockwave, most preffered jockey seats for Bond and Bear Gryllis as seen while boating in their movies and shows.


Shockwave.jpg


​Both brands, Ullman and Shockwave claims being the best on the market, will check its prices, tech specs, shipping. Have made my mind for the Ullman's Compact model or Shockwave S2 model. Both quite appealing and best suited for reduced deck spaces.

Happy Boating
 

Exit

Seaman Apprentice
Joined
May 15, 2015
Messages
38
I think I want one of those Tiny Tachs. Looks super useful.
 

Chopperbill

Petty Officer 1st Class
Joined
Mar 26, 2014
Messages
389
Continuing with my on line search for those nice hydraulic jockey seats have found a Canadian supplier : Shockwave, most preffered jockey seats for Bond and Bear Gryllis as seen while boating in their movies and shows.


​Both brands, Ullman and Shockwave claims being the best on the market, will check its prices, tech specs, shipping. Have made my mind for the Ullman's Compact model or Shockwave S2 model. Both quite appealing and best suited for reduced deck spaces.

Happy Boating

I'd be pulling my under ware out of my crack every 5 minutes with those ball busters. LOL
 

Sea Rider

Supreme Mariner
Joined
Sep 20, 2008
Messages
12,345
Not much possibilities to choose, as like boating withs swimwear will need to pull those two up from time to time or keep injuring my lower spine, you decide. Have not seen yet hammocks nor rocking chairs as better comfy boating options to install while tiller driving at back transom.. LOL.

Happy Boating
 

Sea Rider

Supreme Mariner
Joined
Sep 20, 2008
Messages
12,345
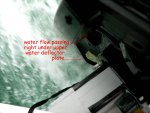
While Rib was being hoisted with crane before launching to sea, noticed that my AV plate was not parallel to lower keel, trim hole was set at second hole out transom best trim seting for my previos rescue 430 Rib. Adjusted trim to third middle hole, went for a wot spin lightly loaded and same water cond as usual and guess what ? engine has achieved + 200 RPM more than with previous second trim hole, that accounts for less water drag on AV plate which translates into more rpm, Now AV rides fully parallel to sea level when Rib is on plane.

P1230101.JPG

As posted before, my throttle grip travel was restricted to achieve just 5900 max rpm, now hitting 6200 revs, that means that if I swap for my original factory delivered 9 pitch prop, max wot rpm should increment from 5600 to 5800 rpm when grip restriction is released and same 400 Kg is maintained. Now water flow at plane is spot on dialed right under upper water flow deflector plate, ain't that sweeet.

Happy Boating
 
Last edited:

Sea Rider

Supreme Mariner
Joined
Sep 20, 2008
Messages
12,345
Went back to my original factory delivered 9 pitch prop and removed the throttle restriction. With new trim setting engine achieved 5750 out of 5800 max wot revs with same 400 Kg while solo driving. Incredible how can an engine increment + 150 revs just by trimming right, sitting at proper height and distributing weight evenly on deck. Hole shot is a bit slow compared to previos 8 pitch, but engine doesn't over rev badly at wot, top speed has been incremented and fuel consumption has been reduced. Will order a Tohatsu 8.5 pitch prop to improve hole shot along moving more load much better.

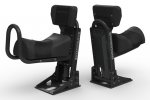
Finally been quoted the inquired suspension Jockey Seats. Ulmam model is not suited for my tillering driving purposes, too high. Shockwave has released a new heavy duty military model, has 5 height positions and the air shock is adjustable to match your choppy and wavy water cond. The only down issue is it's pricey $ 1,830 US + 50.00 shipping to any given location in Canada. A good samaritan has offered me to bring it down here as unaccompanied baggage when returning. If money transfer, paperwork, shipping turns out as expected by August 20 should be riding local seas comfy seated.

Shockwave Suspension.JPG

It's a lot of money to be invested in a seat, but eventually my back spine will be extremely thankful soon, so be it.

Happy Boating
 
Last edited:

Sea Rider

Supreme Mariner
Joined
Sep 20, 2008
Messages
12,345
Bad news, Shockwave is bussy, have a long waiting list order, so late to have one fabricated and shipped to my friends location as he is returning from Canada August 15, a pitty, had already dialed the idea to count with one. Meanwhile will need to add a adequate cushion on top alum transversal seat and throttle less while encountering choppy sea cond LOL.

Will know shortly if Tohatsu Japan still stocks 8.5 pitched props, fingers crossed. With that pitch will achieve a faster hole shot than with a 9 pitch and over rev much less that with an 8 pitch while gaining slight more top end speed that with an 8. Can't have both worlds at same time as one opposes the other.

Happy Boating
 

Sea Rider

Supreme Mariner
Joined
Sep 20, 2008
Messages
12,345
After inquiring for an 8.5 pitch prop at Tohatsu Argentina, Japan with no avail, my last resource was sending my current 9 pitch prop to a prop shop in Texas to have it repitched to 8.5, although the cost is about the same as buying a new prop the shipping cost from my location to Texas and backwards was prohibited.

Searched Iboats props but don't stock medium pitched props, just full numbers which achieves + 500 RPM per one less pitch and I only need max 200-250 RPM, a half pitch should achieve that. Found a original 8.5 Tohatsu prop excellent priced at Boats, already placed the order, will be shipped via UPS, can hardly wait to install it and check its performance.

Happy Boating
 

Chopperbill

Petty Officer 1st Class
Joined
Mar 26, 2014
Messages
389
After inquiring for an 8.5 pitch prop at Tohatsu Argentina, Japan with no avail, my last resource was sending my current 9 pitch prop to a prop shop in Texas to have it repitched to 8.5, although the cost is about the same as buying a new prop the shipping cost from my location to Texas and backwards was prohibited.

Searched Iboats props but don't stock medium pitched props, just full numbers which achieves + 500 RPM per one less pitch and I only need max 200-250 RPM, a half pitch should achieve that. Found a original 8.5 Tohatsu prop excellent priced at Boats, already placed the order, will be shipped via UPS, can hardly wait to install it and check its performance.

Happy Boating

Found this how to repitch your own prop
 

Sea Rider

Supreme Mariner
Joined
Sep 20, 2008
Messages
12,345
Gee my new prop enthusiasm has fallen into the deep blue. Hate when someone swears by Neptune that's stock to find later that's not so and when you have already made the on line purchase procedure. Boats don't have it in stock nor possible to get me one from Tohatsu as this half size pitch is no longer being fabricated. Wanted to send me a 9 pitch which already have 2 and useless for my planed top prop maximization.

Thanks CB for the link, very nice but those guys are pro repitching props, don't have the measuring tool that indicates pitch, besides will need to have that repitched prop properly balanced, too complicated. Was planing placing a 9.8 HP prop 8.3 pitch onto my 18 HP, but don't know if it's same shaft diam, splines shape and number of them. My last option is to buy another 3 blade same diam 8 or 9 pitch in USA, have it sent to a prop shop in Dallas for a repitch and balance and once done sent it down here by UPS courier. That should cost around 150 bucks or bit more, but for my boating peace will be the way to go...

Happy Boating
 

Sea Rider

Supreme Mariner
Joined
Sep 20, 2008
Messages
12,345
Turning a $59 Tohatsu Prop into a $ 282 one.-

OEM Tohatsu Prop 8.2 x 9.0 $ 58.95
USPS from Fla to N.Texas $ 10.95
Repitch from 9.0 to 8.5 $ 53.90
UPS Worldwide Shipping $ 209.53
Wire Transfer to Texas $ 18.00
Local UPS Handling $ 30.50
Total : $ 281.43

I'm crazy myself but not insane to spend that huge amount on another prop to pull +200 revs up. Menawhile depending on the load will need to play with both 8 & 9 OEM props till a good samaritan can bring it to me inside a suitcase. UPS prohibitive shipping rates has finally killed my second & last enthusiasm.

Happy Boating
 

Chopperbill

Petty Officer 1st Class
Joined
Mar 26, 2014
Messages
389
$59 for a prop and no more pitch than you need, I'd take it to the work bench a take a chance And try it myself. What can you hurt especially after messing with it all this time? I bent one up last year and with a hammer on a picnic bench made it as good as new.
 

Sea Rider

Supreme Mariner
Joined
Sep 20, 2008
Messages
12,345
Unfortunately a 8.5 pitch is the one needed as not to change props while boating with less or more load on deck. A variable pitch prop would have been ideal. Thanks, but prefer the pros to do that kind of work specially if liking boating near full revs, a badly done repitch work could make prop to vibrate at high revs and in the short run ruin my lower leg oil seals. Will check locally if a boat builder can do the work or wait for anyone that can bring it here in a near future.

Happy Boating
 

Chopperbill

Petty Officer 1st Class
Joined
Mar 26, 2014
Messages
389
I hit rocks and thought I just hit lower unit. Ran fine just cruising all day. Went to go full speed and the rpm was about 300 short and couldn't reach full speed. No vibration at all. Got back to shore and finally looked at my prop. Bent all to hell. Just pounded it out with a hammer and it ran like new.
 

Sea Rider

Supreme Mariner
Joined
Sep 20, 2008
Messages
12,345
After boating with 2-3 up decided to keep the 8 pitch on my 18 and use the niner as a paperweight. Already used to hear the 18 revving bit higher than with a 9, but hole shot with more load is outstanding, combo jumps on plane near immediately at 3/4 throttle. Loosing 1.5 KM at wot is no big deal as no one really runs full hammer down all the time, besides consumes more fuel...

Ordered a driving seat with huge locker and upper cushion, will remove transversal seat as it's not comfy to seat for long boating periods, my butt and back spine resents really bad. The only down issues as there's always one, factory sent the wrong height seat. Need a 41 cm height as my bow is high, if used that way will hardly see anything up front. My fiberglass tech is rising it to 41 cm height, once top cushion is added will have 45 cm total height.

SR 450 Seat 1.JPG

Besides comfy driving will distribute better the weight forward that now lives aft as 3.5 gal fuel tank, water bottles, small cooler, electronic gadgets, all of which will be stored inside huge seat locker. If all goes as expected, weekend should see it installed on deck.

SR 450 Seat 2.JPG

Happy Boating
 

Sea Rider

Supreme Mariner
Joined
Sep 20, 2008
Messages
12,345
My fiberglass techie has done a work of art rising + 10 cm ideal needed seat height, with cushion installed has total 44 cm height, water test was comfy for tiller driving throughout any water condition along close turns at any speed. Storage capacity has been incremented, all the things that used to hinder around transom and bow are now stored there. Seat has been installed bit to starbord side, this will compensate prop rotating right hand and turning Rib to port when lightly loaded along solo boating.

450 Seat.JPG

Happy Boating
 

gwozhog

Petty Officer 2nd Class
Joined
Sep 19, 2012
Messages
138
wow you have a really good glass guy. It looks like it made that way from the factory.
 

Sea Rider

Supreme Mariner
Joined
Sep 20, 2008
Messages
12,345
Tohatsu 18 HP Restoration.-

Weeks back my 2 strokes 18 developed throttle hesitations issues when opening her past fast idle speed. Having worked continuously for 2 years and clocked 600 run hours decided to tear the powerhead and check its interior condition to latter perform a full preventive maintenance.

The powerhead is just a part of the whole OB, as deslike doing partial preventive maintenances decided to tear the whole OB down in sections and restore each one independently while documenting with data & pics lower leg to powerhead full restoration. Found amazing things while restoring OB to its out of the box condition.

Lower Leg.-
Drained old gear lube and replenished with Amalie API 80-90 multi grade gear oil. Original trim tab which is rather small in size was changed for a larger and wider one that fits the 30 HP model, will protect more efficiently lower leg against corrosion.

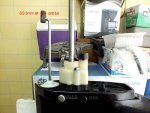
If spring pin that holds shift rod onto coupler gets seized due to salt or oxidation, will be a real PITA to remove it, will need to bang pin hard with same or bit less diam tool extractor consequently making coupler to swing and bang sideways against leg.
01.JPG

Don’t plan anymore installing original spring pin, for practical purposes, got a SS 3mm diam drill bit, was cut same width as coupler, greased interior of upper coupler and pin hole, inserted lower shift rod along pin, wiped all grease excess around coupler and wrapped tight 3-4 turns of 3M electric tape around coupler and voil?. Nope, water won’t unstick tape to coupler. To remove lower leg will only take the time it takes you to remove 4 lower bolts and push the new drill bit out with whatever you like.

If wanting to find water pump housing and adjacent area clean with no salt formations on next lower leg removal, brush small amounts of water grease onto every visible part, include drive shaft length as well.

The liner will always be found with micro round scratches around its circumference due to salt water, particles, debris, sand, you name it while impeller pumps water upwards. To remove those scratches, polished with toothpaste the liner interior circumference to extreme smooth condition. It’s done religiously every 300 worked hours along an impeller flip, but that’s me, has worked fine for all my OB’s. Been doing it for years and this 18 was no exception.
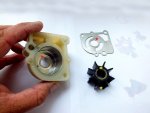
02.JPG

Polishing the liner makes the impeller to last really long while pumping water with excellent pressure. Only possible if impeller vanes are not bottom cracked, are fresh and extremely flexible. NOTE : The (red*) shown on upper liner and lower plate is the molded groove made by upper and lower impeller edges (yellow*) produced when turns at high speed. Nope, the grooves will not lessen impeller pumping pressure. Tohatsu impellers outlasts any other impeller brand by far in durability and proven quality.

Middle Leg.-
Discovered on previous restorations that upper pan water labyrinth feeds water to the internal peeing port. The water connection between labyrinth’s upper peeing port and outer peeing port is not straight, will not meet. There’s a small hidden water chamber like under rear right hand labyrinth where both internally meet.
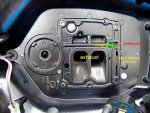
03.JPG

Due to use, water, 2 stroke oil, temp a gelatin sludge forms on sludge green area reducing the amount of water going inside upper peeing port and consequently into small water chamber. Poking a wire, cannula up/down peeing port won’t do much, as there’s no direct connection between both. Have seen cases were complete water pump was changed with no avail whatsoever. Bad music, nobody knew about this hidden water chamber issue. Now you know..

To clear the labyrinth sludge will need to remove thermo and connect a water hose delivering high pressurized water to flush powerhead for some minutes till partial obstruction is cleared and port pees back like a teenager again. A second port (w) to screw flusher adapter was found when disassembling exterior exhaust cover. It’s not mentioned on Owner’s or Service Manuals. Can be used to flush powerhead water paths too same as if flushing through thermo port.
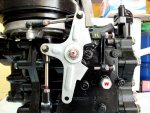
04.JPG

Salt clogs formed inside chamber will limit water outing peeing port, water pump could be blamed for that. In that case insert delivered cannula up port and squirt an overdose of W40 or carb cleaner into chamber, let soak for some minutes to dissolve salt clog. Flush again and check if correct peeing was restored. A Throttle Limiter (TL) was installed, turning limiter CCW will limit the wot operating fully, ideal for kids, women, fearful people when like boating at reduced speeds LOL!!

Swivel Bracket Assy.-
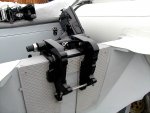
05.JPG

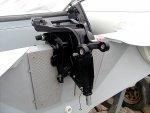
Was completely disassembled, Steering shaft, swivel bracket & bushings, all rotating parts were cleaned with acrylic thinner, greased, assembled back and properly adjusted including throttle grip steering load.
06.JPG

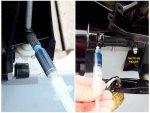
To properly grease swivel bracket and throttle grip pinion & collar without the aide of a grease gun which don’t have nor plan buying, had to use my imagination and develop a grease syringe, it’s a 5 CC syringe filled with OMC grease and fitted with different top fittings for diverse small grease jobs.
06.5.JPG

Made the work as intended, don’t need to add a ton of grease till over filled, the right amount will suffice. Can re grease anytime when needed.

Reverse Lock.-
07.JPG

08.JPG

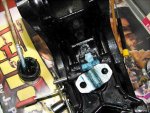
Tilt Stopper and adjacent movable parts were disassembled, cleaned, greased and assembled back for a smooth trouble free pivoting operation when raising lower leg for shallow water operation or when fully tilting OB up.

Upper Pan Cover.-
Base gasket was found with half of it missing, was burned out by exhaust. Should be replaced at each 300 worked hours, if not exhaust noise and fumes will be increased along water draining on pan.

09.JPG

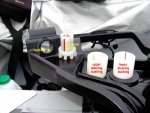
All sliding and rotating parts as shift lever, throttle grip & mechanism, advancer arm were disassembled, cleaned, greased and assembled back for a smooth throttle operation. If OB has excessive side play when bouncing lower leg back and forth, change both steering white bushings, grease them well before are placed inside of swivel bracket body.
10.JPG

Sometimes due to alt formations, dried grease throttle grip tuns hard to rotate. To smooth it out, remove steering handle. disconnect throttle shaft from rod joint and pull backwards. Pull pinion and file it down gently to smooth it out, same with internal bushing, fill middle groove with water grease and slide pinion back in, connect back what was previously removed.

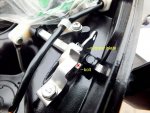
There’s a hidden bolt side to shift lever stopper plate, is bolt becomes loose with use will have unwanted starter lock issues. Adjust this bolt as it’s not delivered that tight before that happens.
12.JPG


Powerhead.-

13.JPG

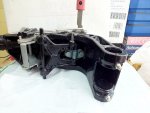
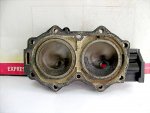
Crankcase & cylinder head water paths were found clean, slightly salted and oxidized, with no internal erosion whatsoever.
14.JPG

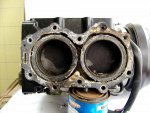
Internal cylinder head and pistons were found slightly carbonized due to high quality 2 strokes oil, premium fuels, engine tuner use along boating usually at ? throttle range which gives a excellent fuel consumption rate.

Inner Exhaust Cover & Chamber.-
15.JPG

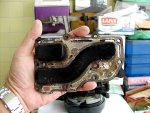
Was found pretty carbonized with thick carbon crust layer. Was decarboned to perfection. Managed to restore both thick inner & outer cover gaskets. All internal water paths were cleaned, a new internal anode was installed. Previous was found extreme salted and eroded.
16.JPG

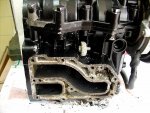
A fast way to decarbonise cylinder head is to dip it in a soda caustic solution bath for one hour and brush it off with a soft metal brush to immaculate clean cond. Repeat procedure if still needed.
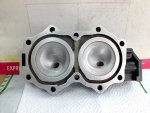
17.JPG

Internal cylinder and piston heads were hand polished with green pad and toothpaste to a perfect smooth condition, with new plugs and new head gasket for opt combustion, will collect less carbon build up than when remaining porous as factory delivered.
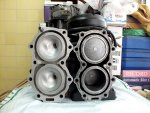
18.JPG

Tohatsu recommends to retorque cylinder head, exhaust cover and base gasket soon after break in period ends, heat compresses head gasket, what was factory torqued will no longer remain same, that’s why a first retorque with torque wrench is mandatory. It’s advised to retorque all mentioned gaskets after every 100 worked hours and a head gasket, base gasket change every 300 hours for OB to work with trouble free operation throughout the whole throttle range. If it’s not done gaskets will be screwed much faster.

Continues on page 9..
 
Last edited:
Top