I have returned... with a Starcraft this time!

BWR1953

Admiral
Joined
Jan 23, 2009
Messages
6,235
I did some more hole filling by myself this morning. Man, there were a lot of holes. Still have some left that I can't reach! The boy will have to do those. And I ended up having to use a heating pad on my knee for a couple hours after my work this morning. D'oh.

Still plenty of work to do before the hull is ready to paint. Slow I know, but getting there... :)

1.jpg

Went back out this evening and removed the anchor chock from the bow nose cap and discovered that the cap wasn't actually fastened down at all. :rolleyes: I could slide it back and forth across the bow, revealing gunk underneath. That will all be cleaned up prior to painting.

The cap will be riveted down after I fill a few holes. :cool:
2.jpg

3.jpg
 

Attachments

  • 3.jpg
    3.jpg
    765.3 KB · Views: 0

BWR1953

Admiral
Joined
Jan 23, 2009
Messages
6,235
BWR1953 that's how I filled my gunwale holes also. It's pretty easy material to work with just a little stinky :lol:

looking good!
How did you sand it down? I'm thinking of using 100 grit paper with my electric palm sander. Could take awhile though with how thick the stuff is and how many holes I have! :lol:

I'm going to have to buy still more JB WaterWeld today to finish up the holes I have left. :rolleyes:
 

MD28

Petty Officer 1st Class
Joined
Sep 1, 2016
Messages
222
I used 60 grit to get it done fast then recovered with regular jb which goes on smoother with a puddy knife. Then I sanded that down with 100 or 120 I think.
 

MD28

Petty Officer 1st Class
Joined
Sep 1, 2016
Messages
222
In the end it wasn’t necessary for me to do that because I covered it with nautolex which covers a host of sins. At the time I was planning on painting the gunnels
 

nrf414

Chief Petty Officer
Joined
Feb 16, 2008
Messages
573
I used 60 grit to get it done fast then recovered with regular jb which goes on smoother with a puddy knife. Then I sanded that down with 100 or 120 I think.

BWR1953 I did it this way minus the reg JB over top. Gets it pretty smooth. Finished with 220 grit and worked out pretty good.
 

BWR1953

Admiral
Joined
Jan 23, 2009
Messages
6,235
So I ended up using my rotary tool with an 80 grit sanding drum attached to cut through the bulk of the JB WaterWeld. Worked like a charm. It cut through that JB like a hot knife through soft butter. I had to be careful not to be too aggressive, lest I dig a hole in the aluminum.

Followed up with the palm sander with 100 grit paper to get things flattened out. Not done yet but it's working well so far.

Completely ran out of JB Weld and still have more holes to fill on the gunwale side panels. And I also found several holes where the JB was improperly mixed and still not cured. Will need to replace those "plugs" as well. I have errands to run tomorrow morning so will plan on getting more while I'm out and about.

This was the way to go.
1.jpg

Look at that JB fly!
4.jpg
 

Attachments

  • 3.jpg
    3.jpg
    366.4 KB · Views: 0
  • 2.jpg
    2.jpg
    346.1 KB · Views: 0

Watermann

Starmada Splash of the Year 2014
Joined
Jan 12, 2013
Messages
13,804
Oh yeah a body and fender man in the making right there :lol:

I love ordering parts for boats but where they get here is when I really get to have fun.
 

BWR1953

Admiral
Joined
Jan 23, 2009
Messages
6,235
Oh yeah a body and fender man in the making right there :lol:

I love ordering parts for boats but where they get here is when I really get to have fun.
Oh Lawdy I hope not! :eek: Unless you mean the boy, then it's okay! :lol:

Spending money on parts for boats is always easy! :p
 

BWR1953

Admiral
Joined
Jan 23, 2009
Messages
6,235
Well, the pressure is on again. Our summer vacation starts 9 weeks from today. Last month we made reservations for a lakefront rental with a dock up in Georgia. Really looking forward to taking the KF up there and having a nice, relaxing time.

Last year's vacation was nice but pressured because of all the driving and activities. This year we're just going to park our butts, take it easy and do lots of fishing. :fish2:

Lots and lots of work to do in order to get the KF ready prior to the trip. But it'll be worth the effort I think!

Here's what the vacation place looks like. Bass boat not included, but that is the dock. :D

v1.jpg

v2.jpg
 

Attachments

  • v1.jpg
    v1.jpg
    80.6 KB · Views: 1
  • v3.jpg
    v3.jpg
    82.9 KB · Views: 1

Decker83

Commander
Joined
Apr 5, 2011
Messages
2,593
That sounds like an exciting vacation. Very nice scenery.. Don't let the pressure over take ya.. Just keep plugging away..:llama:
 

BWR1953

Admiral
Joined
Jan 23, 2009
Messages
6,235
Three steps forward, one step back. So went today. :rolleyes:

A learning experience for the boy though. :cool:

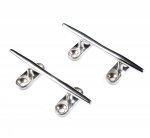
Received the new stainless cleats today. They're smaller than the old Zamak cleats that were previously on the KF but they'll work just fine. We rarely use the cleats anyway.
1.jpg

3.jpg
 

Attachments

  • 9.jpg
    9.jpg
    319.3 KB · Views: 1
  • 10.jpg
    10.jpg
    128 KB · Views: 1
  • 7.jpg
    7.jpg
    456.5 KB · Views: 1
  • 2.jpg
    2.jpg
    728.6 KB · Views: 1
  • 8.jpg
    8.jpg
    363.5 KB · Views: 1

BWR1953

Admiral
Joined
Jan 23, 2009
Messages
6,235
Made some more progress today. Not as much as I'd hoped since we lost 4 or 5 hours of work from the JBWW issue yesterday.

I'd hoped today to finish refilling the "bad" holes, grind them down, do some additional cleanup then turtle the hull. Didn't happen though. But we did find a couple dozen more holes that needed to be filled. :facepalm:

My rotary tool sanding drum gave up the ghost about 4:30 so that ended that. I'll buy replacements tomorrow. Also ran out of time this afternoon. We had a "hard" cutoff time of 5pm so that we could enjoy family time with my wife and so all of us could watch a movie together.

The boy and I reached an agreement today. I mixed up the JBWW to be sure that it was done correctly and the boy helped me plug the holes. I kept an eye on him this time to make sure that all went well. No problems today.

1.jpg

And the source of many new holes... the console. Rediscovered it today while cleaning up the garage.
3.jpg

I miss the old days when I had a shed to keep all the carp in. We spent quite a bit of time cleaning and reorganizing today in preparation of flipping the KF hull. Of course, had we not spent the time cleaning/clearing, we could have flipped the hull. Maybe. :rolleyes:
5.jpg
 

Attachments

  • 2.jpg
    2.jpg
    364.4 KB · Views: 0
  • 4.jpg
    4.jpg
    403.2 KB · Views: 0

BWR1953

Admiral
Joined
Jan 23, 2009
Messages
6,235
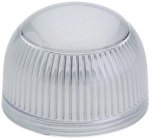
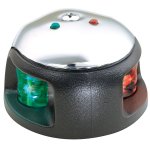
Received this nav/anchor light base today. So now, with the donor boat leftovers, I have 2 working units for the KF.

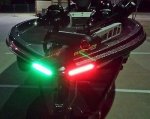
But it does bring up some consternation for me. I do have the LED style nav lights for the bow but they're not USCG approved. Bought them a year or more ago.

We don't actually use the boat after dark but I know that we could get "caught out" late after sunset if the fish are biting really well. It's happened in my past so I'll have the lights, needed or not.

The question begs, do I cut even more holes in the bow to mount a standard light or not? If I use the LED style, I'll have to do more work for that as well. Plus I'd still have to do the standard ones anyway, just to be sure.

I dunno. :confused:

6.jpg

The very cool looking LED lights which I know are going to end up being more work than I anticipate. :cool:
LED Bow Light.jpg
 

Watermann

Starmada Splash of the Year 2014
Joined
Jan 12, 2013
Messages
13,804
Amazing the people they'll sell drills to isn't it? :lol:

The Nav LED lights were easy enough I thought, I stuck them under the RR on the hull. I drilled a hole from the bottom side of the RR and ran the wires to the open point of the bow. The wires lay behind the RR insert and sealed the hole with the wires in it, I think I used liquid tape so there'd be no rubbing.
 

Renderwurx

Petty Officer 2nd Class
Joined
Aug 14, 2017
Messages
189
The only issue I see with the LED strip nav lights is whether they are visible from the full required range of 112.5 degrees port and starboard.

Because of how boats curve in at the bow, the angle of the loght's visibility may not reach the full 112.5 degrees. One way to check is to temp mount a USCG approved light on the nose and the strip lights too and see if you can see the strips as far angled as the standard nav light.

MmSkNwR.jpg
 

baldwibr

Petty Officer 2nd Class
Joined
Sep 1, 2017
Messages
128
Here's the problem with the LED strips. If you look at your boat from dead ahead, you should see both red and green. However, by moving toward one side just 1-3º you should then see only one light. If you still see two lights, an approaching vessel won't be able to tell which direction your are going. The LED strips will have both lights visible for too wide of a range. You may want something like the one below instead...

Also, your boat is less than 12 meters, so you will only have 1 all around stern light.

nav light.jpg
 

BWR1953

Admiral
Joined
Jan 23, 2009
Messages
6,235
Amazing the people they'll sell drills to isn't it? :lol:

The Nav LED lights were easy enough I thought, I stuck them under the RR on the hull. I drilled a hole from the bottom side of the RR and ran the wires to the open point of the bow. The wires lay behind the RR insert and sealed the hole with the wires in it, I think I used liquid tape so there'd be no rubbing.

Yeah, those holes sucked up a lot of time. :grumpy:

Do you have a pic of your LED bow light installation?
 
Top