I have returned... with a Starcraft this time!

BWR1953

Admiral
Joined
Jan 23, 2009
Messages
6,178
WTH is this all about?? :noidea:

After I tweaked the carbs, I reinstalled the cowling and while doing so, I noticed that the engine was REALLY loosey-goosey!

I have no idea why. :confused:

Hep hep! :eek:


Watermann

Starmada Splash of the Year 2014
Joined
Jan 12, 2013
Messages
13,787
Check the reverse lock, looks to me like it was staying engaged.
 

RStewart

Seaman
Joined
Dec 21, 2014
Messages
62
Man oh man, what a job you and the crew did on that boat. I've only checked in a couple times but I've read the entire thread and I'm not sure what I'm most impressed with, the work on the boat or your perseverance. The boat really looks good.
 

BWR1953

Admiral
Joined
Jan 23, 2009
Messages
6,178
Check the reverse lock, looks to me like it was staying engaged.

The motor has power tilt & trim and there's no mechanical reverse lock on this model. It uses the hydraulics for that.

It's absolutely miserable outside so the boy and I are taking the day off. I'll have to investigate starting tomorrow. It's HOT out there and the humidity is incredible. Typical Florida summer, so we're gonna just chill a bit. :cool:
 

BWR1953

Admiral
Joined
Jan 23, 2009
Messages
6,178
Man oh man, what a job you and the crew did on that boat. I've only checked in a couple times but I've read the entire thread and I'm not sure what I'm most impressed with, the work on the boat or your perseverance. The boat really looks good.

Thanks!

It's been quite a project and a significant learning experience. Now that the boat is operational, we just have a little more tweaking to do. And I'm also planning on ordering a custom cover for the boat as well. Then it'll be COMPLETELY finished and I'll be able to move on to other things. :D
 

BWR1953

Admiral
Joined
Jan 23, 2009
Messages
6,178
A short video I took this morning. There's definitely something loose in there. How do I start taking it apart? My manual isn't real helpful in that regard. :rolleyes:


BWR1953

Admiral
Joined
Jan 23, 2009
Messages
6,178
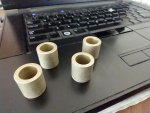
A buddy stopped by for a quick visit and I was yakking with him about the motor slop. He noticed these bad bushings right away. Cool.


Watermann

Starmada Splash of the Year 2014
Joined
Jan 12, 2013
Messages
13,787
The 2 of you were pulling on a different axis, when you were moving side to side and the motor was moving, so was the steering ram. My 115 Merc with new SeaStar NFB helm and cable moves too, maybe about half as much but there's always going to be some play in the cable steering, only hydraulic won't have play like that. Test that out by turning the wheel and see how far it turns before the motor starts moving. Then have the boy take up the slack with the wheel and when the motor starts to move have him hold it tight then do that side to side test again and see what happens.

If that pivot point on the motor is worn out that would surprise me, it's greased steel in there.

The up and down axis, yeah those rubber bushings are compressed and worn out but it's not what's causing the steering play.
 

BWR1953

Admiral
Joined
Jan 23, 2009
Messages
6,178
We took a couple days off but went back out to the garage this morning for a look-see at the motor play.


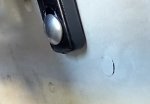
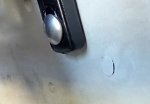
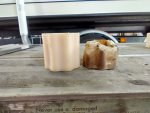
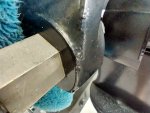
In the process of investigating the motor play, I noticed this JB WaterWeld plug pooching out a little. Yikes! :eek:
1.jpg

I sanded off the lump and examined carefully. Apparently, this JBWW plug was pushed out a little when I installed the motor knee brace bracket.
4.jpg


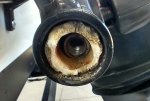
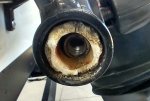
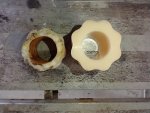
The trim cylinder spacer even has a chunk missing. :facepalm:
5.jpg
 

Attachments

  • 1.jpg
    1.jpg
    94.6 KB · Views: 0
  • 4.jpg
    4.jpg
    387.5 KB · Views: 0
  • 5.jpg
    5.jpg
    555 KB · Views: 1
  • 2.jpg
    2.jpg
    532.2 KB · Views: 1
  • 2.jpg
    2.jpg
    532.2 KB · Views: 1
  • 3.jpg
    3.jpg
    825.8 KB · Views: 1
  • 3.jpg
    3.jpg
    825.8 KB · Views: 1

BWR1953

Admiral
Joined
Jan 23, 2009
Messages
6,178
The 2 of you were pulling on a different axis, when you were moving side to side and the motor was moving, so was the steering ram. My 115 Merc with new SeaStar NFB helm and cable moves too, maybe about half as much but there's always going to be some play in the cable steering, only hydraulic won't have play like that. Test that out by turning the wheel and see how far it turns before the motor starts moving. Then have the boy take up the slack with the wheel and when the motor starts to move have him hold it tight then do that side to side test again and see what happens.

If that pivot point on the motor is worn out that would surprise me, it's greased steel in there.

The up and down axis, yeah those rubber bushings are compressed and worn out but it's not what's causing the steering play.

Copy 2 axes! I'll check it out tomorrow morning, thanks! :encouragement:
 

BWR1953

Admiral
Joined
Jan 23, 2009
Messages
6,178
The 2 of you were pulling on a different axis, when you were moving side to side and the motor was moving, so was the steering ram. My 115 Merc with new SeaStar NFB helm and cable moves too, maybe about half as much but there's always going to be some play in the cable steering, only hydraulic won't have play like that. Test that out by turning the wheel and see how far it turns before the motor starts moving. Then have the boy take up the slack with the wheel and when the motor starts to move have him hold it tight then do that side to side test again and see what happens.

If that pivot point on the motor is worn out that would surprise me, it's greased steel in there.

The up and down axis, yeah those rubber bushings are compressed and worn out but it's not what's causing the steering play.

We just checked it out and you're right. Again. As usual. :p :D

The slop on the vertical axis alone was minimal and then reduced to almost nothing with the steering wheel held tight to starboard. And when the steering wheel was held tightly to port, there was no slop at all. Yay! :biggrin-new:

Bushings and spacers ordered! :nod:

As far as the idle mixture goes... I'd been cautioned by my mechanic(s) almost 6 months ago NOT to test or use the motor underway with the cowling off. But after experiencing the clean holeshot without the cowl and then having the engine bog down immediately afterwards, but with the cowling in place, I think I understand more. I'll do more tweaking and testing next time by enriching the idle mixture a little more with the cowling off, then install the cowling before running it as normal.

AFTER I get the bushings/spacers installed, natch. ;)

I'm feeling better now! :cool:
 

Watermann

Starmada Splash of the Year 2014
Joined
Jan 12, 2013
Messages
13,787
Glad you don't have to tear your motor apart to get to the swivel that's not worn. :joyous:

So when you put the cowl on the motor bogs but without it on the motor revs just fine. Have you done a link and sync procedure following the instructions for your motor and go over it to a T?. The cowl should not restrict air flow into the carbs, does your's have an air flow opening in the back top where the grab handle slot is on most motors?

Also the idle air mixture has nothing to do with your issue of bogging down as the main jets take over from the idle circuit after advancing the throttle.
 

BWR1953

Admiral
Joined
Jan 23, 2009
Messages
6,178
Glad you don't have to tear your motor apart to get to the swivel that's not worn. :joyous:

So when you put the cowl on the motor bogs but without it on the motor revs just fine. Have you done a link and sync procedure following the instructions for your motor and go over it to a T?. The cowl should not restrict air flow into the carbs, does your's have an air flow opening in the back top where the grab handle slot is on most motors?

Also the idle air mixture has nothing to do with your issue of bogging down as the main jets take over from the idle circuit after advancing the throttle.

I've done what I can with what I have and my limited outboard knowledge. Most of the tuning stuff isn't included in my Service Manual. :facepalm:

Did a lot of online research and found a wide variety of information. But not a lot that helped much.

I did find this link from an old iboats Mercury outboard thread about Link and Sync and tried to follow it as best I could. But I don't have a timing light. And the thread mentions things which don't seem to be for a Mercury. Or at least not for my model. :noidea:

https://forums.iboats.com/forum/eng...boards/390826-what-is-the-link-sync-procedure

As I understand it, the idle mixture does play a part on acceleration for a time. How long that time is, I don't know. Picoseconds? Nanoseconds? Microseconds? Milliseconds? :confused:

My motor cover doesn't have airslots anywhere. Just the holes for the shift cable and power wires.

1.jpg

2.jpg
 

BWR1953

Admiral
Joined
Jan 23, 2009
Messages
6,178
Hey guys, I received the shock bushings a couple days ago and the spacers are currently out for delivery today.

When I replace them, should I have the outboard tilted up? Down? Somewhere in between?

Thanks for any info! :joyous:
 

BWR1953

Admiral
Joined
Jan 23, 2009
Messages
6,178
I now have all the part for the trim shocks.

If the weather isn't horrible in the morning, I plan to get the things fixed. :cool:


1.jpg

2.jpg
 

Watermann

Starmada Splash of the Year 2014
Joined
Jan 12, 2013
Messages
13,787
I would use a transom saver motor toter or something similar to prop the motor in place but that motor shouldn't be so heavy to where it can't be tilted into place when you replace the bushings and put it back together.
 

BWR1953

Admiral
Joined
Jan 23, 2009
Messages
6,178
I would use a transom saver motor toter or something similar to prop the motor in place but that motor shouldn't be so heavy to where it can't be tilted into place when you replace the bushings and put it back together.
We're working on it now. How do I get the bushings and spacers out? I removed the outside bolt and the inside locknut but that's as far as I can go. I thought that I might be able to pry the stud out, but that didn't happen.

How does it work? :confused:


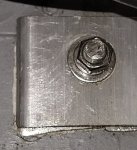
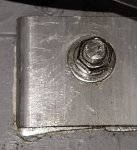
The end bolt is removed. The locknut is loose and ready for removal.
4.jpg
 

Attachments

  • 2.jpg
    2.jpg
    324 KB · Views: 0
  • 1.jpg
    1.jpg
    416.5 KB · Views: 0
  • 3.jpg
    3.jpg
    406.9 KB · Views: 0

BWR1953

Admiral
Joined
Jan 23, 2009
Messages
6,178
Fixed! :D

I'd hollered for help over on the Mercury outboard repair forum and Chris1956 helped me out. Many thanks to him! :)

All I needed to do was to remove the top cylinder bracket bolt, tilt the cylinder back and everything came loose easily. Getting it back together was simply reversing the process. I'm planning on making a detailed video so that other folks can find it if they're in the same situation.

Top bracket bolt removed, old bushings and spacers ready for removal.
6.jpg


Done!
7.jpg
 

Attachments

  • 1.jpg
    1.jpg
    170.9 KB · Views: 0
  • 1.jpg
    1.jpg
    170.9 KB · Views: 0
  • 5.jpg
    5.jpg
    221.7 KB · Views: 0
  • 4.jpg
    4.jpg
    236.2 KB · Views: 0
  • 3.jpg
    3.jpg
    262.9 KB · Views: 0
  • 2.jpg
    2.jpg
    410.2 KB · Views: 0

Watermann

Starmada Splash of the Year 2014
Joined
Jan 12, 2013
Messages
13,787
Nice work and yeah our group of Merc guys here at the forum are very knowledgeable.
 
Top