I have returned... with a Starcraft this time!

Watermann

Starmada Splash of the Year 2014
Joined
Jan 12, 2013
Messages
13,787
Congrats on the final spash! :congratulatory:

You guys did some outstanding work on the little KF and she's better than new! :clap2:
 

BWR1953

Admiral
Joined
Jan 23, 2009
Messages
6,178
Thanks for the kind words, guys. I literally could not have done it without the great help from the iboats crew! :encouragement:
 

FIGMO

Petty Officer 1st Class
Joined
Jun 18, 2017
Messages
321
BWR,

I should have clarified in my original question. I was curious how long it took you from start to finish on the boat motor? Did you have to do a lot of sanding, or did you just rough up the original coat a bit?
 

BWR1953

Admiral
Joined
Jan 23, 2009
Messages
6,178
BWR,

I should have clarified in my original question. I was curious how long it took you from start to finish on the boat motor? Did you have to do a lot of sanding, or did you just rough up the original coat a bit?

Ah. Got it. :)

I just cleaned and roughed it up, then hit it with the Mercury Light Gray Primer; 2 coats following instructions on the can.

Then 2 coats of the Mercury Phantom Black following the instructions - in this case 2 coats an hour apart. Then the next day I put on 2 more coats the same way. Worked pretty good and only took a couple days of paint drying waiting time. ;)
 

Monmouth00

Petty Officer 2nd Class
Joined
Nov 26, 2017
Messages
198
Ah, Man, what a feeling that must've been! Congratulations to all three of you. You should all be very proud of the work you've put in. I hope you enjoy it for years to come. I know you're sure to get a lot of compliments every time you take her out!

An you have what my KF never had - real horsepower to push it around!

Congrats again. You earned it!
 

Pcolafisher

Petty Officer 2nd Class
Joined
Jun 26, 2013
Messages
188
Am I sensing a SOTY nomination in about seven months? Great work and even greater persistence!!!
Cheers
 

classiccat

"Captain" + Starmada Splash Of The Year 2020
Joined
Dec 20, 2010
Messages
3,412
Belated Congrats BWR!

You'll eventually have to stop hammerin' the throttle and start fishing with it! :lol:

great job!
 

FIGMO

Petty Officer 1st Class
Joined
Jun 18, 2017
Messages
321
Hey BWR,

Thanks for the info. I am still waiting for things to warm up in Canada. We have had almost 9 months of crappy cold weather. Next week it should start to get warm enough to paint.

Looking Good!
 

BWR1953

Admiral
Joined
Jan 23, 2009
Messages
6,178
Hi guys! I'm still around.

Had a pretty scary couple of days this week but escaped from the hospital again. Still have the IV bruises though! :lol:

Thanks again for all the kind words. :joyous:

And contrary to what y'all might expect, we haven't been out fishing. We haven't even put the KF back in the water yet.

A few days after the re-splash, we had to put the boy into isolation for 2 weeks. :facepalm:

But I managed to get a few more final things done on the KF while he was in lockup. ;)

I needed to replace the guide-ons because the welded-on homemade versions were too close to the hull. Caused problems. And I went through a real vexation getting replacements, which are still sitting in the box under the boat. I got the old ones cut off but haven't made it to getting the new ones installed yet. :cool:

Ended up ordering a set of guide-ons online because it took a week for the local metal fab shop to get me a real estimate, which was ridiculous. The online order took another week to receive. I also ordered and received the 1/4" x 4 x 4 T6061 structural aluminum angle for the motor braces.

We did tractor shelter (metal roof installed) and tarp shelter (free from neighbor, for storing KF) work while awaiting parts and supplies.

Some of the things we got done after the boy came out of isolation: installed and ran all new wiring and conduits for the bow trim switch, installed some beautiful foldable stainless drink holders, bought some tools and supplies, bought fishing lures, sold the old tires/wheels and seats from the KF and gave the proceeds to the boy. I moved the motor manual trim to the lowest notch. (That should keep the bow down better on holeshot while I'm alone.) Installed the new molly bolts to replace the missing ones which hold the seat bases to the deck. They really worked well!

Started installation of motor/stern aluminum reinforcing braces. About half done now but ran into a problem this morning which I hope to correct tomorrow. Drilling new holes in the back was a real conSTERNation! :pound:

We need to do a little trailer work and get that confounded Bimini installed before the KF will be ready to splash again.

I have a buncha pix, but I'm just too tired to post 'em up.

But now ya know! :yo:
 

BWR1953

Admiral
Joined
Jan 23, 2009
Messages
6,178
Okay, time for May (and some June) pix and whatnot. I'll try to be brief. :p


These are the old guide-on posts, made from a welded on piece of bed frame. :rolleyes:
1.jpg


Stainless folding cup holder behind driver's seat. Easily accessible by port-side passenger or angler in the rear casting seat. If I have both at the same, and it becomes an issue, I'll install another cup holder behind the passenger seat which will be accessible by the rear angler.
1.jpg


This console mounted cup holder is easily accessible from the helm or from the front casting seat.
2.jpg


Bow trim switch all covered with standard plastic conduit.
2.jpg


Pool noodle conduit ready for installation.
3.jpg


2.jpg


4.jpg


Installation nearly complete.
5.jpg


All done! The pool noodle conduit is invisible on the job. :cool:
6.jpg

And the completed switch installation works perfectly!


Drilling holes into that stern bugged me, but I just had to get it done. Although the motor had 2 bolts through the transom, plus four more from the hydraulics, and I was assured that they were perfectly adequate for the job, the engineer in me just HAD to get those other bolts installed. Even so, I didn't like doing it and we did run into a problem when one of the new stainless bolts galled and had to be removed. :cool:
1.jpg

2.jpg


I fabricated a pair of braces from 1/4" T6061 angle aluminum. They're connected to the stern on each side and through-bolted through the knee brace, tying everything together. Plenty strong! Yes, things have been cleaned up since the pix were taken. :joyous: 3.jpg
3.jpg


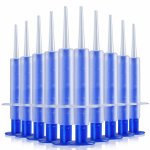
I used these dental syringes to squirt 5200 in, over, under and around the bolts and braces to seal things up. Really convenient! The 5200 tip fits right inside the syringe barrel. No mess. :D
syringe.jpg
 

Attachments

  • 1.jpg
    1.jpg
    289.4 KB · Views: 4
  • 1.jpg
    1.jpg
    518 KB · Views: 4
  • 1.jpg
    1.jpg
    417.2 KB · Views: 3
  • 3.jpg
    3.jpg
    351.4 KB · Views: 3
  • 2.jpg
    2.jpg
    432 KB · Views: 3

BWR1953

Admiral
Joined
Jan 23, 2009
Messages
6,178
And today we got the new guide-ons installed, the PVC pipes painted and the trailer winch updated with a new extension pillow block. :)

The new guide-ons are VERY high quality. I'm as pleased as can be. They're hot dipped galvanized AFTER bending, there's a strengthening gusset and a ring at the base which allows the PVC pipe to spin instead of binding and breaking when bumped during loading/off-loading.
2.jpg

PVC pipes and trim pump cover painted. I still have a little more painting to do tomorrow.
3.jpg

Check out that quality. :thumb:
5.jpg

We moved the winch stand forward, installed a new pillow block extension and added a longer chain.
7.jpg
 

Attachments

  • 1.jpg
    1.jpg
    309.1 KB · Views: 0
  • 6.jpg
    6.jpg
    395.4 KB · Views: 0

BWR1953

Admiral
Joined
Jan 23, 2009
Messages
6,178
Today the boy and I achieved a couple of major milestones and the KF is essentially complete!

We completed painting the guide-on PVC pipes and installed them on the uprights. Then we used stainless cable clamps with rubber insulators to get the electrical and hydraulic lines up off the deck and out of the way. We used stainless screws installed through the aluminum transom brace, filled with 3M5200 (using the syringe) to seal things up.

6.jpg


7.jpg


Bimini installed with blurry picture! :lol:
12.jpg


I bought this small power supply about a month ago. Haven't opened the box yet. I guess it's time to hook it up to the Garmin and put that puppy into simulation mode for a little eyeball testing. At this point, the KF is essentially completed. Yes, we'll do a little touch up work but all in all, it's finally DONE! :becky:
13.jpg
 

Attachments

  • 8.jpg
    8.jpg
    357.3 KB · Views: 3
  • 1.jpg
    1.jpg
    388.2 KB · Views: 3
  • 1.jpg
    1.jpg
    388.2 KB · Views: 1
  • 2.jpg
    2.jpg
    371.7 KB · Views: 2
  • 4.jpg
    4.jpg
    389.3 KB · Views: 3
  • 3.jpg
    3.jpg
    368.8 KB · Views: 3
  • 11.jpg
    11.jpg
    393.4 KB · Views: 3
  • 5.jpg
    5.jpg
    407.1 KB · Views: 4
  • 10.jpg
    10.jpg
    401.2 KB · Views: 5
  • 9.jpg
    9.jpg
    452.1 KB · Views: 4

Watermann

Starmada Splash of the Year 2014
Joined
Jan 12, 2013
Messages
13,787
Looks great, finishing touches are awesome. :thumb:

A couple suggestions, I tried to use the blind rivets on my bimini mounts too but the constant working of that mount on the gunnel with the top being like a sail loosened them pretty quick so i had to go to machine screws and nyloc nuts.

I use pool noodles for the windshield and and edges for my cover, they last about 2 years before deteriorating and littering the boat with particles. I went to pipe insulation and so far they last longer, about twice as long before starting to fall apart.
 

BWR1953

Admiral
Joined
Jan 23, 2009
Messages
6,178
Hi all. Some new info for ya.

I had some reflective stickers left over from the trailer light installation, so asked my wife to cut them to size and put them on the guide-ons for me. Did that 2 nights ago. The plan was to get everything ready to go fishing in the morning.

Red reflectors on top, white reflectors at the bottom.
2.jpg


The reflectors will help illuminate nicely when hit by headlights from the side.
1.jpg


I also connected up the Garmin Striker Plus 4 to the Nocqua portable power supply and checked it out in demo mode. Seems like I'll be able to see it okay from the front casting seat.


BWR1953

Admiral
Joined
Jan 23, 2009
Messages
6,178
Yesterday morning we headed to the lake for some fishing.

Looks beautiful, right?
1.jpg


But NO JOY!!

After I got the Merc started, it kept wanting to die unless I was at high idle. I figured it was still cold, so pressed on. Got everybody in the boat and idled out of the no wake zone, hit the gas and the engine started to rev up, then bogged down! WTH?!? The motor ran perfectly on our splash 5 weeks ago. :mad-new: :grumpy:

I'd been sure to open the vent on the gas tank before launching, but checked it anyway. It was closed again (the boy.) So, I opened the vent, idled some more and hit the throttle again. Same result! Started to rev up, then bogged down.

Disappointing to say the least. At that point I decided to check out how the Minn Kota 45 Edge trolling motor (45 lbs thrust) would pull the little KF around. Disappointment again! It seemed to actually be slower than the 28 lb thrust motor that it replaced. The brand new deep cycle battery was fully charged. :confused: :blue: I ordered a new prop for it last night, in case the one that's on there was incorrect for the motor. (Purchased the TM from craigslist.)

While idling back to the dock, I surmised that the fuel in the tank must have gone bad. That's the ONLY thing that changed concerning the engine in the last 5 weeks.

I thought about it some more and talked with my wife and the boy about it while I was driving us home. That morning we'd topped off the tank. The leftover fuel was about 2 gallons so we added 4 gallons, mixing in the oil too. I realized that the old fuel wasn't just "a couple months old" but in fact was now about 7-8 months old. :facepalm:

So, I'm thinking that running the old fuel on "splash" day through the newly rebuilt carbs must have gummed up the works. Adding the fresh fuel yesterday morning was too little, too late.

On the way home we stopped and bought a new can of Seafoam and after I dispose of the 6 gallons in the tank, I'll buy fresh gas and see if running some Seafoam through the engine at idle will clean things up again. Else, I'll have to pull the carbs and clean them again. Ugh. :rolleyes:

The good news... the guide-ons worked perfectly. The Bimini top was very nice too. :cool:
 

BWR1953

Admiral
Joined
Jan 23, 2009
Messages
6,178
Looks great, finishing touches are awesome. :thumb:

A couple suggestions, I tried to use the blind rivets on my bimini mounts too but the constant working of that mount on the gunnel with the top being like a sail loosened them pretty quick so i had to go to machine screws and nyloc nuts.

I use pool noodles for the windshield and and edges for my cover, they last about 2 years before deteriorating and littering the boat with particles. I went to pipe insulation and so far they last longer, about twice as long before starting to fall apart.

Thanks! I'll keep an eye on those things and take corrective action as necessary. :)
 

Watermann

Starmada Splash of the Year 2014
Joined
Jan 12, 2013
Messages
13,787
Oh man she looks super nice!

So on the motor issues, 7 or 8 months isn't going to make the fuel go bad enough to clog up the carbs, maybe separate or soak up water if you're using E tainted fuel. At least an inline filter but a spin on water separator type is best to limit any future bad gas issues.

If you have a gray Attwood primer bulb fuel line, that needs to go as it's the #1 cause of fuel feed issues in the OB motor groups.
 
Top