I have returned... with a Starcraft this time!

BWR1953

Admiral
Joined
Jan 23, 2009
Messages
6,178
Thunderstorms here this morning so no boat work happening.

Still waiting for input on which paint to use to cover the Gluvit. Since the boat sits outside all the time, I do want to protect the Gluvit while I'm continuing the work. Went to HD yesterday and WM this morning and still haven't figured out which rattle can to buy. I actually picked up a can of Rustoleum 2X Ultra cover at WM this morning which said it would adhere to plastic as well as wood and metal. When I got to the checkout the lid popped off and there was no nozzle on the can. I considered that a "sign" and decided not to make the purchase! LOL!

Which adhesive do you folks recommend to glue the foam board together? I was thinking about getting this DAP stuff because it shows as being water resistant. Thoughts?
 

dozerII

Admiral
Joined
Oct 25, 2009
Messages
6,527
I only use Rustoleum Pro, available at Acklands/Grainger in both spray bombs and gallons, Rustoleum Self Etching primer in the spray can as well. I have never painted over the gluvet as the foam and floor cover it up and protect it from the sun. If your just worried about it during the rebuild I would buy the boat cover you plan on using after the rebuild and cover it up between progress sessions. Cover any sharp edges with pool noodles split down one side.
 

BWR1953

Admiral
Joined
Jan 23, 2009
Messages
6,178
I only use Rustoleum Pro, available at Acklands/Grainger in both spray bombs and gallons, Rustoleum Self Etching primer in the spray can as well. I have never painted over the gluvet as the foam and floor cover it up and protect it from the sun. If your just worried about it during the rebuild I would buy the boat cover you plan on using after the rebuild and cover it up between progress sessions. Cover any sharp edges with pool noodles split down one side.
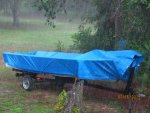
Well, if it's okay to skip the paint, then I'll skip the paint. I normally do keep the boat covered with a tarp when it's not being worked on.
 

dozerII

Admiral
Joined
Oct 25, 2009
Messages
6,527
Some guys have painted the blige and inside of gunwales if they are going to be visible but under the deck is not necessary.
 

BWR1953

Admiral
Joined
Jan 23, 2009
Messages
6,178
Some guys have painted the blige and inside of gunwales if they are going to be visible but under the deck is not necessary.
Ah yes, the bilge. Mine will in fact be open a little on both sides of the knee brace so I guess I do need to paint that area.

Would Rustoleum automotive primer be acceptable there?
 

g0nef1sshn

Lieutenant
Joined
Feb 24, 2015
Messages
1,291
Ah yes, the bilge. Mine will in fact be open a little on both sides of the knee brace so I guess I do need to paint that area.

Would Rustoleum automotive primer be acceptable there?

This is what I did..... no paint needed. and easy access.


image_224546.jpg


image_224544.jpg
 

dozerII

Admiral
Joined
Oct 25, 2009
Messages
6,527
Yes, just dust the bare aluminum with self etch then use the rustoleum primer then what ever color you prefer.
 

BWR1953

Admiral
Joined
Jan 23, 2009
Messages
6,178
Sitting at the VA waiting my turn at the moment. Just reading the forum.

I hadn't planned on painting a color. Was going to use primer only. In gray. No plan to make it extra pretty. Will that work?
 

dozerII

Admiral
Joined
Oct 25, 2009
Messages
6,527
Sitting at the VA waiting my turn at the moment. Just reading the forum.

I hadn't planned on painting a color. Was going to use primer only. In gray. No plan to make it extra pretty. Will that work?

Primer won't stand up very well, I would ad a coat of grey or white for durability.
 

Watermann

Starmada Splash of the Year 2014
Joined
Jan 12, 2013
Messages
13,787
Primer won't stand up very well, I would ad a coat of grey or white for durability.

+1 on the painting. Heck if your like most of us and have half cans of spray paint in a cupboard from some forgotten long ago projects just use them up, who cares about color it'll be covered up. ;)
 

BWR1953

Admiral
Joined
Jan 23, 2009
Messages
6,178
+1 on the painting. Heck if your like most of us and have half cans of spray paint in a cupboard from some forgotten long ago projects just use them up, who cares about color it'll be covered up. ;)
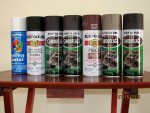
You mean these? :D
Note that there isn't a can of self-etching primer in there. Something else to buy, I guess.

paint.jpg
 

Watermann

Starmada Splash of the Year 2014
Joined
Jan 12, 2013
Messages
13,787
There ya go. Hey that would have someone wondering "WTH" if in the future they pulled the transom and saw a camo paint job on the inside skin.
 

BWR1953

Admiral
Joined
Jan 23, 2009
Messages
6,178
Weather is still not allowing me to do any flotation or deck work, but I made some progress today anyway! :rockon:

Drove 150 miles round trip to pick up this little Johnson 8hp tiller motor. Fires right up on first or second pull. And it came with the 6 gallon tank and 3/4 gallon of Yamalube 2 stroke oil.

The 8hp Johnson is a temporary measure just to get the boat powered while I continue work on the transom and everything else. Yes, I will run this little motor on the boat without replacing the transom first. I'll keep it slow and low powered. No holeshots or efforts to get up on plane. I just want to be able to push the boat around enough to overcome light current and winds. My electric trolling motor can do some of that but I know better than to trust it alone while out on the lake, even if it's a small lake. The transom is strong enough in the center, especially above the knee brace, to allow me to putt around a little and go fishing. :fish2:

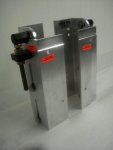
The "final" motor will be a 50hp engine from the late 1980s or after, with power trim and tilt. I'll rebuild the transom before mounting it of course. And the "big" engine will also have a "universal mounting bracket" as shown in the pic below. :D

Am just waiting for the weather to break a little so that I can work on the flotation and deck reinstallation.

Gettin' fired up over here!

8hp Johnson1.jpg8hp Johnson2.jpg 8hp Johnson3.jpg jplate.JPG
 

Attachments

  • 8hp Johnson4.jpg
    8hp Johnson4.jpg
    89.5 KB · Views: 4

BWR1953

Admiral
Joined
Jan 23, 2009
Messages
6,178
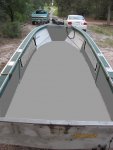
Been making a little progress between storms here. Thoroughly cleaned the inside of the hull again then plopped a couple of the deck sections back inside to provide a stable work platform. And this evening the weather was good enough so that I could prime and paint the bilge portion which will be exposed to sunlight. Gotta protect that Gluvit! :D

Tomorrow I hope to get started on installing the foam. The day after that I have another medical procedure so no work will likely get done that day. Ugh.

A few pix of progress. I do have to admit that seeing even that little bit of the bilge painted makes it tempting to just do the whole boat. But that just isn't going to happen now.

deck reinstallation.jpgbilge painted1.jpgbilge painted2.jpg bilge painted3.jpg
 

BWR1953

Admiral
Joined
Jan 23, 2009
Messages
6,178
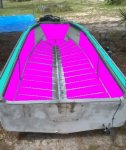
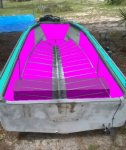
During the rain and storm times I've been doing some photo editing to plan my foam, deck and side panel installation ideas.

The pink is the foam board, the light aqua color on the gunwales shows where I'll use some pool noodles as wiring conduit and admittedly marginal flotation enhancement.

The purplish color is where I'm planning on installing a bench across the stern. The PO had removed it and installed a pedestal seat in that area. I'll fabricate a bench from 3/4" marine ply which will be leftover from the transom replacement. Not only will this give structural reinforcement, it will also be used as an additional location for flotation. I'll probably use 1/8" aluminum C-channel to hold the plywood to the boat sides. Then underneath I'll use a fixed pedestal seat mount to provide vertical support. Should be stout enough. Then under the long sides of the bench (both fore and aft) I'll install some 1/16" aluminum L-brackets. To those I'll install more of the side panels and inside the whole structure will be more pink foam.

The gray and dark gray represent the deck and side panels. The netting looking things at the forward part of the boat represent storage nets which I'll use to hold some small stuff.

flotation deck and netting2.JPG flotation layout2a.jpg flotation layout2b.jpg
 

BWR1953

Admiral
Joined
Jan 23, 2009
Messages
6,178
Oh! I forgot to mention that I'm leaving a portion of the center section under the deck free of flotation foam. That's why it's not pink there.

Based on my calculations, by not having foam about 4" to either side of the center stringer there will enough volume to allow a bit over 200 pounds of water to occupy that space as ballast, helping to keep the boat more centered if it does get swamped.
 

Decker83

Commander
Joined
Apr 5, 2011
Messages
2,593
Your looking good from here BWR..
Hope your medical procedure goes well for you..
Have a great week..
 
Top