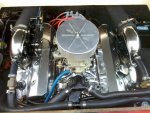
Here We Go: My 383 Stroker Winter Project

joewithaboat

Lieutenant Junior Grade
Joined
Jul 3, 2011
Messages
1,172
Re: Here We Go: My 383 Stroker Winter Project

The washer he was referring to was for the lock nut. He couldnt get it tight. He didnt know about the set screw in the middle. I dont think he was talking about the shims.

Randy, I realize that spacers under shims and the o/p's question about the possible addition of a washer under the ploy lock was two different things. But I think if you read that again you will see T Gunner is concerned about the shims under the springs.

Lots of different thickness shims under springs is an indication that not all seats are on the same plane... sunken valves/seats or different od on the valve itself from being tuliped and reground. I don't think that is the case here, I bet it is to adjust proper seat pressure which is very important with a roller cam.
 

Idlespeedonly

Senior Chief Petty Officer
Joined
Jun 30, 2011
Messages
779
Re: Here We Go: My 383 Stroker Winter Project

Got it now. I would expect to see shims on a redone head.
This is a fine example that it is next to impossible to build an engine through a forum.
 

greg82255

Senior Chief Petty Officer
Joined
Oct 26, 2009
Messages
781
Re: Here We Go: My 383 Stroker Winter Project

I've actually been very happy with the help I've gotten from this forum... At very least, I've been notified about different things that I need to pay close attention to and keep track of, and I've been able to go to local experts and have them help me out with it. The heads are all set - I've had all the clearances and spring pressures checked, and shims installed as necessary. The head shop was very thorough - I told them the cam I was using and with 1.6 rockers and they modified everything as necessary.
 

Flysfloatsor

Banned
Joined
Oct 7, 2010
Messages
202
Re: Here We Go: My 383 Stroker Winter Project

Nice build. Wondering about your comment on the pistons. Do you say that, just because you wanted a higher compression ratio? or lower cost?

I wanted higher compression. With the dishedpistons im barely at 9 to 1. I want to be up in the 10's for more power, plus I never fill up at the lake, I trailer back and forth, so getting higher octaine isnt an issue.

Pete: the pickup is not welded, it was a new oil pickup and pump, the fit was seriously tight.
 

Flysfloatsor

Banned
Joined
Oct 7, 2010
Messages
202
Re: Here We Go: My 383 Stroker Winter Project

I switched from 906 casting GM vortec heads to Patriot Performance Iron Vortec style heads that had amazing specs compaired to the GM's.

The Boat it is in is a 18.5 Chris Craft Scorpion (sleeper, old school resto). It ran 63.x mph gps last season, but has more in it. I dont think the hull will handel well past 70mph. IMG_20111016_152359.jpgChris Craft Lake.jpgIMG_20111016_152252.jpg
 

Idlespeedonly

Senior Chief Petty Officer
Joined
Jun 30, 2011
Messages
779
Re: Here We Go: My 383 Stroker Winter Project

Greg, you have gotten good advice. But there is always a chance to miss something. And that is not something nobody wants to happen. There are so many things that anybody can miss that can have catastrophic results. I have seen 20,000 race engines blow up on the first run due to a loose rod bolt. In fact alot of race shops have 2 people working side by side on an engine to be able to double check everything. Little things like the cam button I mentioned can cause major problems if gone unnoticed. How many times had you messed with the heads because you forgot something or was misinformed?
 

greg82255

Senior Chief Petty Officer
Joined
Oct 26, 2009
Messages
781
Re: Here We Go: My 383 Stroker Winter Project

Greg, you have gotten good advice. But there is always a chance to miss something. And that is not something nobody wants to happen. There are so many things that anybody can miss that can have catastrophic results. I have seen 20,000 race engines blow up on the first run due to a loose rod bolt. In fact alot of race shops have 2 people working side by side on an engine to be able to double check everything. Little things like the cam button I mentioned can cause major problems if gone unnoticed. How many times had you messed with the heads because you forgot something or was misinformed?

I suppose you're right. The heads were done and redone a few times to make sure everything was correct, and they are correct now. I brought my short block back to the original builder I was working with to have it checked over, and he checked it over, including all the torques, and said everything was in good shape. I guess I am hoping that I'll be told about everything critical that needs to be addressed. I can post any question I have on this forum, and can also call either the head shop or the machine shop I worked with. I thought I had all my bases covered.
 

Idlespeedonly

Senior Chief Petty Officer
Joined
Jun 30, 2011
Messages
779
Re: Here We Go: My 383 Stroker Winter Project

I am glad to hear you are having help. Have you bolted the heads on yet?
 

greg82255

Senior Chief Petty Officer
Joined
Oct 26, 2009
Messages
781
Re: Here We Go: My 383 Stroker Winter Project

I am glad to hear you are having help. Have you bolted the heads on yet?

Yea the heads are on. I'm just waiting for the pushrods to come in - they should be in tomorrow morning and then I can get the whole valve train installed and put on the intake and valve covers. Then it might actually start to look like an engine.
 

Idlespeedonly

Senior Chief Petty Officer
Joined
Jun 30, 2011
Messages
779
Re: Here We Go: My 383 Stroker Winter Project

Did you put some kind of sealant on the head bolts? What kind of valve covers are you using?
 

greg82255

Senior Chief Petty Officer
Joined
Oct 26, 2009
Messages
781
Re: Here We Go: My 383 Stroker Winter Project

Did you put some kind of sealant on the head bolts? What kind of valve covers are you using?

I used the ARP assembly lube that they recommend on the heads of the bolts and ARP thread sealer on the threads. I just have a set of standard chrome center-bolt valve covers.
 

Idlespeedonly

Senior Chief Petty Officer
Joined
Jun 30, 2011
Messages
779
Re: Here We Go: My 383 Stroker Winter Project

I am pretty sure your valve covers wont clear the rockers. Good job on the head bolts.
 

greg82255

Senior Chief Petty Officer
Joined
Oct 26, 2009
Messages
781
Re: Here We Go: My 383 Stroker Winter Project

I am pretty sure your valve covers wont clear the rockers. Good job on the head bolts.

John S mentioned that too. He said I may need to grind something down inside them. My pushrods came in today, so I'll get the valve train set up tomorrow and see what needs to be done with the valve covers.
 

Idlespeedonly

Senior Chief Petty Officer
Joined
Jun 30, 2011
Messages
779
Re: Here We Go: My 383 Stroker Winter Project

On mine the top of the nuts hit. The pushrod side pf the rocker was hitting also. But with you 1.6 ratio your pushrods will be closer to stud than my 1.5 were. I milled .150 off the bottom of the nuts so they will clear. So you may have to only do that.
 

greg82255

Senior Chief Petty Officer
Joined
Oct 26, 2009
Messages
781
Re: Here We Go: My 383 Stroker Winter Project

I actually decided to go out and do the valve train today. I put in all the pushrods and put on all the rocker arms and started adjusting the valve lash. I did just as the books and videos describe - turning the engine over until the intake lifter just starts to come up, and adjusting the exhaust, and then doing intake, and so on, and going in the firing order of the engine (although I think that doesn't really matter because there is no moly lube on the cam lobes). Anyways, I got to zero lash and then went to tighten the rocker nuts another 1/2 turn, and it was incredibly easy to do this. I could even do it by hand. Is this normal? Should I tighten the set screws to hold the nuts in place? All the videos I have seen seem to show that it takes some strength to add that 1/2 turn.
 

joewithaboat

Lieutenant Junior Grade
Joined
Jul 3, 2011
Messages
1,172
Re: Here We Go: My 383 Stroker Winter Project

I actually decided to go out and do the valve train today. I put in all the pushrods and put on all the rocker arms and started adjusting the valve lash. I did just as the books and videos describe - turning the engine over until the intake lifter just starts to come up, and adjusting the exhaust, and then doing intake, and so on, and going in the firing order of the engine (although I think that doesn't really matter because there is no moly lube on the cam lobes). Anyways, I got to zero lash and then went to tighten the rocker nuts another 1/2 turn, and it was incredibly easy to do this. I could even do it by hand. Is this normal? Should I tighten the set screws to hold the nuts in place? All the videos I have seen seem to show that it takes some strength to add that 1/2 turn.

It should not be hard to turn the polylock unless you already have the set screw bottomed out on the top of the stud. All you are fighting for resistance is the small spring in the lifter right now because their is no oil present in the lifter. Getting the feel for how to tighten the set screw really depends on the type of allen wrench you are using on the set screw. If you have a short stubby allen head on a t-handle.. you can go your 1/2 turn then tighten the allen set screw because the t- handle will allow you to get enough turning force on the set screw. If you are using a standard L shaped allen wrench it is best to tighten down the set screw and then use the wrench on the poly lock to snug it a bit. When i say a bit i mean not even 1/16 of a turn. If you get them too tight you can split the polylock. If too loose, well they can back off. I have seen guys go back after all are set and tight and run over them with a torque wrench to make sure you have at least 20 or 25 foot pounds on them.

Once you are done look at your set screw height in the locks they should all be about the same. If one or two looks off double check the settings on them.
 

greg82255

Senior Chief Petty Officer
Joined
Oct 26, 2009
Messages
781
Re: Here We Go: My 383 Stroker Winter Project

It should not be hard to turn the polylock unless you already have the set screw bottomed out on the top of the stud. All you are fighting for resistance is the small spring in the lifter right now because their is no oil present in the lifter. Getting the feel for how to tighten the set screw really depends on the type of allen wrench you are using on the set screw. If you have a short stubby allen head on a t-handle.. you can go your 1/2 turn then tighten the allen set screw because the t- handle will allow you to get enough turning force on the set screw. If you are using a standard L shaped allen wrench it is best to tighten down the set screw and then use the wrench on the poly lock to snug it a bit. When i say a bit i mean not even 1/16 of a turn. If you get them too tight you can split the polylock. If too loose, well they can back off. I have seen guys go back after all are set and tight and run over them with a torque wrench to make sure you have at least 20 or 25 foot pounds on them.

Once you are done look at your set screw height in the locks they should all be about the same. If one or two looks off double check the settings on them.

Awesome, that's basically what I did. I added the 1/2 turn and then tightened the set screw. I am using a standard L-shaped allen wrench so I'll go back and snug them and then check the torques on them today. Thanks Joe
 

Idlespeedonly

Senior Chief Petty Officer
Joined
Jun 30, 2011
Messages
779
Re: Here We Go: My 383 Stroker Winter Project

When you fire this up for the first time it will be pretty lound for a minute or 2 till the lifters are purged. When you prime the oil pump it will purge them somewhat, but not completely.
 

greg82255

Senior Chief Petty Officer
Joined
Oct 26, 2009
Messages
781
Re: Here We Go: My 383 Stroker Winter Project

When you fire this up for the first time it will be pretty lound for a minute or 2 till the lifters are purged. When you prime the oil pump it will purge them somewhat, but not completely.

Thanks Randy. Definitely a good idea to keep that in mind.
 

greg82255

Senior Chief Petty Officer
Joined
Oct 26, 2009
Messages
781
Re: Here We Go: My 383 Stroker Winter Project

I went to install the harmonic balancer today and I noticed a few holes on it that I didn't see before. When the machinist balanced my rotating assembly he did internal balance in the front, and told me that my original harmonic balancer (from the old merc 260) was neutral so internal was the way to go. I looked at the balancer today and saw two 1/2" holes drilled into it.

Is this balancer neutral, or were the holes drilled to balance the stock 350 crank? Am I going to need a new one to match the internal balance of the crank?

Also, it appears that my valve covers fit just fine over the rockers. I test fitted them but haven't installed them yet, and they slid right on without any problems.
 
Top