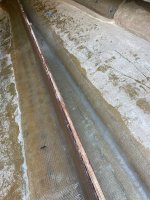
Gipsy - 1996 Sea Ray 210 Bowrider restomod

flashback

Captain
Joined
Jun 28, 2002
Messages
3,925
Mine is a 220 weekender with a cuddle from 1995..
 

Attachments

  • IMG_20210729_170945221.jpg
    IMG_20210729_170945221.jpg
    2.6 MB · Views: 2

flashback

Captain
Joined
Jun 28, 2002
Messages
3,925
I'll try and get you a picture of the stringers and brackets soon. It's not a bad way to mount the engine..
 

biasbilt

Seaman
Joined
Aug 13, 2010
Messages
53
I'll try and get you a picture of the stringers and brackets soon. It's not a bad way to mount the engine..
I’d like to see that. I also like the idea of a complete cradle under the engine with the cradle sitting on top of the stringers/floor but not really necessary as it isn a race boat.

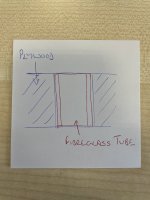
i‘ll either drill oversize holes and fill with PB or glass in fibreglass tube for the transom and engine mounts so there’s no way water can get to the wood
 

biasbilt

Seaman
Joined
Aug 13, 2010
Messages
53
Long evening, started at 6.30 and finished at 10.15.
IMG_6008.jpeg
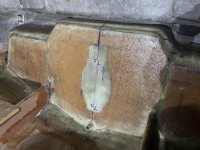
Managed to do the whole transom in one hit. I used the gravicol for the filleting with csm to shape it followed by 2 layers of 1708 and a few patches of csm to help hold the 1708 down where i’d made relief cuts.
IMG_6009.jpeg
Used about 3 litres of resin - lost count as I was mixing as I went. Mixing each batch only took about 3 minutes as I was ready to pour the resin and had a paddle mixer in the drill so doesn’t look like I need a resin fairy. Having a level table in the boat helped loads - pre resining the 1708, somewhere level for putting the resin tray and tools on etc.

I wouldn’t use the gravicol again for the filleting as it wasn’t quite the right consistency so I’ll use PB for the stringers. It also left white patches under the glass so tricky to tell if they were bubbles or not. Doesn’t really matter as it’ll all be gel coated over or under the floor where you can’t see it. If you don’t try anything new, you never learn…

That said, the fillets weren’t bad! Just a little bit of tidying up with some sand paper and it’ll be ready for the doing the stringers
IMG_6011.jpeg
 
Last edited:

biasbilt

Seaman
Joined
Aug 13, 2010
Messages
53
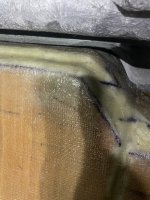
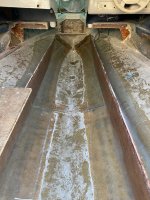
Happy with the results of this weekend - stringers are glassed in.
IMG_6034.jpeg
Had to change plans a bit as I was planning to do the second layer as a single piece over the top and down both sides but trying handle 14 1/2’ long by 3 1/2’ wide of wet out 1708 on my own would have been too difficult, especially under the bow section. Instead I cut it down the centre and will do a wrap over the top of each stringer (to fully seal it) once the glass has been tidied and sanded to key it.
Question - Should I use 1708 or a csm/woven roving/csm combo? I’m leaning towards the combo as eaier to handle as individual lengths. Let me know your thoughts.

Tied each stringer back onto the transom so loads are transferred into the structure
IMG_6035.jpeg

Learning points:
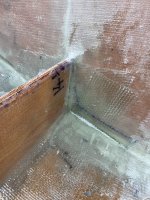
1. The 1708 really doesn’t like going into tight gaps and I struggled to get it into the chine so put some pb in the starboard side to give a shallower radius
IMG_6033.jpeg
2. 1708 should be fully wet out before laying it. Best method is with a squeedgy to spread the resin.
3. Don’t bother doing neat fillets. Use the icing bag method to lay a nice thick bead into the corner and lay the wet out cloth into place. Use your hands to position it and smooth it to get the majority of the air out on one side of the fillet so it held firmly (in my case to the vertical side of the stringer). 1708 doesn’t stretch so you then use your roller to push it into the fillet and then roll the surplus pb away from the corner. Much quicker, no bubbles and no issues trying to make/sand perfect fillets. This also works to fill gaps where they were heavier on one side of a bulkhead than the other with the chopper gun and there is a step in the fibre glass thickness without having to grind loads of material out.
4. Make sure the pb has some chopped strand in it so it’s not too brittle.

Hope that makes sense - ask if it isn’t clear.

Now need to order more supplies as I’ve used about 24kg of resin, need cabosil etc. I’ll cut the bulkheads and cleats while I’m waiting. Once they’re in, on to cutting out the floor!
 
Last edited:

biasbilt

Seaman
Joined
Aug 13, 2010
Messages
53
A few thoughts on a question asked that might be useful to someone else:
Hey bro,
loving the build. I have an 89 Wellcraft with Merc 4.3l Alpha one that i am fixing the same issues, but in a different way. (not better just different)

You obvouisly know what you are doing. Some of your tips have been really good (eliminating water creep between wood pieces)

After evaluating my boat piece by piece as i disassembled, my motto has been, "Seal the top and open the bottom". Every stringer that had a place for the water to escape is still solid, every piece of wood that was sealed at the bottom filled up with water and rotted.
You know how it is with boats, FRP all you want, water will find the wood and leak into the deck, stringers and transom.
My thought as i put my boat back together is give every stringer some type of drainage down to the tunnel so water doesn't have a chance to pool.

Are you creating any type of drainage system for the "sealed" parts of your boat?

I haven't seen any good battery mounting options, you got any good ideas?

Thanks!
Jeff in Georgia
Click to expand...
Hi Jeff,
Thanks for the compliments. Did another Searay about 10 years ago so knew what i was getting in to. This one was a lot better and probably could have been patch repaired but i wanted to do it properly once.

To answer your questions specifically, i'm not planning on letting the water out, just stopping it getting in in the first place, My view is that if there is an opening for water to come out of, it's also an opening the the water to get in. Due to the capillary action, water will creep through the wood in all directions (up and across) and once the wood gets wet, it has very little chance of ever getting out.

I'll be doing simple things like running the fuel tank breather hose out the back of the fuel tank well with the fill pipe and then forward under the gunwhale up to the vent rather than a straight line from tank to vent like the factory do to avoid holes in the stringer and out through the deck. All holes through wood will be sealed with a fibre glass tube (rather than pvc) roughened to provide a good key or epoxy coated (as poly resin isn't waterproof). Any space that may get water in (ski locker, fuel tank compartment, engine bay and floor will be gel coated to really seal them well. Foamed spaces won't be but they shouldn't let water into them anyway.

Most importantantly, there won't be any screw holes through the fibreglass into the deck. All the rot in mine came from the screws for the seat bases and the water which drained off the windscreen into the lockers in the bowrider section and then through unsealed holes in the panels.

Basically though, i think the improvement in quality of workmanship from us restoring these boats compared to factory assembly (pressures of cost/time/limited life expectancy) means irrespective the boats will last a way longer anyway. When i was cutting it up there were areas with glass over 3/8" thick and some where there was nothing but a few strands of glass - this is the problem with a chopper gun - you can't tell the thickness that has been laid down. We use cloth and CSM so there is a consistent thickness across the whole layer.

Things like batteries and trim pump will be mounted onto sacrificial peices of timber which are installed after the floor has been fully glassed and with well sealed screws that don't penetrate out the bottom of the sacrificial piece so there no water passage into the floor. For the seats, i'll drill oversize holes in a peice of ply about 1" thick and fill with fibre reinforced resin before drilling for fasteners - these'll then the glassed to the floor like like the battery/trim pump mounts.

Hope that helps - stay in touch and start a thread of your progress
 
Joined
Jul 14, 2022
Messages
9
Happy with the results of this weekend - stringers are glassed in.
View attachment 386715
Had to change plans a bit as I was planning to do the second layer as a single piece over the top and down both sides but trying handle 14 1/2’ long by 3 1/2’ wide of wet out 1708 on my own would have been too difficult, especially under the bow section. Instead I cut it down the centre and will do a wrap over the top of each stringer (to fully seal it) once the glass has been tidied and sanded to key it.
Question - Should I use 1708 or a csm/woven roving/csm combo? I’m leaning towards the combo as eaier to handle as individual lengths. Let me know your thoughts.

Tied each stringer back onto the transom so loads are transferred into the structure
View attachment 386716

Learning points:
1. The 1708 really doesn’t like going into tight gaps and I struggled to get it into the chine so put some pb in the starboard side to give a shallower radius
View attachment 386717
2. 1708 should be fully wet out before laying it. Best method is with a squeedgy to spread the resin.
3. Don’t bother doing neat fillets. Use the icing bag method to lay a nice thick bead into the corner and lay the wet out cloth into place. Use your hands to position it and smooth it to get the majority of the air out on one side of the fillet so it held firmly (in my case to the vertical side of the stringer). 1708 doesn’t stretch so you then use your roller to push it into the fillet and then roll the surplus pb away from the corner. Much quicker, no bubbles and no issues trying to make/sand perfect fillets. This also works to fill gaps where they were heavier on one side of a bulkhead than the other with the chopper gun and there is a step in the fibre glass thickness without having to grind loads of material out.
4. Make sure the pb has some chopped strand in it so it’s not too brittle.

Hope that makes sense - ask if it isn’t clear.

Now need to order more supplies as I’ve used about 24kg of resin, need cabosil etc. I’ll cut the bulkheads and cleats while I’m waiting. Once they’re in, on to cutting out the floor!
What size of 1708 roll do you recommend? I purchased one roll that is 4 inches wide, don't know the length. Will i need wider 1708 for the transom or will that make it harder for a novice FRP guy?
 

todhunter

Canoeist
Joined
Sep 15, 2020
Messages
1,299
What size of 1708 roll do you recommend? I purchased one roll that is 4 inches wide, don't know the length. Will i need wider 1708 for the transom or will that make it harder for a novice FRP guy?
Just buy a full width roll (38" or 50"). Then you can cut strips to the desired width. I used a 50" roll. For tabbing, I would cut my strips to the desired width off the roll, then cut them in half so they were 25" long. This size was easy to handle by myself, and if you're doing 2 layers, you can alternate the gaps between pieces on each layer (like stacking bricks), and still have plenty of strength.
 

biasbilt

Seaman
Joined
Aug 13, 2010
Messages
53
Just buy a full width roll (38" or 50"). Then you can cut strips to the desired width. I used a 50" roll. For tabbing, I would cut my strips to the desired width off the roll, then cut them in half so they were 25" long. This size was easy to handle by myself, and if you're doing 2 layers, you can alternate the gaps between pieces on each layer (like stacking bricks), and still have plenty of strength.
Exactly this. The 1708 has advantages and disadvantages over separate csm and cloth
You can wet it out easily and quickly with a squeedgy/spreader without tearing the csm, but it needs to be wetted out before applying otherwise it’ll be dry as you’ll struggle to get the resin through from the top side which makes it hard and messy to handle. You’ll go through a lot more gloves with 1708 than csm and cloth!
Individual layers cost more but can be done single layers at a time which is easier to handle as a beginner
1708 doesn’t conform well to compound curves so you often need to make relief cuts and gullys in the hull like chines are easier if filled with pb first (see post 50)
When cut it has a square edge thatks the thickness of the cloth which makes fairing in joins more tricky. Doesn’t matter if it’s hidden later but csm can be torn to give a feathered edge

Ultimately, you find you want to use both methods as they both work better in different situations and depending on what you’re trying to achieve - structural aspects such as transom/stringers/floor to the hull or just waterproofing the surface of plywood/making lockers etc where csm will be strong enough
 
Joined
Jul 14, 2022
Messages
9
Just buy a full width roll (38" or 50"). Then you can cut strips to the desired width. I used a 50" roll. For tabbing, I would cut my strips to the desired width off the roll, then cut them in half so they were 25" long. This size was easy to handle by myself, and if you're doing 2 layers, you can alternate the gaps between pieces on each layer (like stacking bricks), and still have plenty of strength.
Thanks, i probably need to figure out how much i need. Those rolls sound like a ton of material, i doubt i would use half of it. Biasbilt twisted my arm and made me commit to posting my current build. Clarity .... AND confusion will come once you see it.....LOL Is there a Jerry Springer build forum somewhere? ..... cause there is gonna be drama! LOL
 

todhunter

Canoeist
Joined
Sep 15, 2020
Messages
1,299
I bought 50 yd of 50" 1708 and 50 yd of 1.5 oz CSM, then sold the remainder when I was done with my restoration. I estimate I used about 35 yd of 1708 between learning / wasting material and what ended up on the boat. My boat is 19ft.
 

biasbilt

Seaman
Joined
Aug 13, 2010
Messages
53
good thoughts,
For some reason I can't conceptualize "resin a tube"? Does that just mean drill a hole and pour resin inside?

Good thought on the bolts, I had not considered either of those things. Replacing a stripped bolt or sliding the engine. I guess lag bolts work (much better in an epoxy bed) , i am probably just stuck in my ways as a mechanic, I would never use a wood thread on a car. I guess years and years of using lag bolts with success should be good enough for me to get over my bias.
To clarify, I'll bond in a fibreglass tube to seal the wood. Fibreglass tube as the poly resin doesn't bond well to plastic plumbing pipe.

Sectional drawing:
IMG_6042.jpeg
 
Top