Fuel Tank Shape - Lesson Learned

76SeaRay

Lieutenant Junior Grade
Joined
Aug 24, 2017
Messages
1,071
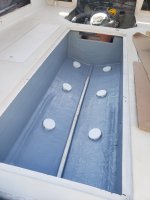
My original tank from 1976 was foamed into place and had corrosion (aluminum). I ordered a new tank (60 gallon) made using the dimensions of the old tank to get an exact replacement. I thought pretty simple, yeah right. I finally got all the neoprene pads in place on the new tank and have it sitting in place for a final test fit. Then, I had a thought, how do I know if the neoprene pads on the bottom are actually sitting on the hull? I got out my inspection scope and put the probe in through the bulkhead drain holes at the bottom. Sure enough it appears that the pads on the tank bottom are not sitting on the hull to distribute the load. The angle of the original tank bottom did not match the hull shape which apparently didn't matter since the original tank was foamed in place.

It looks like the V of the hull is steeper than the angle of the tank bottom. I picked up some modeling clay to put on the pads to see how much of a gap I have on each pad by squeezing the clay down as the tank sits on top of them. Then I have to figure out how to build up the pads or hull with "wedges" to get even distribution of weight on the hull.

Lesson learned, I should have double checked the tank bottom shape and the hull shape before ordering a replacement tank instead of assuming that they matched from the factory.
 

Chris1956

Supreme Mariner
Joined
Mar 25, 2004
Messages
27,852
You could cover the tank bottom with saran wrap, and substitute polyester putty for the modelling clay, to permanently fill in the gap.

Make sure the hull is sanded smooth and wiped with acetone, before applying the polyester putty. The saran wrap will keep the putty from sticking to the fuel tank. The supports will then be custom and permanent.
 

76SeaRay

Lieutenant Junior Grade
Joined
Aug 24, 2017
Messages
1,071
Can't get pics from my inspection camera and the pic if I could get it wouldn't be very clear. Thicker gauge neoprene would cause the tank to sit on the outside ends of the neoprene but leave the inside end with a gap. I ran the neoprene perpendicular to the centerline of the boat so they don't hold water on the "uphill side". Sounds like the plastic and polyester putty idea might be the best approach. I will lift my tank out a little later today and shoot a picture of the neoprene pads on the bottom and simulate my problem.
 
Joined
Jan 26, 2022
Messages
6
#1 Fuel tanks should never touch the hull. Hull flexing can crack the tank. #2 Neoprene can cause corrosion when touching aluminum (chemical reaction)
 

76SeaRay

Lieutenant Junior Grade
Joined
Aug 24, 2017
Messages
1,071
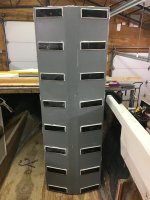
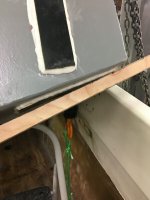
Here is a picture of the neoprene pad layout on the tank bottom. The second picture is a tank end view that simulates the gap I have near the center of the hull.

Tank Bottom.jpg

Neoprene Gap.jpg
 

76SeaRay

Lieutenant Junior Grade
Joined
Aug 24, 2017
Messages
1,071
#1 Fuel tanks should never touch the hull. Hull flexing can crack the tank. #2 Neoprene can cause corrosion when touching aluminum (chemical reaction)
The tank is coated with epoxy paint. Neoprene is bedded in 5200 (completely coated where the neoprene contacts the epoxy on the tank) and then sealed around the outside edge with 5200 on top of the epoxy coating as you will see in the pictures. This method is required by the tank manufacturer to maintain warranty. The tank was manufactured by a marine tank builder.

Also the tank has mounting tabs on 4 points for screwing it to the stringers to help carry the load.
 

Chris1956

Supreme Mariner
Joined
Mar 25, 2004
Messages
27,852
Gee, put some globs of polyester putty on the tank to correspond with the neoprene pads stuck to the tank.. Drop the fuel tank on the hull and clamp it down. The neoprene pads will be captured by the poly putty and the tank will be supported.
 
Joined
Jan 26, 2022
Messages
6
The tank is coated with epoxy paint. Neoprene is bedded in 5200 (completely coated where the neoprene contacts the epoxy on the tank) and then sealed around the outside edge with 5200 on top of the epoxy coating as you will see in the pictures. This method is required by the tank manufacturer to maintain warranty. The tank was manufactured by a marine tank builder.

Also the tank has mounting tabs on 4 points for screwing it to the stringers to help carry the load.
Very good! That's the correct method. But I still wouldn't ever want a fuel tank touching the hull.
 

76SeaRay

Lieutenant Junior Grade
Joined
Aug 24, 2017
Messages
1,071
I was thinking about using polyester structural putty but that is a bit spendy due to the number of pads to be supported. Wouldn't peanut butter work instead?
 

froggy1150

Master Chief Petty Officer
Joined
Nov 3, 2017
Messages
843
I built up pads for my tank with strips of glass with thickened with glass resin. All the strips where progressively wider the closer it got to the hull to prevent hard spots just like tabbing
 

flashback

Captain
Joined
Jun 28, 2002
Messages
3,963
The way I see it you need to make the pads conform to the hull or the hull conform to the pads. If you have a Way of slicing some new pads diagonally then glue them on top of the existing ones.
 

76SeaRay

Lieutenant Junior Grade
Joined
Aug 24, 2017
Messages
1,071
I tried the modeling clay to see if I could determine a taper that would work but no luck with that. The modeling clay was too hard so it held the tank up a bit. Anyway, without being able to see what is going on underneath, it seems like I will need to go with wrapping the tank in plastic, put a couple of globs under the front and rear pads on each side, set the tank, and let the globs squish out and harden. After that pull the tank out again and then run a straight edge between the flattened globs to see how much (how high) is needed on the other pads. Repeat for the remainder of the pads. I have a chain hoist set up so I can lower the tank evenly as it goes into place.
 

kcassells

Fleet Admiral
Joined
Oct 16, 2012
Messages
8,720
Just put some wet newspapers in a bunch down and the tank will compress it. Then measure the squish.
Come on this is too simple right?
 

76SeaRay

Lieutenant Junior Grade
Joined
Aug 24, 2017
Messages
1,071
Dang, I knew I cancelled my newspaper subscription too soon..:)..... Will give the wet paper a shot and see how that works....
 

kcassells

Fleet Admiral
Joined
Oct 16, 2012
Messages
8,720
Dang, I knew I cancelled my newspaper subscription too soon..:)..... Will give the wet paper a shot and see how that works....
U daman. Half of boat rehab is improvising. I hate when "I KNOW" I'm over dinking it.
1655070642450.png
 

Lectro88

Petty Officer 1st Class
Joined
Oct 24, 2020
Messages
303
I use painters plastic in Lou of saran wrap, not as prone to tear.

Why could you not lay your plastic down for a barrier...
Then apply a liberal amount of 5200 or marine PL on your tank pads, set your tank in place on top of the plastic let it settle in place and cure, mark exactly where you had tank, then after cured, pull tank, remove plastic and now your ready... maybe.

Welcome to my world where everything has to be done 15x's
 

Dubed

Petty Officer 1st Class
Joined
Sep 3, 2021
Messages
373
I used pvc "pucks" installed with 5200 on my hull and mating pucks a bit larger 5200 on the tank to match. I used a cardboard cutout template of the tank end to match the angle the pucks were installed in the hull so they would lay flat against the ones installed on the tank. All worked out nicely. At least that was my solution.20210624_155437.jpg
 
Top