Cylinder Compression Incongruences.-

Sea Rider

Supreme Mariner
Joined
Sep 20, 2008
Messages
12,345
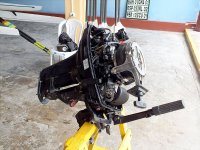
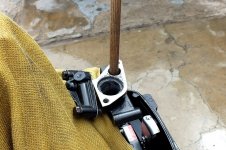
Currently servicing a Tohatsu M18 motor which has been excessively fingered by shade tree pseudo mechanics with no avail and under fully recovery on my side.

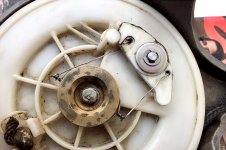
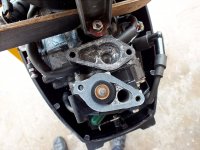
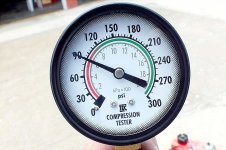
What find strange : The motor has been run less that 200 hours, both cylinders outputs 100 PSI, when the motor is rope cranked there's a slight restriction feel on the flywhee/pistons which doesn't rotate smooth even whereas my 18 motor with 1K run hours and an output of near 120 PSI achieves an even smooth rotation of such parts when the motor is rope cranked.

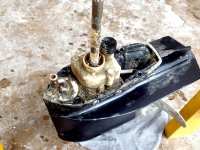
This 2 stroke motor was usually run at non plane speed for tender/transport use, with way off carb/timing advance, colder heat range spark plugs than the factory calls for, missing thermo and with excessive oil amount content far from ideal 50:1 fuel/oil mixture. I'm right to assume that the piston rings have already collected an excessive carbon build up on them due to the latter ?

Once al the electric components have been fully checked with instruments, new thermo installed plan starting the motor and once sufficiently warmed up squirt an overdose application of CRC Power Tuner Carbon Remover. Hope this golden product in a can restores the cranking smoothness, fingers crossed...

Happy Boating
 
Last edited:

MattFL

Master Chief Petty Officer
Joined
Oct 20, 2010
Messages
839
An old motor with very few hours; if it has been sitting a lot it might have rust inside. Can you get a bore scope in through one of the spark plugs holes and take a look? If it doesn't have a ton of value (not worth a rebuild), maybe just put a lot of oil in the gas and run it for a bit and see if it loosens up. One other thought, maybe it's something in the lower unit causing the drag. Drop the lower unit and see if it feels freer.
 

Sea Rider

Supreme Mariner
Joined
Sep 20, 2008
Messages
12,345
Thanks, but this motor needs to be 100% operational for summer, plan adding double 2 stroke oil before starting it, a mandatory overdose of CRC will follow, this product softens about everything. Will post end results.....

Happy Boating
 

Sea Rider

Supreme Mariner
Joined
Sep 20, 2008
Messages
12,345
This 18 HP motor was a challenge to rebuild, too many mechanical issues one after the other, definitely a Pandora Motor. Will post progress pics as the work continues...

Happy Boating
 

Attachments

  • 01.JPG
    01.JPG
    217.7 KB · Views: 10
  • 02.JPG
    02.JPG
    182.8 KB · Views: 11
  • 03.JPG
    03.JPG
    162.2 KB · Views: 13
  • 04.JPG
    04.JPG
    195 KB · Views: 13
  • 05.JPG
    05.JPG
    221.2 KB · Views: 13
  • 06.JPG
    06.JPG
    173.5 KB · Views: 10

Sea Rider

Supreme Mariner
Joined
Sep 20, 2008
Messages
12,345
The only possible way to perfectly remove that filthy stuff deeply adhered all around the lower leg was with the aide of a Karcher Washing Machine set at the highest setting.

The water pump's liner was found in excellent condition, just needed a micro polishing with toothpaste and a Dremel to remove all the micro circular lines that forms inside any liner to smooth it out before installing a new impeller. Micro polishing liners and carb's needle seat are my favorites...​

Happy Boating
 

Attachments

  • 07.JPG
    07.JPG
    230.6 KB · Views: 11
  • 08.JPG
    08.JPG
    186.7 KB · Views: 11

Sea Rider

Supreme Mariner
Joined
Sep 20, 2008
Messages
12,345

This motor powers a mediun size dinghy which is used as a transport for several boats. Lives on salt water and never was flushed before, the nasty found condition says it all. To restore it to a working condition will take several more hours of work although the cosmetic appearance will remain as found.​

The recoil starter assy was recuperated with new parts. thermo's water paths were cleaned along new thermo installation, internal lower middle leg was found in an awful condition, now perfectly cleaned up, new impeller installed, all electrical component terminals along their respective grounds were polished to assure long lasting electrical components, timing advance and carb synch were found 5º off, now correctly synched.​


Happy Boating
 

Attachments

  • 09.JPG
    09.JPG
    176.1 KB · Views: 12
  • 10.JPG
    10.JPG
    199.8 KB · Views: 11
  • 11.jpg
    11.jpg
    713.5 KB · Views: 12
  • 12.JPG
    12.JPG
    218.4 KB · Views: 12
  • 13.JPG
    13.JPG
    188 KB · Views: 12
  • 14.JPG
    14.JPG
    170.3 KB · Views: 11
  • 15.JPG
    15.JPG
    192.6 KB · Views: 12
  • 16.JPG
    16.JPG
    207.1 KB · Views: 12
  • 17.JPG
    17.JPG
    191.9 KB · Views: 12

Sea Rider

Supreme Mariner
Joined
Sep 20, 2008
Messages
12,345
Keeping up with the Restoration.-

Running 1/4 can of CRC Engine Tune UP through the carb with motor ON and geared to 2 K revs made the trick of smoothing the whole motor out. Gave a last long water flush through the flushing port located side of the crankcase with thermo removed to keep the cylinder head water paths open. All water paths are peeing extremely healthy.

As there's no 18 HP thermo, plan installing a 30 HP one, it's just 1.5 mm taller with identical shape and assume heat range. It's much better for the motor to work with one installed than too cold without one.

The motor starts first pull and runs strong on muffs while geared but, there's always a but, dies in about 3 minutes and won't start after several minutes, clean indication that has electrical issues due to tree shade pseudio mechanics seems has swapped the CD. Tomorrow will perform a Exciter Coil Ohm test to check if within specs and test current CDI on my 18 motor. If screwed will miss and turn off, hope is the exciter coil and not the CDI which has an excessive cost for such small electronic component.

Made a compression test with warmed motor and throttle set to max, with 3-4 vigorous smooth rope pulls only dialed 90 PSI on both cylinders which is the max they will go and remain at all you want. 18 HP motors usually runs with 115-118 PSI, the good news is that starts fast and breaks the rule that low compression motors are hard to start.....

Happy Boating​
 

Attachments

  • 18.JPG
    18.JPG
    188.9 KB · Views: 13
  • 19.JPG
    19.JPG
    178.4 KB · Views: 11
  • 20.JPG
    20.JPG
    149.2 KB · Views: 10
  • 21.JPG
    21.JPG
    232.5 KB · Views: 11
  • 22.JPG
    22.JPG
    186.1 KB · Views: 12

Sea Rider

Supreme Mariner
Joined
Sep 20, 2008
Messages
12,345
Progress :

A shade tree mechanic spliced both CDI female terminals to the male stop switch terminals. As I hate empirical works, installed to new female terminals and a new stop switch. Removed the Yam fuel male and female connectors and connected the fuel hose directly to the fuel filter entrance. Now primes much better and faster till fully firm. Primed the motor, with choke out started on second pull.

Runs strong on muffs while geared forward, hasn't died in the 20 minutes that was ON. Took advantage to flush the motor for 15 minutes using the powerhead's flushing port along the last and long overdose of CRC decarbonizer through the carb's throat. It's amazing how much the motor has softened through this repetitive decarbon long process.

Now the issue is : without new thermo installed the exhaust cover and cylinder head remains hot to finger touch, with thermo installed both are much hotter to finger touch and will need to remove your finger out fast. Which should be the temp when metering it with a heat gun on a motor that cools properly ?

Seems that will need to tear the cylinder head, exhaust cover and powerhead from pan and mechanically clean all water passages if wanting to work with a thermo and cool as it should as when out of the box.

Will test without thermo on a wot run powering a small Rib, if doesn't over heat seems will need to work that way as a tender combo transporting boaters on very short distances...

Happy Boating
 

Attachments

  • 23.JPG
    23.JPG
    215.7 KB · Views: 7
  • 24.JPG
    24.JPG
    190.1 KB · Views: 7

pvanv

Admiral
Joined
Apr 20, 2008
Messages
6,509
I use whatever is cheap. The IR guns around here are about $25.
 

Sea Rider

Supreme Mariner
Joined
Sep 20, 2008
Messages
12,345
I use whatever is cheap. The IR guns around here are about $25.
A friend will lend an industrial IR Gun to check that out. Which powerhead place will be ideal to check for such temp. On or above the exhaust cover, on or above the cylinder head ? 150F equals 65C, thought that was much higher. Probably could fry an egg there at a very slow pace.

Could compare the temp of my 18 sufficiently warmed at idle against the other and check temp diferences between a motor with all their water passages cleaned out to perfection some time ago and the other with filthy salted water passages...

Happy Boating
 

Sea Rider

Supreme Mariner
Joined
Sep 20, 2008
Messages
12,345
The industrial IR Gun dialed 140 Fº right over the exhaust cover on my 18 HP with clean water passages and thermo installed after a 10 minute warm up at idle on muffs while this one dialed over 170 Fº without thermo installed after a 10 minute warm up at idle on muffs. The difference is that on my 18 can leave your finger touching the cover for extended seconds while the latter no more than just a few seconds.

The good news is that the motor ran smooth on muffs for 45 minutes geared at fast idle without stopping. Will test as is without thermo installed and check if overheats more, if does so will remove the powerhead from the pan and strip the exhaust covers and check the interior, don't have an X ray vision to check that out, but definitely is extremely salt crusted.

Happy Boating
 

Sea Rider

Supreme Mariner
Joined
Sep 20, 2008
Messages
12,345
Last but not less important. The throttle grip was rotating hard to my particular taste as love counting with very smooth ones. Disassembled the whole steering and throttling handle to pieces which were swimming in a heavy hardened grease, thinner does wonders removing such a mess.

With use, sand, filth getting there will develop deep scratches on both mentioned parts sides which will harden the throttle grip operation. Before assembling back the throttle handle into place it's a must polish the internal circumference (*) and the pinion body with a Dremel tool along SS polishing brushes to get rid of such scratches and smooth out both, way faster job than doing it with any other polishing method. Grease well both with marine grease for a smooth throttle operation.

Time to install 2 new (*) plastic collars in place. Can re grease both through their respective protruding grease nipples with an appropriate re greasing method, just add a small amount periodically. It's a good idea to remove the screw that holds the grip in place, add some marine grease, screw back in or will never be able to remove it again if salt seizes against the alum throttle shaft.

The motor will definitely work with removed thermo as heats a bit up when tested at open water, that nice motor has huge salt sclerosis build ups on the entire water passages which don't intend dismantling to clean that out any time soon. Right now having La Niña anomalous vavy water conditions at my Boating Club as never ever occurred before, all boating operations have been canceled till who knows when so stranded at Terra Firme at the moment...


Happy Boating​
 

Attachments

  • Internal Polishing Procedure.JPG
    Internal Polishing Procedure.JPG
    162.5 KB · Views: 8
  • Pinion Polishing Procedure.JPG
    Pinion Polishing Procedure.JPG
    181.7 KB · Views: 8
  • Grease Syringe.JPG
    Grease Syringe.JPG
    139.6 KB · Views: 8
  • Throttle Grip Hold Screw.JPG
    Throttle Grip Hold Screw.JPG
    175.4 KB · Views: 8
  • Ready to Go.JPG
    Ready to Go.JPG
    203.5 KB · Views: 8
  • La Niña Misbehaving Badly.JPG
    La Niña Misbehaving Badly.JPG
    253.3 KB · Views: 8

Sea Rider

Supreme Mariner
Joined
Sep 20, 2008
Messages
12,345
This almost used motor as an anchor was put back to life and has been performing flawlessly till yesterday when was reported misbehaving badly. As I'm the witch doctor, started the troubleshooting pulling the cord several times, found was bit heavy to fully pull, removed the starter assy, turned it upside down, pulled the cord again and worked right. Removed both spark plugs, turned the flywheel by hand and was found rotating with difficulties, raissed the motor fully horizontal and squirted an overdose of CRC decarbonizer on both cylinders, let soak for 15 minutes, turned the flywheel back and forth by hand and starting rotating again as it should.

Started with a spark plug test, both were found firing strong then proceeded with a compression test pulling the rope 5 times in a row, never have seen such scenario, pics speaks for themselves. Although can start the motor up only runs as a single 9 HP motor Lol!!


Cylinder Compression Test.JPG

Definitely the lower cylinder has both piston's rings stuck on their respective grooves. Tomorrow will remove the cylinder head and check the cylinder condition to check if with scratches or deformed, if all is good will tear the whole powerhead down, inspect both pistons, remove the stuck rings and probably install a new set of standard pistons rings on both pistons. Is there a formula/procedure to release stuck rings without the need to tear the whole powerhed down ?

What find amazing is than in previous compression test both cylinders dialed just 90 PSI, running the motor constantly at speed and squirting small doses of CRC magic in a can frequently has made an incredible 25 PSI increase on the upper cylinder. Assume the lower cylinder would have dialed the same if not for stuck rings.

Can someone determine what has caused such low compression on the bottom cylinder ? Data : the boat and motor lives moored to a pier....

Happy Boating
 

Sea Rider

Supreme Mariner
Joined
Sep 20, 2008
Messages
12,345
Pulled the cylinder head this morning, luckily didn't break any bolt. There's a deep scratch seen on the lower cylinder at around 7-8 o'clock and not that much around 2-3 o'clock while the upper cylinder it's immaculate clean.

Lower Cylinder 1.JPG

Lower Cylinder 2.JPG

Seems the previous pseudo mechanic broke a piston ring while assembling the powerhead or forgot to install both side piston's pin clips ? closed the powerhead, charged his work and voilá. There's no one to complain to, C19 got him.Tomorrow will disassemble the powerhead to pieces and check the lower piston's condition. Hope to be possible to install 2 new standard rings on each piston, increase compression towards the upper one without the need to rebore both cylinders and install oversized pistons and rigs which will turn costly to bring that nice motor to life again...

Happy Boating
 

Sea Rider

Supreme Mariner
Joined
Sep 20, 2008
Messages
12,345
After two hours work disassembling the whole powerhead what was found was not to my complete satisfaction.
Powerhad Mess.JPG

This nice motor has suffered from 3 proven facts : the previous shade tree mechanic broke the front piston ring when assembling the piston into the lower cylinder, although the upper cylinder has no scratches seems bit overheated due to constant kelp build ups on the whole lower leg, prop and water intakes which lessened the overall water cooling even with thermo removed.

DSCF2607.JPG

The lower cylinder scratch is so darn deep that won't be possible to bore both cylinders and install oversized pistons and rings. The only possible way to keep using that horse would be installing 2 new cylinder sleeves at a machine shop, new standard pistons and piston rings, a complete gasket set and an exhaustive crankcase decarbon and deep water passages clean up.

The intake manifold was found sealed with mega gray, the pseudo mechanic not having handy both OEM gaskets to install decided that Mega Gray was the fastest way to go, will surely qualify as a reloaded moron raised to the umpteenth power.


Intake Manifold.JPG

The crankshaft's assy it's in excellent shape, ball and needle bearings, rods, piston pins, are in excellent shape to go, will need just new upper and lower oil seals and that's about it.

Crankshaft Assy.JPG

Happy Boating
 

MattFL

Master Chief Petty Officer
Joined
Oct 20, 2010
Messages
839
Was that OEM sized pistons in there? I doubt he broke a ring installing the pistons, it looks more likely the cylinder was bored/honed and he didn't bother chamfering the ports and a ring caught the edge of the port. Or he didn't measure the ring end gap on the new rings and the gap was too small, it got hot and since the gap was too small it pushed the ring out of the groove enough to catch the port.
 

Sea Rider

Supreme Mariner
Joined
Sep 20, 2008
Messages
12,345
Was that OEM sized pistons in there? I doubt he broke a ring installing the pistons, it looks more likely the cylinder was bored/honed and he didn't bother chamfering the ports and a ring caught the edge of the port. Or he didn't measure the ring end gap on the new rings and the gap was too small, it got hot and since the gap was too small it pushed the ring out of the groove enough to catch the port.
Nope, the issue with this particular motor is that other shade tree mechanic took it apart for a supposed maintenance, gave up, returned it boxed in pieces and the last pseudo mechanic reinstalled everything back in. No new parts were installed. Lessons learned don't trust any non certified mechanic, luckily isn't my horse it's my Club's motor which I have already taken control of for months now.

No wonder there was a somewhat resistance felt when with removed spark plugs the rope was pulled hard, the broken ring was playing tricks inside the lower cylinder and the deep scratch smoothed the pull and threw the compression to 23 PSI after having worked flawlessly for some months.

Happy Boating
 

MattFL

Master Chief Petty Officer
Joined
Oct 20, 2010
Messages
839
I doubt there was a broken ring in there for that long, especially if the ends line up with a port, my guess is something caused it to break while the motor was running. Is the ring locating pin for the broken ring still in the piston?
 
Top