Custom Fiberglass Extended Swim Platform

tpenfield

Moderator
Staff member
Joined
Jul 18, 2011
Messages
17,712
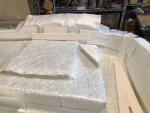
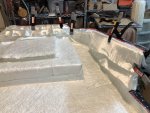
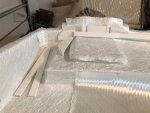
I ran the infusion test last night, doing 3 samples of laminate, peel ply, and flow media combinations as previously mentioned. Resin flow was from the lower part of the picture towards the top (samples were infused laying flat).
.
Click image for larger version  Name:	IMG_2393.JPG Views:	1 Size:	262.9 KB ID:	10726300

The best result was sample #2, which had 1 layer of CSM and 1 layer of DBM1708, NO Peel ply but flow media.

Sample #3 was the worst in terms of wet-out. It was similar to sample #2, except it had a second layer of DBM1708.

In between those 2, in terms of quality was sample #1, which had CSM + 1 layer of DBM1708 AND Peel ply.

So, it looks like I'll set up an infusion according to sample #2. The flow media will probably become embedded in the laminate, but that should be OK. (I think :) )
 

tpenfield

Moderator
Staff member
Joined
Jul 18, 2011
Messages
17,712
Gelcoat Update . . .

Gelcoat is now applied to the platform mold.
.
IMG_2396.JPG .
This was only 40 oz. of gelcoat, which I thought would not be enough, . . . but it went a long way. I still have plenty of gelcoat left to do another coat, and/or do the underside of the finished platform.

I applied it with a small roller to get a fairly thick coating. . . not sure if I need another coat :noidea:

BTW - on the gelcoat can it said to use "no less than 1.5% and no more than 3% MEKP". So it looks like 2% is the norm for gelcoat. That's what I used.
 

briangcc

Commander
Joined
Jul 10, 2012
Messages
2,117
Looking good Ted! Can't wait to see the finished product so hurry up would ya? :)
 

tpenfield

Moderator
Staff member
Joined
Jul 18, 2011
Messages
17,712
Speaking of doing it right the second time . . . I pulled (more like pried) the hatches from their molds.

The second one that I did came out better than the first. The first one (right side in picture) had some dry spots in the corners, so that will be some re-work.
.
Click image for larger version  Name:	IMG_2397.JPG Views:	1 Size:	178.0 KB ID:	10726391
.
For some reason :noidea: the second one seemed to have more resin in the mold. I was pretty sure that I used the same amount for each, but maybe I messed up on the first one (should be 26 oz each mold . . . )
 

tpenfield

Moderator
Staff member
Joined
Jul 18, 2011
Messages
17,712
Quick Update - Non-skid surface repair . . .

A few areas of the non-skid surface of the hatches got beat up during the 'de-molding' process. Fortunately, I still have the original hatch plugs.

So, to repair these areas, I am using the plugs to make an impression of the corresponding damaged area.
.
wAAACH5BAEKAAAALAAAAAABAAEAAAICRAEAOw==


Once cured, I pulled the impression off the plug.
.
wAAACH5BAEKAAAALAAAAAABAAEAAAICRAEAOw==

.
And now I can use this to fix the non-skid area(s) that need some attention.
.
wAAACH5BAEKAAAALAAAAAABAAEAAAICRAEAOw==
.

It is sort of the same idea as using the GIBCO negative images for non-skid area repair.
 

tpenfield

Moderator
Staff member
Joined
Jul 18, 2011
Messages
17,712
Schedule update . . .

It looks like I am not going to be able to do the platform infusion this weekend, as we have plans for Easter. So, that puts me a little bit behind my 'schedule', but I think I can make up some ground next week.

Today, I'll get everything ready for the infusion so that can be first thing to do next weekend.

I did want to show folks some of the 'plumbing' that I used to infuse the platform mold and will be using again to infuse that actual platform, in case anyone is interested.

Here is what I call the 'distribution manifold' . . .
.
IMG_2403.JPG .
It is series of 3/4" polypropylene irrigation fittings with 3/4"-1/2" reducers at the endpoints, and a 3/4" valve. This gives a decent resin flow from the 'elevated' resin pot out to 4 resin feed lines, which are connected through the bagging material to the resin 'runner' system. I realized after the fact that these pipe fittings, when used with the clear tubing, do allow some air to leak through the threads. That was probably the source of leakage that I could not seem to hunt down last time. This time around, I have applied tape to all the joint areas to make the seal 100%.

With a large infusion (40 ish sq, ft.), I figured that I needed to get a decent amount of resin flow. It seemed to work really well for the mold infusion. I'm hoping it will work equally well next weekend. :thumb:
 

tpenfield

Moderator
Staff member
Joined
Jul 18, 2011
Messages
17,712
I spent about 5 hours laying out the glass and the infusion materials today. I put the second coat of gelcoat on the platform mold today and let it cure for about 2 hours, then began the cloth layup.

I didn't quite finish with the infusion materials, as I ran out of time. Here are some pictures of the progress from today . . .

Laying torn-up scraps of CSM in the corners . . .
.
Click image for larger version  Name:	IMG_2404.JPG Views:	1 Size:	181.3 KB ID:	10727108 .
.
Also around the perimeter is the main resin runner with all of the 'T' fittings. I started on the secondary resin runners, but only got 1 of the 8 runners completed. The runner is mounted on peel ply so that it can be easily removed after the infusion.
.
Click image for larger version  Name:	IMG_2416.JPG Views:	1 Size:	218.8 KB ID:	10727111 .
.
I'll finish things up next Friday (April 26th) and will be doing the infusion shortly thereafter.
.
 

Attachments

  • IMG_2409.JPG
    IMG_2409.JPG
    203.3 KB · Views: 2
  • IMG_2411.JPG
    IMG_2411.JPG
    175.1 KB · Views: 2
  • IMG_2412.JPG
    IMG_2412.JPG
    227.9 KB · Views: 2
  • IMG_2404.JPG
    IMG_2404.JPG
    181.3 KB · Views: 2
  • IMG_2408.JPG
    IMG_2408.JPG
    209 KB · Views: 2
  • image_310944.jpg
    image_310944.jpg
    191.1 KB · Views: 2
  • IMG_2405.JPG
    IMG_2405.JPG
    194.4 KB · Views: 2
  • IMG_2407.JPG
    IMG_2407.JPG
    209.9 KB · Views: 2
Last edited:

tpenfield

Moderator
Staff member
Joined
Jul 18, 2011
Messages
17,712
I realized something later in the day, yesterday . . .

I need to put some flow media (green stuff) between the runner and the peel ply. Otherwise, the resin will be mostly trapped within the runner and not disperse well.

IMG_2416B.jpg
.
So maybe it is good that I had a break in the action :)
 

tpenfield

Moderator
Staff member
Joined
Jul 18, 2011
Messages
17,712
Despite the amount of time setting up the infusion . . . probably about 7 hours in this case. . . I do like infusion versus hand layup. I can't imagine trying to do hand layup on the platform. unless I had a small army of people wetting out glass, mixing resin, etc.

I may do some hand layup for the additional layers, but that should be at an easier pace once I have the initial layers infused and presumably well bonded to the gelcoat.
 

garbageguy

Lieutenant Commander
Joined
May 8, 2012
Messages
1,537
Nice work! Maybe I missed it, but how heavy do you think it will be when done?

Enjoy your weekend activities (then get back to this, it's really cool!)
 

tpenfield

Moderator
Staff member
Joined
Jul 18, 2011
Messages
17,712
Quick update. . .

Today was all about 1 step forward, 2 steps back . . . :( :rolleyes:

I got the runners laid out and then secured the bagging material over the mold. Unfortunately, I had a bag malfunction and was not able to pull much of a vacuum. I ended up pulling off the bagging material for some re-engineering. I had the pleats in the wrong place and some other issues. . . I did find a small puncture in the material. So, I'll take another run at it tomorrow (4/27/2019)

Here is where I am at . . . got the runners done and about to take a second attempt at the bagging.
.
IMG_2427.JPG
.
 

Scott Danforth

Grumpy Vintage Moderator still playing with boats
Staff member
Joined
Jul 23, 2011
Messages
47,562
Ted....im usually 7 steps forward, 4 to rhe right, 8 back, then 5 to the left....

We have all been there
 
Top