Complete Restoration of 1982 Galaxy 16' bowrider with Mercruiser and Pre-Alpha

devildogae

Petty Officer 2nd Class
Joined
Jan 14, 2017
Messages
147
Hopefully you'll be foaming the hull If so it's practically impossible to utilize drainage I personally would not worry about it 😜

That's one thing I was wondering about. I've seen some people say don't put foam back in. The correct way would be to foam it after the deck is installed by cutting holes in your new deck correct?
 

Baylinerchuck

Commander
Joined
Jul 29, 2016
Messages
2,726
Yes, that is correct. It seems counterintuitive to cut holes in your new deck. After its foamed, you'll glass the pucks bacon place making it waterproof again.
 

pckeen

Commander
Joined
Jun 20, 2012
Messages
2,067
Nice looking engine - can't wait to see it brought back from the dead.
 

devildogae

Petty Officer 2nd Class
Joined
Jan 14, 2017
Messages
147
No Title

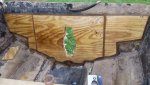
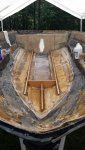
Made some progress. Got the transom built and placed onto the boat. I used foam board to make a template. Then cut the plywood, trimming and fitting until I thought it was perfect. Changed the design a bit, didn't do all the way to the sides with the second layer of 3/4 ply. Decided to bring it in a bit. Bonded the two pieces with PL premium. After that I traced the key hold. Cut it out and tested it, it was perfect.

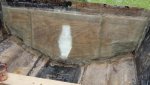
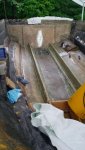
Ok so my father-on-law came to help me, so we coated the wood with two coats of thinned polyester resin. I used M.E.K to thin. Then I put a layer of CSM on the back side of the transom. I was shocked at how much the CSM took to wet out completely. I then made up some thickened resin with chopped stran and cabosil. Used a trow to apply heavily and we clamped it to the boat. One think I discovered later is that it slid some as we applied clamping pressure. Now the key hold is off but about 1/2 centimeter on one side, not sure top - bottom yet.

I did each layer within 4 hrs of each other.

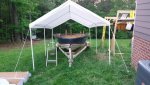
I put up a carport around it to keep the rain out until I can complete the hull section.

Questions:

I bought 5 gallons of Polyester Laminating Resin (Marine Grade) from promarinesupplies. It doesn't state if it was wax in it. They don't have customer support, but their tech doc states layups within 4 hrs or sanding required. Total cure in 24 hrs. This sounds like its waxed correct? I asked this before I bought but they couldn't answer my question. I'm kinda ticked off about it. If it is waxed, do I really need to sand, or wiping with acetone or M.E.K. will wipe wax away and ready for prep?
 

Attachments

  • photo264907.jpg
    photo264907.jpg
    77.6 KB · Views: 0
  • photo264908.jpg
    photo264908.jpg
    73.7 KB · Views: 0

Baylinerchuck

Commander
Joined
Jul 29, 2016
Messages
2,726
Just an FYI- PL is awesome, I used it a lot on my project. You have to give it time to gas out. Hopefully you waited at least 72 hours prior to laying glass over it.
Layup resin shouldn't have wax in it. It's best to do more layups when the resin is still a little tacky. If your fingernail scratches it, it's tacky. Cure time depends on amount of MEKP added, temp, and humidity. The instructions you have there read pretty generic. A quick wipe with MEK won't hurt. It softens the surface slightly. Don't thin your resin.
 

devildogae

Petty Officer 2nd Class
Joined
Jan 14, 2017
Messages
147
Just an FYI- PL is awesome, I used it a lot on my project. You have to give it time to gas out. Hopefully you waited at least 72 hours prior to laying glass over it.
Layup resin shouldn't have wax in it. It's best to do more layups when the resin is still a little tacky. If your fingernail scratches it, it's tacky. Cure time depends on amount of MEKP added, temp, and humidity. The instructions you have there read pretty generic. A quick wipe with MEK won't hurt. It softens the surface slightly. Don't thin your resin.

Yea, I still haven't laid glass over the two pieces yet, I will most likely tomorrow. When you say don't thin, are you stating ever, or just with the layups? I only thinned for the initial coats to get the wood to soak up resin.
 

Baylinerchuck

Commander
Joined
Jul 29, 2016
Messages
2,726
I was told not to thin for either. Instead use a slow kicking resin so the wood has time to soak it up by adding less MEKP.
 

devildogae

Petty Officer 2nd Class
Joined
Jan 14, 2017
Messages
147
I will need to test fit my engine to figure out the distances of the engine mount. I want to put the transom plates on only once. I've never done it, what items do I need to order for that process. Any advice, tricks, order of things I kneed to know.
 

Woodonglass

Supreme Mariner
Joined
Dec 29, 2009
Messages
25,924
Hopefully you took LOTS of measurements in the beginning. I'd highly recommend you put the Motor Mounts back in as closely to the original dimensions as possible. The alignment of the motor to the outdrive is not that forgiving so it needs to meet the factory specs.
 

devildogae

Petty Officer 2nd Class
Joined
Jan 14, 2017
Messages
147
Hopefully you took LOTS of measurements in the beginning. I'd highly recommend you put the Motor Mounts back in as closely to the original dimensions as possible. The alignment of the motor to the outdrive is not that forgiving so it needs to meet the factory specs.

There wasn't anything to measure, since it had collapsed from rotten wood. I don't have any info on the boat either. Can't find anything. So only thing I know is to test fit. But that's not what my question was. To put the transom plates on, need some advice of what I need, for example, gasket on both sides, or just outer side. Also my stern drive is MC-1, and I'm not sure what parts work for me. Can't find any kits for MC-1, but lots for pre-alpha, MR, etc...
 

devildogae

Petty Officer 2nd Class
Joined
Jan 14, 2017
Messages
147
No Title

Making headway!! I got the stringers installed and mostly glassed in. I still have the front to do after I grind some of the finger like projections from where I cut the 1708. I put two layers of 1708 to tab in the transom, two layers to skin the transom, and two layers over the stringers. I plan on putting down two layers of gel coat over the transom and then install the transom plate and gimbal housing. I have to install the engine to find where the front engine mount will be. Once I have that then it's time to start working on the deck. It's taking me so long because I work full time on the weekend, and watch my daughter during the day. She in 9 months old, so I get to work on it when she's napping. Here are some pics!
 

Attachments

  • photo265931.jpg
    photo265931.jpg
    74.5 KB · Views: 1
  • photo265932.jpg
    photo265932.jpg
    47.8 KB · Views: 1
  • photo265933.jpg
    photo265933.jpg
    89 KB · Views: 1
  • photo265934.jpg
    photo265934.jpg
    107.7 KB · Views: 1

devildogae

Petty Officer 2nd Class
Joined
Jan 14, 2017
Messages
147
No Title

Also rounded the lower shift cable nut, but I applied a torch to that puppy and hammered on a smaller socket after cutting the cable with a cutting disk, and she came out. That was a close one... So looks like the shift linkage seal needs replaced. Can anyone instruct me on how to do this? I think I saw a kit stating it has a new design.
 

Attachments

  • photo265953.jpg
    photo265953.jpg
    131.9 KB · Views: 1
  • photo265961.jpg
    photo265961.jpg
    109.7 KB · Views: 1

devildogae

Petty Officer 2nd Class
Joined
Jan 14, 2017
Messages
147
No Title

And what is this, and the rubber boot is in bad shape, need to be able to look it up, any help please.
 

Attachments

  • photo265962.jpg
    photo265962.jpg
    107.3 KB · Views: 0

pckeen

Commander
Joined
Jun 20, 2012
Messages
2,067
Do a Google search for parts diagrams and you'll find them. I can't post the names here.
 

52FordF2

Petty Officer 1st Class
Joined
May 31, 2013
Messages
372
That looks like a bumper part. I didn't remove mine either just painted over it :facepalm:

Check out my MC1 transom rebuild.
 

52FordF2

Petty Officer 1st Class
Joined
May 31, 2013
Messages
372
If you need to change out the old shift cable to a new one here's a procedure


This is a National Pipe Straight thread tap NOT tapered.

Also NAPA sells a 9/16 Spark plug socket that you can use with a deep well to remove or tighten shift cable into bell housing. The Spark plug socket has the HEX on the backside that a deep well can slide onto and use with a ratchet wrench. This is a cheaper option instead of buying the more expensive installation tool.
 
Top