Building a '93 Caravelle 1750 Classic Bowrider

Reserector_

Chief Petty Officer" & 2021 Splash of the Year Win
Joined
Oct 15, 2019
Messages
607
There is no way those are 4mm stitches. I know that's what the setting is but that's not what you are getting. 4mm would be a little more than 6 stitches per inch.

When the stitches are as short as what you are getting, you can have a big problem with them tearing through the vinyl.
I see what you are saying. I'll go bigger and see what I get. Thanks.
 

Baylinerchuck

Commander
Joined
Jul 29, 2016
Messages
2,726
There is no way those are 4mm stitches. I know that's what the setting is but that's not what you are getting. 4mm would be a little more than 6 stitches per inch.

When the stitches are as short as what you are getting, you can have a big problem with them tearing through the vinyl.
That’s great information. Most of the stitching of vinyl and leather is pretty long. I too have a walking foot attachment on a Singer, so I’m following along with much interest.
 

Reserector_

Chief Petty Officer" & 2021 Splash of the Year Win
Joined
Oct 15, 2019
Messages
607
Here is the best that this machine can do. 4mm pierce to pierce.
I tweaked the tension, and am really satisfied with the strength of the seams now. It's a good, marine vinyl. The stitches are tight, but not cutting in.

There was a plastic cover on the back of the walking foot that had a bad habit of snagging overlaps and wrinkles. I removed it and have not missed it one bit.
 

Attachments

  • 20201014_185314.jpg
    20201014_185314.jpg
    1.3 MB · Views: 21
  • 20201014_185421.jpg
    20201014_185421.jpg
    1.1 MB · Views: 20
  • 20201014_185424.jpg
    20201014_185424.jpg
    1.1 MB · Views: 20
  • 20201014_185428.jpg
    20201014_185428.jpg
    512.4 KB · Views: 21
  • 20201014_185435.jpg
    20201014_185435.jpg
    1.2 MB · Views: 21

bruceb58

Supreme Mariner
Joined
Mar 5, 2006
Messages
30,537
Here is the best that this machine can do. 4mm pierce to pierce.
I tweaked the tension, and am really satisfied with the strength of the seams now. It's a good, marine vinyl. The stitches are tight, but not cutting in.

There was a plastic cover on the back of the walking foot that had a bad habit of snagging overlaps and wrinkles. I removed it and have not missed it one bit.
That looks better. Is that through one piece or two pieces of vinyl? What does the back look like?
 

Reserector_

Chief Petty Officer" & 2021 Splash of the Year Win
Joined
Oct 15, 2019
Messages
607
That looks better. Is that through one piece or two pieces of vinyl? What does the back look like?
That is two pieces of material seamed, then doubled over and top-stitched. Once I got the tension adjusted, I'd say the bottom looks the same as far as how snug it is to the backing. I should have thought to take pictures of all that.
 

bruceb58

Supreme Mariner
Joined
Mar 5, 2006
Messages
30,537
That is two pieces of material seamed, then doubled over and top-stitched. Once I got the tension adjusted, I'd say the bottom looks the same as far as how snug it is to the backing. I should have thought to take pictures of all that.
What type of thread are you using?
 

Reserector_

Chief Petty Officer" & 2021 Splash of the Year Win
Joined
Oct 15, 2019
Messages
607
That looks better. Is that through one piece or two pieces of vinyl? What does the back look like?
I ran this pass through five layers. Front side photo, it's the pass on the right. Back side photo, it's the pass by my thumb.
This seemed to be the physical thickness limit for this walking foot attachment.
Tension is consistent whether two layers or five.
 

Attachments

  • 20201016_004116.jpg
    20201016_004116.jpg
    722.9 KB · Views: 18
  • 20201016_004226.jpg
    20201016_004226.jpg
    643.2 KB · Views: 18
  • 20201016_004159.jpg
    20201016_004159.jpg
    700.3 KB · Views: 18

vroom ZOOM

Chief Petty Officer
Joined
Aug 15, 2017
Messages
414
Quick question... thinking back to the bilge blowers: once the engine is running, will the intake draw enough air to prevent fumes in the engine compartment? Is it safe at that point to shut the blowers off?

The only time that gas fumes develop, barring a leak, is when the engine is off. The fumes eminate from the carburetor. Agree? Disagree?
Couldn't help but comment on this. partly from the carb, but also a thing you might be familiar with as an engineer - diffusion. Fun fact - the gas smell at a gas station is the diffusion of gas molecules through the hose. So you will get some gas vapours while fuelling when the gas is going through the fill hose - which is part of the reason they want you to run the blower at a fill up.
 

Reserector_

Chief Petty Officer" & 2021 Splash of the Year Win
Joined
Oct 15, 2019
Messages
607
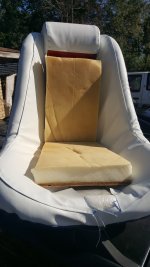
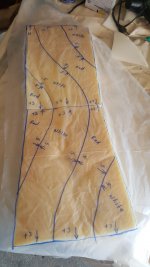
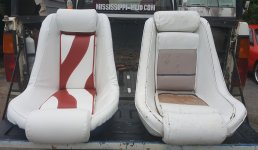
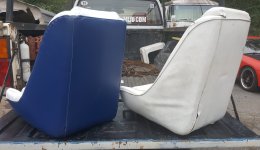
One seat is done. The other should be a snap because the patterns are made, and most of the parts are marked out, if not cut and sewn already.
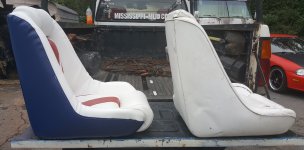
I reupholstered the seats in my truck five years ago with good success, but I have to say that covering these glorified plastic buckets is more difficult. Overall I am satisfied with how it turned out, and it is pretty comfortable to sit in.
I like the fact that I saved around $500 by not buying new ones. That's substantial to me. Staying in my budget while building an almost-like-new boat.
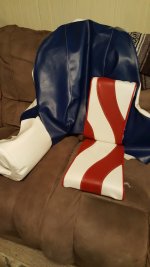
Staying with the American flag motif, too.
 

Attachments

  • 20201017_153621.jpg
    20201017_153621.jpg
    798.5 KB · Views: 16
  • 20201017_154535.jpg
    20201017_154535.jpg
    480.1 KB · Views: 20
  • 20201024_172708.jpg
    20201024_172708.jpg
    283.6 KB · Views: 20
  • 20201024_173017.jpg
    20201024_173017.jpg
    401.3 KB · Views: 20
  • 20201024_173256.jpg
    20201024_173256.jpg
    378.2 KB · Views: 18

Reserector_

Chief Petty Officer" & 2021 Splash of the Year Win
Joined
Oct 15, 2019
Messages
607
I've been thinking about how I want to build the fiberglass engine enclosure. I want to make it slick-finished glass like it came out of a factory mold, but I want to shortcut the process by skipping the plug stage. I just want to build a single-use mold with a smooth-surface material. Something like you would use in a a shower.
Maybe a sheet of powder-coated aluminum like I built my camper out of; I could roll curves into that. That stuff's not cheap, but might be worth $75 to build a nice mold with only one seam around the top.. Now that I think about it, aluminum is probably not much more costly than that shower board, and much easier to curve.

I have a good idea of how to brace it on the outside by using adhesive to attach the bracing to the sheeting.

I think the top could be flat, and I could form smooth fillets with caulk.

Anyway, the wheels are turning and the vision is starting to come to me.
 

Reserector_

Chief Petty Officer" & 2021 Splash of the Year Win
Joined
Oct 15, 2019
Messages
607
Random thought: The Coast Guard requires that I have a trash recepticle on board. This is a small ski boat. Maybe I can build something in while I am in this phase of construction. Any ideas? What do you guys use?
 

Scott Danforth

Grumpy Vintage Moderator still playing with boats
Staff member
Joined
Jul 23, 2011
Messages
49,538
I have two 55 quart coolers I built into the deck. One gets used as a cooler, the other the recycling/trash

I keep a box of the plastic bags from grocery shopping in the cabin. we double-wrap food waste so it doesnt grow by the time we clean out the cooler.
 

Reserector_

Chief Petty Officer" & 2021 Splash of the Year Win
Joined
Oct 15, 2019
Messages
607
Hoping for more thoughts on trash receptacles.
One more question: Glue down the carpet and THEN screw the seat pedestals in place, or screw the pedestals in place and cut the carpet around the pedestals?
 

Reserector_

Chief Petty Officer" & 2021 Splash of the Year Win
Joined
Oct 15, 2019
Messages
607
I have yet to strip and clean the second seat, but I went ahead and made all of the upholstery for it. This one waves in the opposite direction.
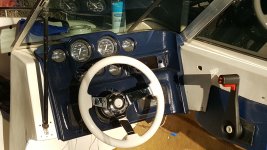
My original plan for the steering wheel was to wrap the Teleflex wheel that I already had, but at best that would leave me with a nicely wrapped wheel with an ugly black plastic hub and spokes that is too shallow.
I decided that this was a place to go ahead and splurge a bit. Keeping with the American flag theme, I went with white against the blue dash. It is a hard finish, so it should be easy to keep clean.
The adapter hub is polished aluminum. I think it brings out the bling of the gauges. I'm anxious to continue onto the interior panels that will bring the look full circle. But I need to get back to the outdrive and get the boat operational.
 

Attachments

  • 20201101_153530.jpg
    20201101_153530.jpg
    1.5 MB · Views: 11
  • 20201101_153541.jpg
    20201101_153541.jpg
    596 KB · Views: 11

todhunter

Canoeist
Joined
Sep 15, 2020
Messages
1,308
Hoping for more thoughts on trash receptacles.
One more question: Glue down the carpet and THEN screw the seat pedestals in place, or screw the pedestals in place and cut the carpet around the pedestals?
Take my opinion for what it's worth, because I've never re-carpeted a boat, but I would think you would want to put the carpet down first then screw the pedestal in place through the carpet. If you cut the carpet around the pedestal, the edge will eventually roll back and look bad, or potentially get snagged at some point in the future and tear.
 

Reserector_

Chief Petty Officer" & 2021 Splash of the Year Win
Joined
Oct 15, 2019
Messages
607
My main concern is about sealing. I don't want water to get under there and rot the screw holes. Maybe I'm overthinking it.
 

JASinIL2006

Vice Admiral
Joined
Feb 10, 2012
Messages
5,673
My main concern is about sealing. I don't want water to get under there and rot the screw holes. Maybe I'm overthinking it.

I think you are on the right track. I'd want to be sure the holes were sealed against water intrusion. That would be hard to do with a layer of carpet under the seat pedestals. It might make for trickier carpet installation, but well worth the trouble, in my book.
 

Scott Danforth

Grumpy Vintage Moderator still playing with boats
Staff member
Joined
Jul 23, 2011
Messages
49,538
finish the floor and do a snap in carpet.
 

Reserector_

Chief Petty Officer" & 2021 Splash of the Year Win
Joined
Oct 15, 2019
Messages
607
I could mark the screw holes on the carpet, and then cut away the carpet where the screws will be so I can pre-drill and apply a small bed of sealant for each screw. I'm picturing a round piece of carpet about a half inch smaller diameter than the pedestal base.
 
Top