Bought a 1998 Sea Ray Sundancer 270 wide beam with rot...

tpenfield

Moderator
Staff member
Joined
Jul 18, 2011
Messages
18,040
Yes, there is no hard and fast way of doing it. A variety of tools can get the job done, and the amount of access comes into play. I suggest that you Google a bunch of transom repair threads to see the variety of approaches. The toughest thing tends to be getting the wet, but not rotted, wood out of the transom to a point where you have good/dry wood remaining. It seems like the wood has a death grip until it rots.
 

drewm3i

Petty Officer 1st Class
Joined
Dec 31, 1969
Messages
288
Quick qyestion: So I have begun to skin part of the transom with the oscillating tool. It works fairly well, but for some reason it keeps burning/smoking with the steel cutting blade. Am I doing something wrong?
 

Baylinerchuck

Commander
Joined
Jul 29, 2016
Messages
2,726
Quick qyestion: So I have begun to skin part of the transom with the oscillating tool. It works fairly well, but for some reason it keeps burning/smoking with the steel cutting blade. Am I doing something wrong?

Fiberglass is hard on those blades. If cutting, I have found the metal cutting blades last the longest. They have a tooth rake that closely resembles a hacksaw blade. Wood cutting blades wear down very quickly. Cutting Fiberglass generates a ton of heat that burns up the blades very quickly.
 

tpenfield

Moderator
Staff member
Joined
Jul 18, 2011
Messages
18,040
Quick qyestion: So I have begun to skin part of the transom with the oscillating tool. It works fairly well, but for some reason it keeps burning/smoking with the steel cutting blade. Am I doing something wrong?

Like what Chuck said, and in my boat cutting experience, I have found fiberglass to be tougher than steel. You tend to go through lots of cutting blades.
 

drewm3i

Petty Officer 1st Class
Joined
Dec 31, 1969
Messages
288
Good to know. I've been cleaning and cutting some more, but I'm waiting for more blades and tools to finish the demo. Another thing I've noticed is my engine hatch lid feels soft in a few spots by foot. I removed the foam and drilled a bunch of holes and the wood is intact. I think the problem is that the wood is so thin that it really doesn't do much. I could try adding more support, but this is the OEM design and the squishy area is under a seat.
 

Baylinerchuck

Commander
Joined
Jul 29, 2016
Messages
2,726
Think you could add a few layers of fiberglass to the bottom side, then replace the foam? Wouldn't add much in the way of thickness, but sure would stiffen it up a bit IMO.
 

shaw520

Chief Petty Officer
Joined
Aug 27, 2009
Messages
634
1-1/4" pvc pipe cut lengthwise in halves, epoxied to the bottom will create some massive rigidity.
 

drewm3i

Petty Officer 1st Class
Joined
Dec 31, 1969
Messages
288
Update: I would say my gut is at least half way complete. Overall the damage is not too bad. I have repeatedly confirmed the port main stringer and bulkhead are good. I have cut back the aft bulkhead to good wood on either side. Furthermore, I have cut out pretty much all the remaining fiberglass tabbing in this area. I also cut the engine stingers out in the rear portion to skin the transom, which I have also done. The center, lower portion was mush and wet, but there seems to be lots of good wood too. I am in favor of a partial replacement of course. Here are some pics:

Center transom:


Most of the rotted wood is dug out, I am still trying to figure out how to cut the rest out of the transom. I want to use the oscillating tool , but I don't want to cut through the hull. Would a grinder work better?


See this little block??? IT'S ALUMINUM. I do not know it's purpose, but it keeps the (dry) foam off the hull. I am also guessing the main stringer buts up against it. I drilled into it because it was a bit soft, I knew something was up, but being aluminum makes sense. I also can't get it to budge so I'm going to leave it and rebuild around it as the foam is fine.


Here is a larger view of the same main stringer. Note the spacing blocks:


Port side of aft bulkhead cut back to good wood:


Starboard side cut back to good wood:


Stringer skins practically gutted near bulkhead:


Drilled holes in engine hatch, all solid:


Not the design of the hatch, very weak in the center. I like the pvc pipe idea, but it may interfere with my risers:
 

drewm3i

Petty Officer 1st Class
Joined
Dec 31, 1969
Messages
288
Looks like you're doing a proper job !

Indeed, I don't want to to skimp, but I also don't want to overbuild and never finish. There's no need to go overboard IMO and build it way better than Sea Ray (who actually did a pretty decent job IMO.
 

alldodge

Moderator
Staff member
Joined
Mar 8, 2009
Messages
42,056
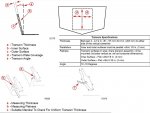
I would use the oscillating saw before a grinder and would go clear to the skin. The transom must be flat and perpendicular to within 1/8 or 3mm. If it does not meet these specs then there could be problems aligning the motor.

I would also remove the stringer skin glass and redo them when the new is reinstalled. the new stringer will slide into the slot but it will not be bonded to it. Need to grind out all the paint on portions not being replaced so the new glass will bond to it.

Transom Thickness.jpg
 

tpenfield

Moderator
Staff member
Joined
Jul 18, 2011
Messages
18,040
My 2 cents . . .

Transom

Cut around the wet/rotted area (looks mostly around the drain plug) . . . Let the other areas dry out and treat them with E.G . . . let dry out a bit. Replace the rotted area and glass everything over, making sure your transom assembly areas stay true and of proper thickness. This looks like a partial replacement is the right thing to do based on what I can see in the photos. I see no need to do a full or even greater partial replacement provided that you treat the remaining wood.

For the deck hatch . . .

If you think it could use some stiffening, See if you can get a height measurement on the engine from the bottom of the engine mount to the top of the spark arrestor. Compare that measurement from where the engine mount once rested upon the outboard stringers. That should give you an idea of how much clearance you had to the underside of the deck hatch when the engines were in the boat.

Hopefully you will have enough space to add a 1" or 2" high stiffener and epoxy it to the existing glass on the underside of the hatch. Allow some clearance for margin of error, etc.

I'm also interested in the foam chamber that the starboard main stringer was a part of . . . wondering if the foam got saturated. also, you are going to need to access the chamber to tab in the new stringer from both sides, then re-build and re-foam the chamber.
 

drewm3i

Petty Officer 1st Class
Joined
Dec 31, 1969
Messages
288
How would you all feel about an epoxy filler/putty for the bad parts of the transom versus glassing in new wood? I save the transom fiberglass skin FYI.

Also for clarification: in the compartment in question, the foam is not saturated and it is indeed structural.

The main stringers are almost completely hollowed out by the way. One was really rotted, but the other is not terrible and I'm having a tough time getting the wood out even with a chainsaw.
 

tpenfield

Moderator
Staff member
Joined
Jul 18, 2011
Messages
18,040
How would you all feel about an epoxy filler/putty for the bad parts of the transom versus glassing in new wood? I save the transom fiberglass skin FYI.

Also for clarification: in the compartment in question, the foam is not saturated and it is indeed structural.

The main stringers are almost completely hollowed out by the way. One was really rotted, but the other is not terrible and I'm having a tough time getting the wood out even with a chainsaw.

You could even go with a high density foam (16 lb/cu ft ) for the patch area in the transom.
 

drewm3i

Petty Officer 1st Class
Joined
Dec 31, 1969
Messages
288
Update, though I haven't posted more pictures, I have been continuing with the demo which is basically done. The bad stringer is gutted, the engine mounts are hollowed out, and a small portion of the lower transom has been removed. I am still unsure whether I am going to use arjay/seacast/nida for the whole restoration or just the engine mount. I may end up doing a bit of both wood and composite. Here are some pics:

Lower center of transom removed in a rectangular shape to make repair easier:


Hollowed out stringers:


Bad stringer removed:
 

tpenfield

Moderator
Staff member
Joined
Jul 18, 2011
Messages
18,040
drewm3i it has been a while . . . any updates on the project. I also see you have become one of the victims of photobucket. :(
 
Top