Boat porpoising

alldodge

Moderator
Staff member
Joined
Mar 8, 2009
Messages
42,027
I've never done this but my thought would be to get an angle finder like this
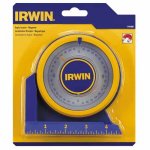
IRW-1794488-2.jpg

Place the finder next to the transom and see what the angle is, then place it on the forward edge of the leg. The difference between the two angles is the angle you need to make if flat. If after the wedge is installed and it plows to much, the motor can be moved out with the pin.

That said, I can only find one manufacture and that's T-H Marine. They sell on which is one inch thick and changes the angle 5 degrees. Walmart also sells them online
http://thmarine.com/transom-wedge.html
 

Trains1938

Petty Officer 3rd Class
Joined
Jun 30, 2015
Messages
75
Hi Alldodge, Thanks for the come back. Sounds like a plan to me. Will see if I can get one, perhaps Harbor fright might have one. Will check it out today and let you know how it turns out. It may take a while before I get this all done though.
 

Trains1938

Petty Officer 3rd Class
Joined
Jun 30, 2015
Messages
75
Hi Alldodge, Checked out angle of my transom (using the carpenter square method) and it is about 15 degrees. Still looking for a angle finder that I can afford since it will only be used once. Question, If I make sure the leading edge of the motor is the same as the transom, would that work?
 

Watermann

Starmada Splash of the Year 2014
Joined
Jan 12, 2013
Messages
13,786
Starcraft transoms are 15 degrees as well, so that's pretty common. You don;t need a special tool to find the degree of angle, this web page describes how to find it and has a calculator for the measurements.
 

alldodge

Moderator
Staff member
Joined
Mar 8, 2009
Messages
42,027
As before I have not done this before but the wedge only come in one size from what I can find. So unless your going to make one, I would just get the one listed, either that or make one out of wood just to see how much it will help. If it works then go get one
 

Watermann

Starmada Splash of the Year 2014
Joined
Jan 12, 2013
Messages
13,786
[h=4]CMC Transom Wedges and Setback Spacers (Item #20122)[/h] These 2 degree wedges are designed to give extra positive or negative trim.
Features:
  • Used as an aid for boats with an insufficient transom angle or for boats having planing problems at low speed
  • Unique design of the CMC Transom Wedges allows you to also use them as set back spacers
  • Simply stack and invert 2, 4, and 6 sets (sold in sets of two)
  • Fit all Transom jacks, jack plates, Outboard lifts, tilt trim units, and outboard motors with a standard B.I.A bolt pattern
  • Made of strong 6061 T6 alloy aluminum (not cast aluminum)
 

sphelps

Supreme Mariner
Joined
Nov 16, 2011
Messages
11,462
My transom was around 12 to 13 deg .
Wedge was 5 deg . I could not set the wedge fully down because it was pushing my steering cable to far out and would hit the raised sides of transom .
It still worked fine and I usually don't have to set the ptt all the way down to stop the porpoising
 

Trains1938

Petty Officer 3rd Class
Joined
Jun 30, 2015
Messages
75
Hi Alldodge, You jest gave me a idea, I think I will make some using the spec. of one that is already made. I that works I will buy a set. I have found 2 different angles. A 2 degree and a 5 degree. I plan on making a set of both.
 

Pusher

Lieutenant
Joined
Sep 2, 2014
Messages
1,273
A cheaper alternative might be to place a ruler between the leg of the motor and the bottom of the transom measuring that distance. Next you would measure up the transom 12 inches and again measure the distance between the transom and the leg of the motor mount directly 90 degrees off the transom.
This would tell you how many inches out it goes for every foot and then you can divide that distance by 12 to get the step out per inch (lets call it "Y").
Then all you would have to do is measure the length between your upper transom bolt holes and lower bolt holes and multiply that by "Y" to get the amount of distance that should be between the transom and your top motor mount holes.

Also I bet you could make a pretty fancy one out of a $30 Teflon cutting board or for a dollar at the Goodwill.

Definitely less sophisticated than the angle described earlier but it might work.
 

Trains1938

Petty Officer 3rd Class
Joined
Jun 30, 2015
Messages
75
Hi redneck joe, I guess I could. However I think I will make some out of hard wood and see how they work. I plan to make the same seize as the original ones. If they work, I mite just leave them in.
 

Trains1938

Petty Officer 3rd Class
Joined
Jun 30, 2015
Messages
75
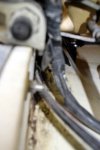
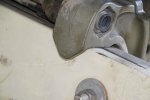
Hi guys, Just ran across another problem. You know that I was going to install transom wedges but I found out that I do not any clearance between the motor and the transom for any wedges. I only have about 1/4" between the motor mount the little hook that is over the transom. I have thought about cutting them off but I don't think that is a good idea. What would you guys suggest?
 

alldodge

Moderator
Staff member
Joined
Mar 8, 2009
Messages
42,027
Cutting the hook doesn't sound good but got a pic so we can look at it?
 

Watermann

Starmada Splash of the Year 2014
Joined
Jan 12, 2013
Messages
13,786
The hooks assist in putting the motor on the transom but they do nothing to hold the motor on as you mentioned they're 1/4" away from the front of the transom. Not sure I would want to cut them either but they really serve no purpose.
 

Trains1938

Petty Officer 3rd Class
Joined
Jun 30, 2015
Messages
75
Hi ALLDodge, Will try to post a pic tomorrow.

Hi Watermann, Going to post some pic's tomorrow if I can. Then you guys can take a look at what I mean.
 

sphelps

Supreme Mariner
Joined
Nov 16, 2011
Messages
11,462
Can you lift the motor just enough to clear the hook ?
Most only hang down a 1/4" or so ..
 

Trains1938

Petty Officer 3rd Class
Joined
Jun 30, 2015
Messages
75
No Title

Hi guys sorry for the delay, had problems on this end. However here are the pic's. As far as raising the motor above the hooks, then the motor would not be setting all the way down on the transom. I don't think that would be right for me.
 

Attachments

  • photo255330.jpg
    photo255330.jpg
    40.1 KB · Views: 0
  • photo255331.jpg
    photo255331.jpg
    36.4 KB · Views: 0
  • photo255332.jpg
    photo255332.jpg
    38.7 KB · Views: 0
  • photo255333.jpg
    photo255333.jpg
    39.7 KB · Views: 0

sphelps

Supreme Mariner
Joined
Nov 16, 2011
Messages
11,462
That is a rather long hook turned down ... How does the vent plate line up with the bottom of the hull ? If it is bellow the hull bottom it would improve the performance if the motor was moved up some ... Then you could shim under your mounting bracket ... Or do what was suggested earlier and add some washers to the top bolts to bottom out what space you do have on the mount hook ... Some times it don't take a lot of down trim to really help performance...
Just throwing thing out there .... You'll get it worked out I'm sure ...
 

Watermann

Starmada Splash of the Year 2014
Joined
Jan 12, 2013
Messages
13,786
The motor sitting on top of the transom means nothing. Take a look at after market jack plates and trim units. They bolt directly on the the transom face with nothing on top, same goes for OB pods.
 

Patfromny

Lieutenant Junior Grade
Joined
Dec 2, 2012
Messages
1,197
My motor is about a half inch off the transom to line the cav. plate up with the bottom of the hull, no problems to report thus far. in fact, if you look at your motor plate, you will see that the motor is probably on the highest bolt hole setting. you can jump up hole settings until the motor lines up with the hull with no problem.
 
Top