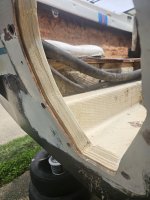
Any Transom experts here. I have a Transom Rebuilding Question.

todhunter

Canoeist
Joined
Sep 15, 2020
Messages
1,316
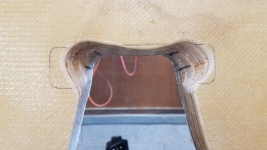
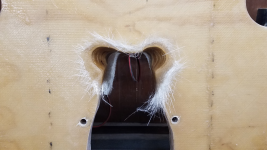
I didn't have a template, fixture, or a special kind of saw. I just took a die grinder with a 1" drum sander on it and went to town - see HERE. I glassed over the wood I ground away afterwards, then gelcoated. In the link above, I had eyeballed it before installing the transom, but when installing the transom assembly, it was hitting the transom. I just used a sharpie to mark where I needed to grind further.
 

1985 Century Mustang

Chief Petty Officer
Joined
Mar 9, 2023
Messages
532
I didn't have a template, fixture, or a special kind of saw. I just took a die grinder with a 1" drum sander on it and went to town - see HERE. I glassed over the wood I ground away afterwards, then gelcoated. In the link above, I had eyeballed it before installing the transom, but when installing the transom assembly, it was hitting the transom. I just used a sharpie to mark where I needed to grind further.
I downloaded your photos for my reference, Nice job! 👍. I think I'm gonna use a keyhole saw with a pilot bit.5.png6.png
 
Last edited:

Drivewayboater2

Petty Officer 1st Class
Joined
Aug 21, 2019
Messages
335
What's the best way to apply the peanut butter resin to the transom?
I used a paint stirrer to get the globs in place. Then used plastic spoons to create a reversed radius. You want those to be as rounded and as smooth as possible so your fiberglass tabbing goes in much easier.

i also used a 1qt plastic bag. Filled it with thickened resin, cut the corner about 3/8”. Similar to a bakers icing applicator. Just squeezed the bag and applied the resin to where it needed to go. Learned that from the folks here.
 

1985 Century Mustang

Chief Petty Officer
Joined
Mar 9, 2023
Messages
532
I used a paint stirrer to get the globs in place. Then used plastic spoons to create a reversed radius. You want those to be as rounded and as smooth as possible so your fiberglass tabbing goes in much easier.

i also used a 1qt plastic bag. Filled it with thickened resin, cut the corner about 3/8”. Similar to a bakers icing applicator. Just squeezed the bag and applied the resin to where it needed to go. Learned that from the folks here.

Thanks, I like the idea of the makeshift icing bag. I saw that on YouTube, I forgot about that way with the bag.
 

1985 Century Mustang

Chief Petty Officer
Joined
Mar 9, 2023
Messages
532
Question: What should I use to fill the screw holes in when I glued it together previously. Is it a bad idea to leave the screws in and then fill over them? I was thinking if I removed the screws to fill the holes with Titebond 3 glue or 3M 5200. Your thoughts.

Screenshot_20240509_075525_Gallery.jpg
 

JASinIL2006

Vice Admiral
Joined
Feb 10, 2012
Messages
5,678
I took the screws out because I didn't want to take a chance on drilling into a screw if I had to install any kind of thru-hull fitting. I filled the holes with thickened resin before I skinned the transom core with fiberglass.

For applying the peanut butter, I used a large (4" or 6") plastic putty knife and scooped the stuff out of a bucket and smeared it on the transom. The icing bag approach seems unnecessarily fiddly to me, and loading the bag with thickened resin also takes away from your working time after you have catalyzed the stuff. Mixing it in a bucket and slathering it on works fine; if you can't keep the PB loaded on a putty knife, it's probably too thin anyway.
 

Chris51280

Ensign
Joined
Jan 24, 2018
Messages
932
I agree with JASinIL. Ever done cake decoration? The stuff will end up everywhere. It is very sticky once it starts to cure. I used a large spoon to get nice fillets. also acetone to clean after. that dollar tree spoon helped me make nice round corners
 

Dubed

Petty Officer 1st Class
Joined
Sep 3, 2021
Messages
373
Is it a bad idea to fill in the screw heads that are counter sunk, and leave them in? A carpenter friend of mine said it won't harm it if the screws are in and sealed over.
I would remove them, drill a fresh hole straight through, glue and drive a hardwood dowel through, flush cut, then seal. This will fill in all voids and not have the chance of hitting a screw head when screwing in any accessory
 

1985 Century Mustang

Chief Petty Officer
Joined
Mar 9, 2023
Messages
532
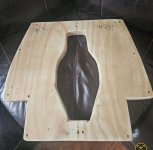
I just dry fitted the new wood transom piece in, but i just noticed there is slight gap thats shown in the photo between the gelcoat and new transom and it's not flush. Nothing's tying it up as the surface seems fine but, maybe the gelcoat had warped causing it not to fit tightly.

I'll do a dry clamp with wood on the inside and outside of the transom and see if it brings the new wood transom into together tightly so I can then peanut butter it in. The gap is about 1/4 of an inch or less on some areas of the bowling pin cutout.

In other words it's not totally flush, but it's flexible to where it will join together if I clamp it. I'll advise.

Is it too much of a spacing? Your thoughts.

20240517_122853.jpg
 
Last edited:

1985 Century Mustang

Chief Petty Officer
Joined
Mar 9, 2023
Messages
532
need to be within the spec I gave you before. any gap can be filled with peanut butter that has the 1/4 chopped strand in it.

It tightened up pretty good when I did a dry run with the clamps. I'm doing the resin peanut butter fiberglass mix in a little while, I'll advise on how it went. I'll take some photos too.
 
Last edited:

1985 Century Mustang

Chief Petty Officer
Joined
Mar 9, 2023
Messages
532
Put the transom in yesterday and I followed the directions for the resin hardener etc. it's approximately 16 hours since, Today I noticed it's still a little tacky where it squeezed out, some areas are hardened ok, but some not, our temps here overnite were in the mid 50s, but it was in the low 70s yesterday when I applied it. Is this an issue as to why it's still tacky in some areas where it squeezed out on the sides due to the colder temps? I used 1 oz of MEKP to 1 quart of resin. Also, should I use a heater overnite till it gets warmer out, as it will soon in the next few days or so? Your thoughts.
 
Last edited:

Drivewayboater2

Petty Officer 1st Class
Joined
Aug 21, 2019
Messages
335
Colder temps with make the cure time take longer. Humidity will effect it as well. As long as your proportions of MEKP and resin where correct you should be good.
any pics of how you clamped in your transom? As Chris said you gotta be within spec when as is said and done.
 

JASinIL2006

Vice Admiral
Joined
Feb 10, 2012
Messages
5,678
It's a bit late, but the things you want to make sure are:

1. Thickness of transom (transom core + fiberglass + peanut butter) is between 2" and 2.25"
2. The exterior of the transom (where the gimbal housing meets the exterior of the hull) is perfectly flat top to bottom and side to side.
3. The thickness of the hull is uniform (e.g., 2" all around the keyhole).

As long as you hit those, you should be OK. If you didn't there are fixes, but they involve extra work.
 
Top