And Away We Go, Restarting The Rebuild

wooky30014

Petty Officer 1st Class
Joined
Jun 8, 2012
Messages
288
Yup, tag along, maybe you and/or others can give me some more good ideas. Through talking with several others I've modified an idea for the stringers when I soon get to them. Instead of laying a 2X? flat in the strakes (slight curve front to back) and then cut parallel channels for 3X4 ply I'll cut to fit and laminate 2 layers of 3/4 with the channel and where needed set bulkheads on the laminated wood, fillet and tab. Should be a bullet proof hull for the local "ponds", won't ever see saltwater (even though it was originally made for ocean running)
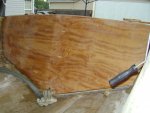
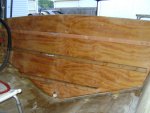
 

Attachments

  • Stringer Idea 2 (2).JPG
    Stringer Idea 2 (2).JPG
    1 MB · Views: 0

wooky30014

Petty Officer 1st Class
Joined
Jun 8, 2012
Messages
288
I got another milestone done here (have seen it in me head SO many times and now can put me grubby lil paws ON it :excitement:). Transom wood is IN the hull :triumphant: WOO HOO. This was betwixt the rain :rain:, sun :flame:, clouds, and a threatened storm tonight. It's shimmed and has a temporary clamp bracket holding it it place until I can drill the holes where the big clamps will go when I glue it in. I had thought about moving it back out of the way to grind the fillets down just a bit, NAH, all that just for a 1/8-1/4 inch lower. I also marked where I'll be drilling for the threaded rod for the clamps. The marks are dead center and I may adjust up or down where they'll actually be.
 

Attachments

  • photo296591.jpg
    photo296591.jpg
    879.7 KB · Views: 0
  • photo296592.jpg
    photo296592.jpg
    373.5 KB · Views: 0

Baylinerchuck

Commander
Joined
Jul 29, 2016
Messages
2,726
Glad to see you’re back at it, and soooo sorry about your loss. Tough stuff.

The wood in the center of the keel was there as reinforcement. My Chaparral had wood in the same place as well as in the strakes. I removed all the wood in the keel replacing it with CPVC and gluing it in place with PL, then a few layers of 1708. For the strakes I just replaced with some hairy PB. I didn’t want any wood in those areas.

if it were me, I would build the stringers and any lateral support with plywood instead of dimensional lumber. ACX plywood is much stronger and what most folks use here. Properly glassed, bedded, and tabbed, your rebuild will be far stronger than factory.

:)
 

wooky30014

Petty Officer 1st Class
Joined
Jun 8, 2012
Messages
288
Thanks chuck, the hardest part of all that was watching my Dad take his last breath :sorrow: OH no, I didn't have anything in the keel, just two of the strakes but I'm planning to put new wood (ACX is what I have for transom and what I'll use elsewhere as well, mainly for the waterproof glue used in it's manufacture) in all four strakes as well as the chines. She had a 6 inch piece of ply in the chines up the side up to about where the helm was. Deep down in the bilge starting about 3 or 4 feet from the stern is another set of strakes that I'll place stringers too, these will support the dropped floor/walkway on up into the cuddy. Yeah it was mentioned by someone NOT to use 2X's but instead laminate the 3/4 ply with staggered joints with the 1/4 inch or so groove to set the upright 3/4 stringers, kinda like an I-beam. I'll have any bulkheads setting on the laminated ply. Once in place all will be tabbed and covered with 1708, 2 layers I think should do it from what I've read. The idea is to have the stringers and bulkheads tie together with the deck (planned 1/2 ACX also resin sealed after cuts needed) to have basically a one piece frame supporting the hull skin and anything built in or mounted to it, seat boxes, pedestals, fuel tank(s), etc. The engine bed will come later when I actually get it (not near ready for it yet) and will be tied together with the stringers and it's own forward bulkhead. Agreed, this will be a stronger and perhaps even a little lighter boat when done. Some of the work I saw during the tear down I'd swear it was trainees or amateur hour at the factory :facepalm: :eek:
 

Baylinerchuck

Commander
Joined
Jul 29, 2016
Messages
2,726
Trust me, as many of the threads I’ve read here, and seeing how my Chaparral was build, you’re not alone on the amateur hour thinking. Boat manufacturers cut corners to turn profits. I think they’ll hand a chop gun to anyone. That said, the hull molding, at least in my Chaparral was very robust. It needed to be, 10 or more years with a rotten sub structure, and it didn’t break in half. Pretty impressive.
 

wooky30014

Petty Officer 1st Class
Joined
Jun 8, 2012
Messages
288
This old Seabird is a stout one as well, down to the bare hull I didn't find any chopper evidence. It appears to be all hand laid (?) woven cloth, the thick heavy stuff. The liner in it was stout as well in some places, same woven cloth, but it was so thick and heavy. Some spots where I cut it up were twice as thick as the ply inside :faint2: . The stringers weren't bedded and had a void the entire length of both, tabbing was sloppy :eek: and the glass lifting hoops (?) were 2 inches thick where the joined the hull. When I tore it down for this build the flotation foam was water logged and simply stepping on the deck caused water to come out :facepalm: no drains either. (It's no wonder the liner was cracked in several places and some stress cracks in the cap. Like I said before I've done a boatload of research, reading and watching videos to get it right this time. The hull itself is in fine shape with just a few scratches that will be easy to fix
 

wooky30014

Petty Officer 1st Class
Joined
Jun 8, 2012
Messages
288
After a late start I got the clamp wood cut and drilled. I did a "dry fit" just to make sure (after mixing the resin is NOT the time to find something doesn't fit right :frown:) I also got to thinking that the resin might get squished out leaving just a thin film, not good. SO I fashioned a set of spacers/shims from some leftover plywood, 2 plies of the 6 giving me about 1/8 inch thickness, 3 for the threaded rods and a pair for each clamp board end. As always, if someone has a suggestion or another idea . . . . . it's going to be a couple of days before I'll be gluing this in
 

Attachments

  • photo296825.jpg
    photo296825.jpg
    876.4 KB · Views: 0
  • photo296826.jpg
    photo296826.jpg
    730.1 KB · Views: 0

Baylinerchuck

Commander
Joined
Jul 29, 2016
Messages
2,726
Yeah, it’s ok for the thickened resin to squeeze out. You want the fit to be tight. Keep in mind thickened resin alone is not that strong. Squeezing it out ensures even coverage and a thin, very strong bond. What does squeeze out you can tool around the edges to make your fillets. An 1/8” gap would waste resin and would not be very strong unless you added 1/4” chop. Without the chop strand in there, you run the risk of that 1/8” layer of thickened resin cracking. You also risk not getting even coverage of resin bonding the wood and hull. Air gaps are not ideal. Again, I would forget about making an 1/8” gap. Clamp that wood tight.
 

wooky30014

Petty Officer 1st Class
Joined
Jun 8, 2012
Messages
288
Maybe I left the recipe out, tropical extra slow hardener epoxy (gives me a little extra time to "play" plus it's been in the mid to high 90's here), a good handful of chopped strands for the structural strength (just been "eyeballin' how much so far), and cabosil to thicken it enough to not run
 

sphelps

Supreme Mariner
Joined
Nov 16, 2011
Messages
11,445
Yep clamp it down snug just not too tight that you squeeze all the pb out . I think most suggest using a notched trowel to apply the pb . 1/4” x 1/4” maybe ...I would also roll a layer of resin on the plywood side facing the transom skin before you glue together ..
Looking great keep up the good work !
 

wooky30014

Petty Officer 1st Class
Joined
Jun 8, 2012
Messages
288
Thanks sphelps, Yeah one of the videos I saw showed the rolling resin on one side, PB on the other, and the notched trowel. I was taking a break yesterday and piddling around and noticed there is a slight bow-in in the skin (wood is flat and straight) so it looks like it would be squeezed out no matter what. Question, with the chopped fibers (maybe a little extra) in the mix would the shim keeping a 1/8 inch layer help or hurt the structural strength ? I want to get this right.
 

Mad Props

Lieutenant Commander
Joined
Jul 8, 2016
Messages
1,766
I wouldn't bother with the shims. Also not positive, but I don't think you NEED chopped glass with epoxy, but it may be beneficial in acting as a small shim that will prevent you from squeezing out ALL of the resin, so couldn't hurt to add it.
 

wooky30014

Petty Officer 1st Class
Joined
Jun 8, 2012
Messages
288
Thanks Mad Props, after what has been said here I believe I'll scrap the shim idea. The PB formula, I got from watching several videos on boat rebuilds, particularly the transom wood replacement. There they said chopped fibers give structural strength and the cabosil gives some bulk and helps prevent sags or runs. I got to thinking (a dangerous sport here sometimes :laugh:) that the fibers in the resin would give it some "space" so that the new wood won't be entirely up against the glass of the transom and the resin filling in the void betwixt the fibers. After getting the clamps snugged down and that what is squeezed out around the perimeter will be spread with leftovers making the fillets (chemical bond vs a mechanical after it cures out). It'll take a week to cure according to the jug, not a problem as I'm JUST getting started on building back

I want to take a moment here to Thank everyone who has tossed in suggestions, I don't want to screw this up and all suggestions are welcomed :thumb: This is my second and way more intense rebuild, the first one I didn't know what I was doing. It lasted for a few years until the plywood in the stern gave out (rotted around the perimeter)
 

Dennischaves

Chief Petty Officer
Joined
Nov 9, 2016
Messages
439
All the people on here have so much experience
they help me so much along the way
Your off to a great start
I'm gonna tag along
 

wooky30014

Petty Officer 1st Class
Joined
Jun 8, 2012
Messages
288
Welcome aboard Dennis. People keep coming aboard I might need a bigger boat :faint2: :D or we could do the "flotilla" like down on my nearby lake, several pontoons tied together and anchored out in the middle, other boats, jet skis coming and going, swimming and judging from the smoke, cookouts, an all day/weekend affair in the summer
 

Dennischaves

Chief Petty Officer
Joined
Nov 9, 2016
Messages
439
Just keep at it
im done with my boat well almost now I have nothing to doing in actually missing my time working on my boat
 

wooky30014

Petty Officer 1st Class
Joined
Jun 8, 2012
Messages
288
I'm planning on gluing the wood in tomorrow, I'll have the extra pair of hands I'll need so's I won't have to be climbing in and out and in and out of the boat like a ping pong ball, then I can sit around and "watch the paint dry" :cool:

Dennis, I won't miss this rebuild when done, what I DO miss is riding the waves :bounce:, wetting a hook :fish2:, and watching the bikinis :biggrin: ride by while tied up under a bridge
 

wooky30014

Petty Officer 1st Class
Joined
Jun 8, 2012
Messages
288
The transom wood is IN, and curing out. All went according to plan with one exception, I was just a tad short on the PB and was a very small gap at the uppermost corner port side, about an inch or so wide and just enough room for a putty knife. I didn't want to risk pulling all back apart so I mixed a batch for fillets down each side and applied, then mixed a slurry of resin and chopped fibers only and using a thin putty spreader packed the gap, didn't take much and used the rest to make the fillet across the top. 48 hours out now and tapping every inch of the stern I could hear no hollow spots, solid all across. Now to sit and "watch the paint dry", jug says 4-7 days so I'll go for a week. In the meantime I can be puttering around prepping for the wood band around the gunnel, 1/4 inch ply sealed with thinned resin. I sure am glad I'm on the putting back together part finally
 
G

Guest

Guest
Sorry to be late to the Party, Wookie, but I'm a Big Fan of Sea Bird boats! Never owned one but rode in many back in the early 70's and they were brutes! Very tough boats. Looks like your doing a great job bringing this old girl back! How long is she? is the a 24 footer? those were the ones I used to ride in.

I've replaced both transoms in my Hiliners, in additon to rebuilding them from wrecks. Can't wait to see the finished boat, I have walked the path you're on now more than once. Its hard work now, but believe me, it all pays off in the end!

Can't wait to see the finished boat! Sea Birds are beautiful !
 
Last edited:
Top