97 SeaRay 175 project boat hull weeping question

todhunter

Canoeist
Joined
Sep 15, 2020
Messages
1,304
I measured width every foot right after popping the cap off...probably overkill, though. Mine did splay out just a bit over the course of the rebuild, so every time I glassed in major structure to the hull (stringers, bulkheads, and decking), I used 2-3 ratchet straps to pull the hull back into shape (actually about 1/2" - 1" tighter to counteract any spring back). Cap went back on without much fuss.
 

flashback

Captain
Joined
Jun 28, 2002
Messages
3,941
Your on your way, and you have help. The resto folks on this site have seen most all pitfalls and will help... most of all, have fun!
 

komby

Cadet
Joined
May 30, 2023
Messages
27
I made some more progress this week! So here is some updates and a call for help on the stringers.

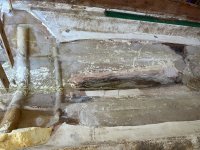
I got the old floor out and a lot of the foam. I was hoping to keep some of the foam in place in the upper sections but when I got there it kept crying on me so I kept going until I basically am fully gutted.
Before removing It I made some reference markers on my story stick for the dash area bulkheads.
bow.jpg
This I hope will help me have a reference for the top of the bulkheads and the bottom of the old resin where I cut the walkthrough out. I plan on using that reference to set the height of the decking.
Once marked, I removed them.

IMG-5223.jpgIMG-5225.jpg

I still have some detail grinding to do on the transom and all the cleanup grinding to do on the hull. So I can do stringers.

Side note I named the guy who was manning the spooge resin gun Kevin. I needed to have someone to curse at while I was pulling it apart. Kevin has been fired a few hundred times at this point.

Since this boat never had glassed in stringers (or any really, just the molded floor which was glued down using Kevin's generous application of resin) I am debating where to put the new ones. The gas tank establishes the width of the main ones.

The question I am stuck on is where to end them. It seems logical that as it tapers to the bow that I stop the 2 22" wide stringers and put a single or two more narrow ones in the bow area.

IMG-5222.jpgIMG-5221.jpg


Any feedback on this rough idea?
stringersMaybe.jpg
I can see I need some more in the back now that I have attached it here.

I am still debating also, do I really need to grind off all that resin from Kevin? It is like an inch thick in parts. I know I need to sand and prep for glassing in the tabbing on the stringers. Grinding it would reduce weight I guess but I am just going to cover it with foam, do I really care?

Now that I am this far I am going to drill the transom again and find wet wood and add that to the list I am 99% sure of it.
 

Attachments

  • IMG-5224.jpg
    IMG-5224.jpg
    4.9 MB · Views: 13

ScottinAZ

Master Chief Petty Officer
Joined
Jun 25, 2009
Messages
831
ok, im gonna give my pragmatic 2 cents here. Kevin sucks.... that much we already know.

whether I would grind out all the extra spooge or not really depends on if the mess restricts me getting in the new wood, and getting it glassed in PROPERLY. If its in an area that is not affected by the new work, or it doesnt prevent proper adhesion and tabbing in of the new wood, I would leave it..... you can go NUTS grinding it out back to the original hull, but as you say, in the end its covered with foam.

as for the new stringers, did you take pics of what the existing mulch appeared to look like. I would replicate that as best possible, as it worked up until the point that Kevin's crap glassing job allowed it to rot out. In this respect staying factory is the best bet IMHO.

Good luck on the transom, but at this point, as far as you are into it, I would just do it new, and never have to worry about it again..... that nagging feeling in the back of your mind if Kevin had a brothercousin in the woodworking department would have me changing it out for my own peace of mind if nothing else.
 

komby

Cadet
Joined
May 30, 2023
Messages
27
as for the new stringers, did you take pics of what the existing mulch appeared to look like. I would replicate that as best possible, as it worked up until the point that Kevin's crap glassing job allowed it to rot out. In this respect staying factory is the best bet IMHO.
That is where I have been debating. There really were not any. There was some boards that lined the ski locker and the gas tank storage but they were placed on the form when they were forming the floor on a mold. Those boards never touched the hull they were encapsulated in the glass. The majority of the floor was 1/4+" thick glass only with some 2" strips inserted in areas.
Following what I have seen in other rebuilds I figured running the main stringers lengthwise to form the ski locker and the gas tank area seems like the way to go. Ill have to cope them to the hull bumps but I can do that.

Most of the wood I have pulled out was wet but not rotten yet. I am sure it would have eventually, so I agree about the transom also.

So far I have 6 demo bags full of foam and glass and have freed up at least 7 gallons of water that it wept while removing foam.
 

flashback

Captain
Joined
Jun 28, 2002
Messages
3,941
I'll get beat up for this, if it were mine and not for sale you can stuff the foam and have a happy life...and I don't mean stuff it in the boat..:)
 
Last edited:

todhunter

Canoeist
Joined
Sep 15, 2020
Messages
1,304
I agree with Scott - I would only grind off what would be in the way of tabbing in new stringers and bulkheads. Your 2-stringer plan looks fine, but IMO, that looks like a lot of bulkheads. My 19ft boat has one bulkhead that forms the front of the bilge / back of the ski locker, and one that forms the front of the ski locker / back of the gas tank area (mine has tank in the bow).
 

flashback

Captain
Joined
Jun 28, 2002
Messages
3,941
I opened up a 1978 220 cc scorpion and it was a grid.. I gutted it and put some decent stringers in it, did not replace the half-ass bulkheads .. I enjoyed the boat for 20 years after...
 

komby

Cadet
Joined
May 30, 2023
Messages
27
I'll get beat up for this, if it were mine and not for sale you can stuff the foam and have a happy life...and I don't mean stuff it in the boat..:)
LOL, I do plan on doing 2 part foam. I was thinking of if I can take the dry chunks I have and put them in the voids and then pour 2# in there. Hopefully not having to buy another foam kit.
 

Scott Danforth

Grumpy Vintage Moderator still playing with boats
Staff member
Joined
Jul 23, 2011
Messages
49,310
You will always need more foam than you think. Incomplete fill happens.
 

komby

Cadet
Joined
May 30, 2023
Messages
27
I keep telling myself there is only 1 day of demo left before I can start rebuilding.....
Given the good advice I have had from you all, I decided to remove the transom for piece of mind. Yesterday I got the transom wood removed and some of the cleanup done. The wood in the main part of the transom was pretty dry. It did have one area that was wet in the upper left wing area. It's kinda interesting how water found its way in there (up top) but not the other areas where it would have pooled.

This setup was 3 pieces. There was a main middle section with 1.5" of ply in it. The two side wings were separate pieces of plywood set at an angle, filled between the main section with thickened resin and then all of it was glassed over.

In the picture below you can see I have one grey area left to sort out and some more grinding before I can put the wood back. The area I have held off on is a small pedestal of wood that they put in to mount the bilge pump down I think because it needed some wood to bite into the screws to hold the pump in place. I have a sense of irony that when I cut into that lower wood it will be bone dry.

Also in the middle of the transom there was a big hole that drained water from the swim deck to the outside. It was lined with two pieces of what seemed to be aluminum. Anyone know where/what that is so I can replace it?
Only one more day of demo left ...
 

Attachments

  • noTransom.jpg
    noTransom.jpg
    2.6 MB · Views: 11

komby

Cadet
Joined
May 30, 2023
Messages
27
I figured out the drain tube. It wasn't 2 pieces it was a single aluminum piece that had been flared after installation. Found replacement ones and the flaring tool!
 

komby

Cadet
Joined
May 30, 2023
Messages
27
Update on recent progress. I got the transom re-installed. I did 1.5 CSM on both sides and then attached it using thickened w/ a notched trowel and every clamp I could get on it. Tabbed it with 1708 and then two layers of 1708 on top. It isn't as flat as I had hoped for as you can see from the sanded areas.
transom.jpg
I also noticed that though I am mixing total boat laminating resin it seems to cure to hard and not tack free, is that to be expected?

I started the stringers and replacements for the back parts I cut off. I had some tile leveling clips left over from another project and turns out they are really good at holding the pieces together temporarily while I mock up the replacement wood. You can see one in the left side bulkhead. They are 1/16" so they mimic the gap left by the cutting wheel even.
 

Scott Danforth

Grumpy Vintage Moderator still playing with boats
Staff member
Joined
Jul 23, 2011
Messages
49,310
It remains tacky for the next layer, or until you apply gel (and then spray a coating of PVA to final cure)
 

komby

Cadet
Joined
May 30, 2023
Messages
27
It remains tacky for the next layer, or until you apply gel (and then spray a coating of PVA to final cure)
My observation is that it cured rock hard and not tacky overnight. I never used wax or PVA. I ended up grinding it a little between layers just for peace of mind because it felt cured and not tacky. Mixing at 1.5%
 

Scott Danforth

Grumpy Vintage Moderator still playing with boats
Staff member
Joined
Jul 23, 2011
Messages
49,310
It will cure hard in high heat...... If the temp is high, it will even cure in the bucket
 

komby

Cadet
Joined
May 30, 2023
Messages
27
Well that explains it. It was 106 F here the afternoon I did this. I did most of it in the morning while it was cooler. I had to dump out one batch that started to get goopy while rolling the second layer.

I did worry a bit about the resin storage in the garage and spent a few hour rigging up this cheap temp controller (Celsius settings only) to a rockstar fridge I had in the garage. Now it is keeping the resin around 70F while I am not using it. We see 100F days here for months during the summer and I was worried by the label on the resin for storage temp.

resinStorage.jpg
 

komby

Cadet
Joined
May 30, 2023
Messages
27
Well it took all summer and then some but today I got enough finished up that tomorrow the cap moves back into the garage on top of the boat. The Decking double tabbed, everything is foamed and glassed and some gel coat applied !
I still haven’t faired the deck but I got all the areas that the top cap will cover finished so I can move it before we start getting rain.

Bow IMG_5663.jpeg
Ski locker IMG_5660.jpeg
Transom
IMG_5659.jpeg

It took way too long and too much $$ to get here but at least I can get it back in one piece … hopefully 😂
 
Top