96 5.7L Mercruiser - no compression, water in

96RinkerCaptiva212

Petty Officer 3rd Class
Joined
Jun 4, 2017
Messages
84
No Title

Ok guys - back in action again. I went and picked up my new Vortec LB today in a total monsoon!!! It was barely sprinkling and as I'm trying to the motor in the back of my f150, here it came.. rained the whole way home. Probably got about 2-3" today. Anyway, back in the saddle and ready to try and get this thing out on the water for July 4th. Doable goal!

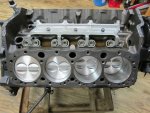
I have some questions coming but I will just post some pics in this one of the engine. Packaged REALLY well, might I add. I used bolts from the front and rear of the block to hang the motor from. And I was surprised to see a full gasket set included. I have no idea what half of those gasket go to. Must be for a full block rebuild. All I need is intake (almost ordered a few days ago, phew), exhaust manifold, rocker cover and oil pan. Really not sure what the rest is lol.
 

Attachments

  • photo268539.jpg
    photo268539.jpg
    40 KB · Views: 0
  • photo268540.jpg
    photo268540.jpg
    35.5 KB · Views: 0
  • photo268541.jpg
    photo268541.jpg
    40.4 KB · Views: 0
  • photo268542.jpg
    photo268542.jpg
    40.9 KB · Views: 0

96RinkerCaptiva212

Petty Officer 3rd Class
Joined
Jun 4, 2017
Messages
84
No Title

Now for the tech questions:
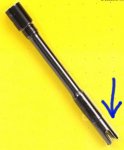
Pic 1) I also received a new Melling Oil Pump, but the shaft is way shorter than my old one. I mean, it's still the 880 block. Should I just reuse my old pump. Going to buy a stand tomorrow (forget to grab my friends last week and he lives an hour away). Once I get it on the stand I can probably test fit it and maybe it will make more sense. Also, you guys are getting your pickup tube brazzened(sp)? I used to read that on car forums, is that thing here with marines too?
Pic 2) Intake/Carb pic - Not really sure what adapter plate I'm supposed to be using. I haven't identified the intake yet but the Holley appears to be a 600cfm 4160 model.
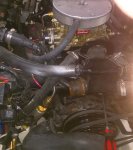
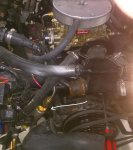
Pic 3) Priming with oil - I went and got some Castrol 15W40 for the first oil run that I need to change after the breakin 10 hours. I'll probably switch back to mercruy 25w40 from there on. Lubed up the timing chain and sprockets before I installed the cover. I went to O'Reilly and they don't loan a priming tool. I saw a video of someone using the shaft from an old oil pump and putting a drill on it but I don't have that. Do you guys have other tricks? Maybe harbor freight has something.

Complete - timing cover, crank dampener and sprocket, water pump, engine mounts and oil pressure sender. With the stand tomorrow, I will look at this oil pump situation and see if I can get the oil pan/gasket installed along with flywheel, housing and coupler plate.

**Still need to figure out this electrical fuel pump thing when I get there. It's midnight and I'm beat after a long day at work for fiscal year end!
 

Attachments

  • photo268543.jpg
    photo268543.jpg
    39.2 KB · Views: 1
  • photo268544.jpg
    photo268544.jpg
    37 KB · Views: 1
  • photo268545.jpg
    photo268545.jpg
    45.1 KB · Views: 1

tpenfield

Moderator
Staff member
Joined
Jul 18, 2011
Messages
18,082
That is a lot to work through in just a week's time.

As for priming with oil . . . not sure if you can just oil the daylights out of the cylinders, crankshaft, and cam shaft before you button things up and then use the starter to 'spin' the engine (with no spark plugs in) so you can get oil through the engine in a 'no load' condition.
 
Last edited:

bman440440

Petty Officer 1st Class
Joined
Apr 4, 2011
Messages
266
as far as a trick for priming the oil system... if you have some metal round stock and a cut off wheel you can make one.... cut a slot out of one end like in the pic I attached and you are good to go
arp-134-7901_xl.jpg
 

Rick Stephens

Admiral
Joined
Aug 13, 2013
Messages
6,118
I never bought a long block, always did a rebuild. However, I would make for sure and for certain I primed the pump with a drill when someone else assembled it. As shown by bman440440, you just need a pickle fork to spin er up.

You have a spread bore intake and a stright bore carb. For the gaskets to reliably cover the mating surface you should get a straight bore carb to spread bore intake adapalator. Your local auto parts store will have it, common as can be. I'd give you one if you lived in Idaho :^)

Dry fit your new oil pump and see if it will hook up to the disty while on the motor stand. You may need to purchase a different pump. Pumps are cheap, motors expensive, so don't reuse an old one, IMHO. Your local auto parts store will also have the correct pump.
 

96RinkerCaptiva212

Petty Officer 3rd Class
Joined
Jun 4, 2017
Messages
84
No Title

I never bought a long block, always did a rebuild. However, I would make for sure and for certain I primed the pump with a drill when someone else assembled it. As shown by bman440440, you just need a pickle fork to spin er up.

You have a spread bore intake and a stright bore carb. For the gaskets to reliably cover the mating surface you should get a straight bore carb to spread bore intake adapalator. Your local auto parts store will have it, common as can be. I'd give you one if you lived in Idaho :^)

Dry fit your new oil pump and see if it will hook up to the disty while on the motor stand. You may need to purchase a different pump. Pumps are cheap, motors expensive, so don't reuse an old one, IMHO. Your local auto parts store will also have the correct pump.

lol, you said "adapalator" :lol:. I will check it out at O'Reilly early this week when I get to that point. Thanks for the info. I figured out that the oil pump actually has 2 shafts with that plastic piece holding the two together (also a male a female slot on the shafts). I pulled my "intermediate" shaft and put it on the new pumps short shaft. Went and got a new pickup screen. Goodness, that thing was a bear getting it pressed into the pump housing. I really have no idea why anyone would need to weld those in place. Unless the housing has major expansion under heat and the tube doesn't at all. I feel like that thing isn't going anywhere but I understand the piece of mind. I have a wire mig welder... but wouldn't that need tig? Wife was getting bored and annoyed so I'm hanging it up for the night. I have the pump/tube on and the windage tray. Going to put the oil pan back on tomorrow and prime the engine. I found O'Reilly actually had the primer tool for rent with that centering sleeve.

Hunny-Do List:
1) Install oil pan and prime engine
2) Install new dipstick tube - I snapped the old one trying to get it out
3) Mount the new electric fuel pump - might save it until the block is back in the block to see what kind of line I need.
4) Get engine back on hoist and install Flywheel, Plate, Bellhousing and Outdrive Coupler, starter
5) Maybe go ahead and put Longblock back into the boat.. my old lifting hooks seem to not match up with the new intake threads. Maybe I'll just lift the engine from the exhaust manifold threads instead and go ahead and get the intake on there. Probably put the Carb on later in the boat. Trying to save weight on the garage trusses since I'm paranoid :facepalm:
6)Acetone Test the manifolds and risers to check possible cracks. Hope not, things are pricey!
7) Get intake to carb adapter
 

Attachments

  • photo268611.jpg
    photo268611.jpg
    168.9 KB · Views: 0

96RinkerCaptiva212

Petty Officer 3rd Class
Joined
Jun 4, 2017
Messages
84
No Title

Ok, I think I just ran into something and I'm glad I did. I just installed the intake and torqued down after I lined up the RTV in the front and rear surface of the block. I started researching where to mount the electric fuel pump and ran into a picture of a tray that sits in the oil valley? What is this? My old 5.7 didn't have it. Is this a necessary item for the vortec or something. Here is a pic of the tray I'm talking about (in the oil valley). It actually looks like this tray/pan holds down the "retainers" that are sitting around the pushrods. I noticed mine kinda shift back and forth on the pushrods and cam followers(terminology)? I sent a message to a few of my gear head friends and they said they wouldn't worry about it.. but, I am worried about it. Any experience on this?

Also seems to be conflicting info on the net and intakes. I did 3 passes of 6lbs, 20lbs and ended at 30lbs with some 5/16-18 SS bolts from the hardware store. I let the RTV setup for an hour before I hit pass 2 and 3. Now I feel like I'm going to have to tear it back apart and clean the RTV up for this pan/tray.
 

Attachments

  • photo268818.jpg
    photo268818.jpg
    128.8 KB · Views: 1
Last edited:

Rick Stephens

Admiral
Joined
Aug 13, 2013
Messages
6,118
If you have roller cam and lifters then the retainers use that plate to keep them in place. Flat tappets, no retainers.


When I added an electric fuel pump I decided to use the OEM setup. I purchased the fuel pump bracket, o-rings and brass nipples along with the stainless line to the carb from Mercruiser. You can see the OEM line and pump bracket hardware that goes with the OEM Weber carburetor, which is identical to the Edelbrock. I built the electrical system to match spec as well with an oil pressure switch switching a solenoid that is in lower left of picture. Pump is also wired to the outer small lug on the starter for priming the carb when the engine is being cranked. Not a complicated wiring but needs to be done right to be safe.


fuel system.jpg
 

96RinkerCaptiva212

Petty Officer 3rd Class
Joined
Jun 4, 2017
Messages
84
Not sure how to delete posts but I went ahead and bought the "retainer guide spider" today. Will be here Friday so I think I'll go ahead and slap the engine in the boat so i can test fit the electric fuel pump and get that work out of the way and button up the engine later.
 

Rick Stephens

Admiral
Joined
Aug 13, 2013
Messages
6,118
Probably a LOT easier to build the electrical harness for the electric fuel pump on a motor stand. You have to access the rear block deck next to the distributor to install the pressure switch, the starter to get prime power and the entire motor harness to build in the other wire paths, solenoid etc. And if you are installing the fuel pump on the motor then routing fuel lines is easier on a stand as well.
 

Bondo

Moderator
Staff member
Joined
Apr 17, 2002
Messages
70,986
Ayuh,.... Everything is Easier on a motor stand,.....

Test runs sittin' on blockin' on the floor or maybe a pallet,...
 

96RinkerCaptiva212

Petty Officer 3rd Class
Joined
Jun 4, 2017
Messages
84
well pulled the intake and cleaned up the rtv, awaiting arrival of the retainer spider. I went ahead and put the flywheel, coupler and housing back on. Put the starter back on and never made it to 50lbs like the manual suggests. I got to 40, turned it again and seemed like the 40 lbs didn't move much, tried again and the mount cracked on the starter. I'm no actual welder but tried to MIG it and doesn't seem to be holding well. Maybe it needs to be tigged.. that's a let down! So can I go get a car starter for a 5.7 vortec from the auto parts store? This boat only sees fresh water. Do I actually need a marine version? Running out of budget here so this was a let down. was hoping i could mig the crack and it hold up just fine. I'd hate for the starter to break loose and hang up in the flywheel after all of this work. Who knows how many starter kicks it could handle now. ughhhh

The cone end of the starter looks like it actually had some previous damage, I can see into the starter from there so must have happened when I hydrolocked
 

Attachments

  • unnamed.jpg
    unnamed.jpg
    18.5 KB · Views: 0
Last edited:

Rick Stephens

Admiral
Joined
Aug 13, 2013
Messages
6,118
I never actually torqued a starter down... I'd have had trouble with 50 ft pounds too. I just spin em on tight with a 3/8th ratchet driver. I know I've never gotten close to 50...

The reason for a marine starter is they are protected from sparking. All the electrical components in a boat are marine so the boat don't blow up. On a car or truck, gas drips down and the fumes, which are heavier than air, sink out of the open bottomed engine compartment. A boat is a bucket that collects the fumes, hence the bilge blower and rules that you run it for 5 minutes before cranking the engine, and starter, distributor, alternator, solenoids are all marine rated.

Marine starters do not cost more, in my experience. And you may very well find one at the local auto parts that is marine rated. I would give that a good chance.
 

tpenfield

Moderator
Staff member
Joined
Jul 18, 2011
Messages
18,082
50 ft-lbs seems like a lot for a starter bolt, but it might have been damaged from the hydro-lock as you said. Sort of means you'll be rowing over the 4th of July :(

I'll PM you with some sources I have used in the past for marine electrical stuff.
 

96RinkerCaptiva212

Petty Officer 3rd Class
Joined
Jun 4, 2017
Messages
84
I never actually torqued a starter down... I'd have had trouble with 50 ft pounds too. I just spin em on tight with a 3/8th ratchet driver. I know I've never gotten close to 50...

The reason for a marine starter is they are protected from sparking. All the electrical components in a boat are marine so the boat don't blow up. On a car or truck, gas drips down and the fumes, which are heavier than air, sink out of the open bottomed engine compartment. A boat is a bucket that collects the fumes, hence the bilge blower and rules that you run it for 5 minutes before cranking the engine, and starter, distributor, alternator, solenoids are all marine rated.

Marine starters do not cost more, in my experience. And you may very well find one at the local auto parts that is marine rated. I would give that a good chance.
good info, as I was tightening it down I'm thinking man this is a lot, then heard it snap - saw some with very poor reviews on amazon.. then saw the same ones on ebay.. looking at DBelectric and Overton now. Was actually thinking of mounting the fuel pump on the gas tank since I saw some pics out there of that. I was going to mount it right on the old blocked off boss that was for the mechanical pumps but it seems it may put the pump with the outlet line right by the motor mount. I couldn't quite tell exactly where your pump was in the pic but thanks for providing that. Helped me make more sense of the situation anyway.
 
Last edited:

96RinkerCaptiva212

Petty Officer 3rd Class
Joined
Jun 4, 2017
Messages
84
50 ft-lbs seems like a lot for a starter bolt, but it might have been damaged from the hydro-lock as you said. Sort of means you'll be rowing over the 4th of July :(

I'll PM you with some sources I have used in the past for marine electrical stuff.
Thank you sir - I was looking at them last night but now that I have a trusted source as a recommendation, I went with that. Says it ships today! :watermelon:
 

Rick Stephens

Admiral
Joined
Aug 13, 2013
Messages
6,118
Was actually thinking of mounting the fuel pump on the gas tank since I saw some pics out there of that. I was going to mount it right on the old blocked off boss that was for the mechanical pumps but it seems it may put the pump with the outlet line right by the motor mount. I couldn't quite tell exactly where your pump was in the pic but thanks for providing that. Helped me make more sense of the situation anyway.

Here's a screenshot of a Mercruiser parts page that shows the OEM setup.
Screen Shot 2017-06-28 at 7.13.25 AM.png


I stuck an arrow on my photo below. I also pulled the big hose off the water pump so the pump would be visible behind it.

The fuel pump bracket is just screwed right to the front of the block, a threaded hole just below the head. That puts the suction line pointing about where the mechanical pump drew from making it easy to plumb. Best part of using factory is you can get the pre-bent stainless steel line from pump to carb. The whole thing is a little spendy: $100 pump and probably another $70 in fittings, fuel line and mounting bracket. But I like having the fuel system right. Less worries about walking home.
fuel system1.jpg
 

96RinkerCaptiva212

Petty Officer 3rd Class
Joined
Jun 4, 2017
Messages
84
Thanks Rick - I originally thought your pump was an inline filter of sorts. I understand better now. I was thinking of the side of the engine, gas tank or side of the bilge but the front mount hole is probably best spot. I need to get everything together so I can see exactly how much room I have. My Carter pump and bracket looks to be a little larger than what you have there. I need to sh!t or get off the pot about the fittings and lines I guess if I want to be running by next week for my stay-cation!
 

96RinkerCaptiva212

Petty Officer 3rd Class
Joined
Jun 4, 2017
Messages
84
No Title

Lifter Retainer Spider came in a day early and started test fitting the pump. Looks like this location will work, placing the water separator in it's normal location and then plumbing down to pump on lower front area of block, then up to carb. Was thinking of grabbing some flexible stainless fuel line for separator to pump, then making some hard line out of brake line for the segment from pump to the new carb. Any watchouts for fuel line bends? I was going to come out of the pump wich is towards the bow of the boat, immediately bend up vertical then probably back toward the block and up. I'm saying the line would exit the pump and then run behind the coolant hose up to the top.

Putting the block in the boat tonight! My chains are obstructing putting the intake on now so will get that on later in the boat.
 

Attachments

  • photo268987.jpg
    photo268987.jpg
    85.7 KB · Views: 0

Rick Stephens

Admiral
Joined
Aug 13, 2013
Messages
6,118
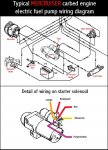
This is probably the best wiring diagram for your electric pump. You will need:

sealed solenoid switch
oil pressure switch
10 amp fuze or circuit breaker

Ask away with questions. It is easier than it looks once you get the picture.. Two power sources - ignition switch to oil pressure switch to solenoid switching. And Battery to Solenoid power to pump. T the power wire (purple/yellow) going from solenoid to pump and connect the wire from the outer lug on the starter solenoid. That lug won't have anything attached to it if the boat was wired for a mechanical pump.

fetch?id=7043308&d=1422407474.jpeg
 
Top