'67 Holiday 18' - Make it Usable

Berdink

Petty Officer 1st Class
Joined
Mar 5, 2020
Messages
235
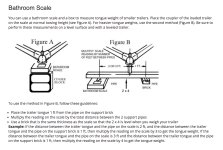
I found this as a way to weigh what my tongue weight is.
For heavier boats I can use the board technique to reduce the weight on scale.
 

Attachments

  • boat tongue weight.jpg
    boat tongue weight.jpg
    808.3 KB · Views: 8

Watermann

Starmada Splash of the Year 2014
Joined
Jan 12, 2013
Messages
13,794
I'd venture a guess at around 1800 - 2000 lbs tops with your trailer.
 

Berdink

Petty Officer 1st Class
Joined
Mar 5, 2020
Messages
235
I'd venture a guess at around 1800 - 2000 lbs tops with your trailer.
Thanks!
Using the house scale method above the tongue weight is around 85lbs.
.
But calculating 6% x 2000 = 120 pounds.
But I'm thinking my 85 pounds is correct in that most the weight is at the rear of the boat.
And because I can easily lift it from the tongue.
.
Now, going down hill and hitting the brakes I could see an additional load being 100's of pounds against the payload capacity of my truck.
 
Last edited:

Berdink

Petty Officer 1st Class
Joined
Mar 5, 2020
Messages
235
I plan on putting gear and fuel tank up front, so that'll get me closer to the 6% tongue weight of the total weight.
 

Berdink

Petty Officer 1st Class
Joined
Mar 5, 2020
Messages
235
I've read in these forums to find a leak is to fill the boat with water. Of course not fill it, but perhaps to the water line and then watch for drips.
Is that a bad idea?
 

Moserkr

Chief Officer + Starmada Splash Of The Year 2021
Joined
Nov 23, 2020
Messages
869
You can fill it but it can be hard on the hull when sitting on the trailer. A lot of weight with minimal distribution compared to it sitting on a lake as intended. Another option is just put a little water in it and move it around, side to side, front to back. Less stress then, same goal accomplished.

I chose to float mine down the street at a local lake. Sits very high with nothing in it. Only leaks were my fish finder transducer mount holes that I left wide open lol.
 

Berdink

Petty Officer 1st Class
Joined
Mar 5, 2020
Messages
235
You can fill it but it can be hard on the hull when sitting on the trailer. A lot of weight with minimal distribution compared to it sitting on a lake as intended. Another option is just put a little water in it and move it around, side to side, front to back. Less stress then, same goal accomplished.

I chose to float mine down the street at a local lake. Sits very high with nothing in it. Only leaks were my fish finder transducer mount holes that I left wide open lol.
The first time I took it after repairing the transom I had no leaks.
But last time I did end up with some water coming out the back when I pulled the plug.
.
The load on the hull being evenly distributed on the water vs a trailer is a good point.
.
I think I'll start with only a foot of water and see if there are any drips, and then take it off the trailer and tilt the boat different ways to move the water to different portions.
I have acreage and the ground is soft so it won't hurt the hull.
.
But I could also see trying to move it around with water in it could cause some rivets to come loose.
 
Last edited:

Berdink

Petty Officer 1st Class
Joined
Mar 5, 2020
Messages
235
I figured out the leak issue. Like I said, first few times I took it out after replacing the transom I had very little water come out when I removed the plug, but the last time quite a bit came out. Anyway, the seal between the transom and the splash well is where the water is getting in.
 

Berdink

Petty Officer 1st Class
Joined
Mar 5, 2020
Messages
235
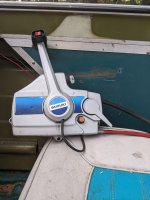
For some reason the safety kill switch had been bypassed and completely removed.
I found a universal one and installed it. It looks like my boat was a light green (seafoam green) originally.
 

Attachments

  • PXL_20230116_213548577.jpg
    PXL_20230116_213548577.jpg
    3 MB · Views: 7

Berdink

Petty Officer 1st Class
Joined
Mar 5, 2020
Messages
235
I don't like how low the seats are.
I put a 6 inch tall box on top of my seat and it feels about the perfect height. The frame the seats are on are 10 inches high. I'm thinking about building a 16 inch high new frame for the seats. Anyone have any insight? Bad idea?
 

SHSU

Lieutenant Junior+Starmada Splash Of The Year 2019
Joined
Mar 8, 2017
Messages
1,741
One thing to consider is will you be to far up for the windshield to work. I am to tall for mine and wish I had made something custom, but that is another story.

SHSU
 

Berdink

Petty Officer 1st Class
Joined
Mar 5, 2020
Messages
235
One thing to consider is will you be to far up for the windshield to work. I am to tall for mine and wish I had made something custom, but that is another story.

SHSU
I was just thinking of that today.
 

Berdink

Petty Officer 1st Class
Joined
Mar 5, 2020
Messages
235
Second thought I may just keep some kind of booster pillow available. :)
 

SHSU

Lieutenant Junior+Starmada Splash Of The Year 2019
Joined
Mar 8, 2017
Messages
1,741
If I were always on a lake it wouldn't matter as much. Don't really get any spray to speak of when we are out tubing and such. When I am out in the bay/gulf, which is most of our outings, I get constant spray in the face no matter how calm.

Just something else to think about... lol

SHSU
 

Berdink

Petty Officer 1st Class
Joined
Mar 5, 2020
Messages
235
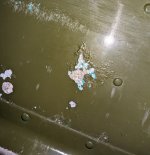
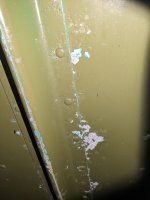
My plan to address this is to brush with either a stainless steel or 40 grit nylon brush. Clean up with white vinegar. Wipe down with acetone. Let dry and spray with etching primer as soon as dry - maybe even use a heat gun to make sure it's good and dry.
Then use clean metal primer, then oil based Sherwin-Williams enamel tinted to match my existing paint.
Sound about right?
 

Attachments

  • PXL_20240406_001609866.jpg
    PXL_20240406_001609866.jpg
    1.4 MB · Views: 10
  • PXL_20240406_001511444.jpg
    PXL_20240406_001511444.jpg
    2.3 MB · Views: 10

Watermann

Starmada Splash of the Year 2014
Joined
Jan 12, 2013
Messages
13,794
My plan to address this is to brush with either a stainless steel or 40 grit nylon brush. Clean up with white vinegar. Wipe down with acetone. Let dry and spray with etching primer as soon as dry - maybe even use a heat gun to make sure it's good and dry.
Then use clean metal primer, then oil based Sherwin-Williams enamel tinted to match my existing paint.
Sound about right?

Looks to be corrosion forming under the paint, not sure what that blue color is in the pitting but yeah it needs to cleaned up and stopped. Being on the bottom makes me suspect either wet with brine on the bunks or someone put on copper anti fouling paint.
 

Berdink

Petty Officer 1st Class
Joined
Mar 5, 2020
Messages
235
Thanks, I think the blue is a paint layer under.
If you look at the wore through area above, it has that same blue/green color.
I
 

Berdink

Petty Officer 1st Class
Joined
Mar 5, 2020
Messages
235
Although, your point about copper makes sense also. Copper can oxidize a blue/green.
.
"Aluminum will be very susceptible to galvanic corrosion in contact with copper, assuming that the two metals are also in contact with a common electrolyte (such as water with some ionic content.)"

.
I'll start with getting the exposed corroded areas first - to tide me over this year. And maybe do a portion at a time - stripping to bare metal.
 
Last edited:

Berdink

Petty Officer 1st Class
Joined
Mar 5, 2020
Messages
235
Zooming in on another area I think the blue/green is just a previous paint job.
 

Attachments

  • IMG_20240406_200741.jpg
    IMG_20240406_200741.jpg
    1,003.6 KB · Views: 9
Top