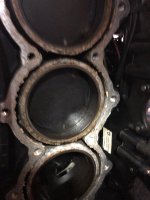
60HP 1989 Johnson outboard low compression

Toshi

Petty Officer 2nd Class
Joined
Aug 7, 2021
Messages
121
Hi.
Compressions are 100, 83, 100. I am having hard time to start the engine and I believe it’s due to the low compression.
What do you guys suggest to do the next?
Leak down test to check the possibility of blown head gasket? Any advice is greatly appreciated.
 

racerone

Supreme Mariner
Joined
Dec 28, 2013
Messages
37,835
Just 14 bolts to take the head off I think.-----Do it.-----Head gasket is cheap.------When was water pump impeller changed ?-----Does fitting for tell tale hose come off the side of the block or the top ?
 

Toshi

Petty Officer 2nd Class
Joined
Aug 7, 2021
Messages
121
Just 14 bolts to take the head off I think.-----Do it.-----Head gasket is cheap.------When was water pump impeller changed ?-----Does fitting for tell tale hose come off the side of the block or the top ?
Thank you for the advice. I will replace the gasket. The fitting for the tell tale hose is coming off the side and I have a new water pump kit including the fitting modification parts even though my outboard has a healthy pee.
I have a question. Changing the position of fitting hose of tell tale is for the prevention of possible overheat in the future and would not do anything to improve the low compression that I have now, right?
Thank you.
 

oldboat1

Fleet Admiral
Joined
Apr 3, 2002
Messages
9,612
Resurface the mating surface of the head/ head cover and put in a new gasket as indicated above -- might improve compression. Moving the tell-tale fitting can prevent future overheating/warping caused by an air lock in the water passage at the top of the head.
 

Toshi

Petty Officer 2nd Class
Joined
Aug 7, 2021
Messages
121
Resurface the mating surface of the head/ head cover and put in a new gasket as indicated above -- might improve compression. Moving the tell-tale fitting can prevent future overheating/warping caused by an air lock in the water passage at the top of the head.
Thank you. If the sealing surface is smooth enough, I don’t think gasket sealant is necessary. But should I use it just to make sure it will have a good sealing? If so, any recommendation like brand, type??
 

oldboat1

Fleet Admiral
Joined
Apr 3, 2002
Messages
9,612
The gasket you buy will indicate whether sealer is used. Use a piece of glass or similar (table saw top, etc.) with wet/dry sandpaper to resurface (wet the backside of the paper so it will stay in place). Rotate the mating surface in figure 8 pattern until shine is uniform. Need water proof sealer if one is used (permatex aviation, I believe, if you are out of the OMC stuff). Read instructions on the can or tube.
 
Last edited:

racerone

Supreme Mariner
Joined
Dec 28, 2013
Messages
37,835
Check cylinder walls when head is off !----Post pictures of cylinder walls.
 

Toshi

Petty Officer 2nd Class
Joined
Aug 7, 2021
Messages
121
The gasket you buy will indicate whether sealer is used. Use a piece of glass or similar (table saw top, etc.) with wet/dry sandpaper to resurface (wet the backside of the paper so it will stay in place). Rotate the mating surface in figure 8 pattern until shine is uniform. Need water proof sealer if one is used (permatex aviation, I believe, if you are out of the OMC stuff). Read instructions on the can or tube.
OK. Thank you very much.
 

Thirsty Endgrain

Petty Officer 1st Class
Joined
May 30, 2020
Messages
245
When you have the head off, you will have a very good view of the cylinders, no need for endoscopy.

Be careful removing bolts, give them a soak of penetrating oil. Sometimes a bolt will be stubborn and only move a little, and if you can just barely crack it loose it will give you some room for some shots of penetrating oil. Also good practice to unscrew a little then screw back in a little, then out more, etc until it's out.
 

Toshi

Petty Officer 2nd Class
Joined
Aug 7, 2021
Messages
121
When you have the head off, you will have a very good view of the cylinders, no need for endoscopy.

Be careful removing bolts, give them a soak of penetrating oil. Sometimes a bolt will be stubborn and only move a little, and if you can just barely crack it loose it will give you some room for some shots of penetrating oil. Also good practice to unscrew a little then screw back in a little, then out more, etc until it's out.
Got it ! Also, thank you for the tip for removing bolts. I will make sure to follow the method.
 

Toshi

Petty Officer 2nd Class
Joined
Aug 7, 2021
Messages
121
Hello guys.
I just placed an order for head gasket. What’s the number of sand paper to use for resurfacing mating surface of head gasket?
Thank you.
 

tphoyt

Lieutenant
Joined
Jun 10, 2010
Messages
1,265
I use 240,320 and finish with 400.
It’s probably over kill but that the I like it.
Best
 

oldboat1

Fleet Admiral
Joined
Apr 3, 2002
Messages
9,612
^good method. nice smooth surface.

(Toshi -- you are correcting slight warpage with the sanding, along with providing a good mating surface.)
 

Toshi

Petty Officer 2nd Class
Joined
Aug 7, 2021
Messages
121
There’s a temperature sensor probe on the cover and I would like to remove it so that I can reuse it
I use 240,320 and finish with 400.
It’s probably over kill but that the I like it.
Best
Thank you. I will follow your recommendation!
 

Toshi

Petty Officer 2nd Class
Joined
Aug 7, 2021
Messages
121
^good method. nice smooth surface.

(Toshi -- you are correcting slight warpage with the sanding, along with providing a good mating surface.)
Thank you. I hope I don’t have to correct the warpage much…But, if necessary, I have to do what I have to do to get good compressions back.
 

racerone

Supreme Mariner
Joined
Dec 28, 2013
Messages
37,835
I think it may be more than a new head gasket to fix this.----Take head off and inspect cylinders !
 

clemsonfor

Lieutenant Junior Grade
Joined
Sep 19, 2005
Messages
1,011
I think it may be more than a new head gasket to fix this.----Take head off and inspect cylinders !
I agree but was going to assume if it was more he would have seen it if the head is off or surely would see it when he takes it off and rotates the flywheel to raise and lower each piston and inspect the cylinder walls. And if you, the OP weren't planning on this for sure take it off and drop each piston to the bottom so you can see the walls and look for scoring. I would think by now you had the head off at this point it's just a few bolts and if it's bad there is no reason to buy just a gasket if your not going to do anything else or if you are order it all at once.

So I said all that to echo what he said. Pull the head and look at the condition on the cylinders.
 

Toshi

Petty Officer 2nd Class
Joined
Aug 7, 2021
Messages
121
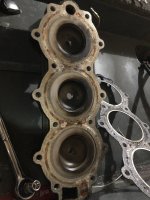
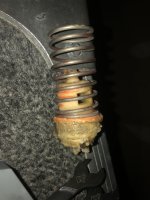
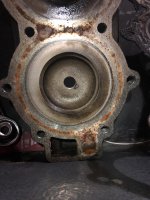
It seems thermostat melted sometime ago.
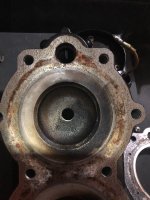
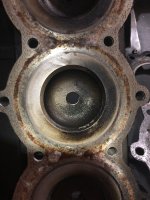
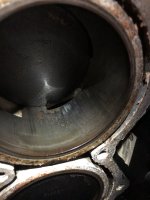
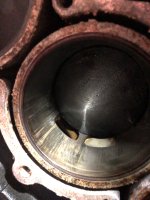
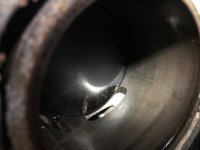
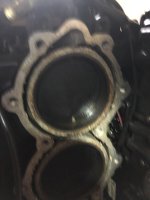
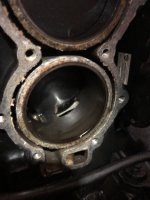
Top cylinder wall felt really smooth and no scratch or whatsoever.
Middle cylinder wall is the worst among 3. I can see and feel scratches. No wonder this one is having the lowest compression.
Bottom cylinder wall has one scratch but the scratch is shallower than the middle one.

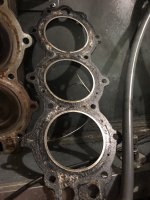
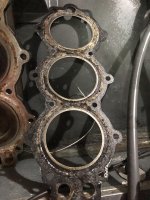
I put pictures of cylinder head and gasket (front and back) if these could help to identify something.

Thank you.
 

Attachments

  • 706E6436-C544-4912-8C3A-B477EB2E07FF.jpeg
    706E6436-C544-4912-8C3A-B477EB2E07FF.jpeg
    2.2 MB · Views: 23
  • 1EF65542-F2F1-4684-AB07-B1E880CD8ECC.jpeg
    1EF65542-F2F1-4684-AB07-B1E880CD8ECC.jpeg
    2.2 MB · Views: 20
  • 54CE2169-5A49-405F-8680-518E5303EDCD.jpeg
    54CE2169-5A49-405F-8680-518E5303EDCD.jpeg
    1.9 MB · Views: 19
  • 1A0B0721-7C73-49B5-889F-552C82882B9B.jpeg
    1A0B0721-7C73-49B5-889F-552C82882B9B.jpeg
    2.3 MB · Views: 17
  • FCBE9F75-8009-488E-B22F-5BCECAC0BF26.jpeg
    FCBE9F75-8009-488E-B22F-5BCECAC0BF26.jpeg
    2 MB · Views: 16
  • D985DBAE-66F4-4081-A513-1431AD7A630E.jpeg
    D985DBAE-66F4-4081-A513-1431AD7A630E.jpeg
    2 MB · Views: 16
  • CB408ABA-8DE4-42B4-80EF-8D3A0B62CBAA.jpeg
    CB408ABA-8DE4-42B4-80EF-8D3A0B62CBAA.jpeg
    2.1 MB · Views: 29
  • BADCF69B-13E6-4F51-98F6-A812E8811999.jpeg
    BADCF69B-13E6-4F51-98F6-A812E8811999.jpeg
    1.8 MB · Views: 36
  • 3120FCE0-E2A8-4F98-8CC1-D14E97EDEA85.jpeg
    3120FCE0-E2A8-4F98-8CC1-D14E97EDEA85.jpeg
    1.5 MB · Views: 35
  • 77E28EFF-6011-4375-8B30-215CA9877B45.jpeg
    77E28EFF-6011-4375-8B30-215CA9877B45.jpeg
    2.2 MB · Views: 31
  • F5A9A970-75F5-45B0-881D-1BA5F2EDC073.jpeg
    F5A9A970-75F5-45B0-881D-1BA5F2EDC073.jpeg
    1.9 MB · Views: 24
  • 956CA633-5169-4262-9E9D-E6AEB6C013CB.jpeg
    956CA633-5169-4262-9E9D-E6AEB6C013CB.jpeg
    1.7 MB · Views: 21
  • E2C016BC-3F85-453F-B0B3-382BCE7BBFA9.jpeg
    E2C016BC-3F85-453F-B0B3-382BCE7BBFA9.jpeg
    1.8 MB · Views: 22
Top