60HP 1989 Johnson outboard low compression

Toshi

Petty Officer 2nd Class
Joined
Aug 7, 2021
Messages
121
The assembly grease will help you keep the needle bearings in place durning assembly.
Without it you may end up going insane.
Thanks. I bought used used assy. (piston and piston rod already assembled). I didn’t need to assemble needle bearings.
 

Toshi

Petty Officer 2nd Class
Joined
Aug 7, 2021
Messages
121
+1 to this.

It is incredibly difficult to keep needle bearings in place for assembly without it.

I recommend putting the stuff in refrigerator and assembling in a cool room.

+80 degree F temperature melts it rather quickly into liquid if not refrigerated.

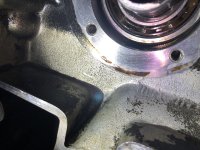
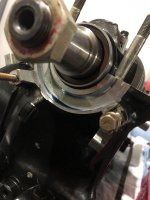
Make sure you pay attention to the connecting rod lube hole orientation so it faces upwards towards flywheel and that the piston is put on correctly facing the right way.
Thanks. I will check the orientation of the assy. (piston and piston rod already assembled because I bought used ones on eBay)
 

havoc_squad

Senior Chief Petty Officer
Joined
Mar 5, 2011
Messages
730
Thanks. I will check the orientation of the assy. (piston and piston rod already assembled because I bought used ones on eBay)

The connecting rods can be re-used if the surfaces are good, within tolerance measurements, AND the connecting rod caps align properly without an exposed lip/groove.

However, you should NOT re-use used pistons that you got because they were tied to connecting rods that you had to buy.

So if cylinder 1 piston is junk, you replace it with new piston, ring, and wrist pin.

If cylinder 2 piston is good and is 100% verified as not needing replacement, you re-install it ONLY in cylinder 2. You do not use that piston for anywhere else.
 

Toshi

Petty Officer 2nd Class
Joined
Aug 7, 2021
Messages
121
The connecting rods can be re-used if the surfaces are good, within tolerance measurements, AND the connecting rod caps align properly without an exposed lip/groove.

However, you should NOT re-use used pistons that you got because they were tied to connecting rods that you had to buy.

So if cylinder 1 piston is junk, you replace it with new piston, ring, and wrist pin.

If cylinder 2 piston is good and is 100% verified as not needing replacement, you re-install it ONLY in cylinder 2. You do not use that piston for anywhere else.
Thank you.
I ordered new piston but the pn on the piston arrived says 433945 and not 394461. I did a bit research and some say they are equivalent and I’m checking with the store that I purchased I am not convinced…
Any comment??

Thank you.
 

Toshi

Petty Officer 2nd Class
Joined
Aug 7, 2021
Messages
121
Thank you.
I ordered new piston but the pn on the piston arrived says 433945 and not 394461. I did a bit research and some say they are equivalent and I’m checking with the store that I purchased I am not convinced…
Any comment??

Thank you.
The height of the piston is different. No way this is equivalent.
 

Toshi

Petty Officer 2nd Class
Joined
Aug 7, 2021
Messages
121
I am trying to put crank case back and I noticed the bearings on both ends of crankshaft don’t fit right.
I see some gaps as shown in the pictures. Can anybody help me out why this is happening? I keep rotating crankshaft but I get the same gaps. Thank you.
 

Attachments

  • 04C7B66F-72D1-4617-9C11-D2988F5581FA.jpeg
    04C7B66F-72D1-4617-9C11-D2988F5581FA.jpeg
    3.9 MB · Views: 7
  • CD0E732E-830F-40F0-AA6A-30A7EA55075D.jpeg
    CD0E732E-830F-40F0-AA6A-30A7EA55075D.jpeg
    1.7 MB · Views: 7

racerone

Supreme Mariner
Joined
Dec 28, 2013
Messages
37,481
Are you lining up the split bearings and dowel pins ?-----Work carefully and don't use a hammer.
 

flyingscott

Fleet Admiral
Joined
Apr 8, 2014
Messages
8,067
That is because your center bearings have holes in the races. These need to align with the pins in the crank case, then the crank will fit correctly.
 

racerone

Supreme Mariner
Joined
Dec 28, 2013
Messages
37,481
Describe how you installed / torqued connecting rod screws.---And how you checked alignment of the rod caps?
 

Toshi

Petty Officer 2nd Class
Joined
Aug 7, 2021
Messages
121
I tightened the connecting rod screws little by little making sure the side edges of the mating surface are smoothly aligned. I followed tightening torque according to the service manual.
 

Toshi

Petty Officer 2nd Class
Joined
Aug 7, 2021
Messages
121
I am now struggling to remove the reed valve bolts to replace the gasket. I torched and put penetrating oil at the bolt, but no luck even with manual impact driver.
I will try with automatic impact driver to see if bolts come off.
If you have any advice, please let me know.
 

tphoyt

Lieutenant Junior Grade
Joined
Jun 10, 2010
Messages
1,180
I know it’s sounds crazy but use the hand impact to tighten just a hair to try and break the grip. Like try to tap and twist forward and backwards.
 

Toshi

Petty Officer 2nd Class
Joined
Aug 7, 2021
Messages
121
It’s been a while…and finally she is back and runs. BUT, it’s running rough.

I will tune air-fuel mixture screws (because I turned some long time ago with my ignorance and I didn’t record the original position…) but do you have any recommendations what to check other than these screws?

Here’s a short movie hoping this would help for you guys advice.
Thank you.
 

Attachments

  • IMG_2879.MOV
    10.5 MB · Views: 0

saltchuckmatt

Commander
Joined
Jul 19, 2019
Messages
2,451
It’s been a while…and finally she is back and runs. BUT, it’s running rough.

I will tune air-fuel mixture screws (because I turned some long time ago with my ignorance and I didn’t record the original position…) but do you have any recommendations what to check other than these screws?

Here’s a short movie hoping this would help for you guys advice.
Thank you.
Are you running it without water?
 
Top