1999 Crestliner Sportfish 2050

ezmobee

Supreme Mariner
Joined
Mar 26, 2007
Messages
23,767
I had a similar experience with runny Bass Pro branded carpet adhesive years ago. To make it worse I was applying it over non-sealed plywood that absorbed some of it as well. From now on I just use the inexpensive Roberts outdoor carpet adhesive from Lowes/Home Depot.
 

Tuna MT

Seaman Apprentice
Joined
Jun 13, 2017
Messages
30
I bet the PO used a product like that to glue the outdoor carpet to the dash. Not fun to remove...


Tuna MT

Seaman Apprentice
Joined
Jun 13, 2017
Messages
30
So I found some time this afternoon to address my failed glue experience. I had a quart of weld wood sitting around my shop and decided to use it for this one piece.


Didn't turn out too bad considering it was already partially stuck with the 290.


Watermann

Starmada Splash of the Year 2014
Joined
Jan 12, 2013
Messages
13,777
Hey that's not bad at all, now if it will just stay put. :whistle:
 

Tuna MT

Seaman Apprentice
Joined
Jun 13, 2017
Messages
30
Still holding...time will tell I guess.

Do any of you guys know of a way to prevent this from happening?


To be more specific, I don't want the carpet fibers to split when it is bent around 90 degrees like it did with this test piece.
 

Watermann

Starmada Splash of the Year 2014
Joined
Jan 12, 2013
Messages
13,777
budski is the boat carpet guru around here. Lets see if he has any thoughts on that issue.
 

Tuna MT

Seaman Apprentice
Joined
Jun 13, 2017
Messages
30
I used 3/4 marine ply with 1 coat of WOG's old timer formula top and bottom, then 3 coats spar varnish top and bottom.
Put a 1/4 round on the top and bottom of all the edges to help with the carpet corners.


Tuna MT

Seaman Apprentice
Joined
Jun 13, 2017
Messages
30
I have some questions before I start attaching carpet...

Do I need to scuff the spar varnish before applying the Lancer 290 adhesive?

Are galvanized staples OK or should I find aluminum or stainless?

I am going to use screws to attach the floor panels. Should I place all the panels and drill screw holes before carpeting them so I can seal inside of the holes or is there a better way?


My plan is to run the carpet the same direction on all the floor panels relative to how they place in the boat.
 

Watermann

Starmada Splash of the Year 2014
Joined
Jan 12, 2013
Messages
13,777
Stainless staples for sure. I don't scratch up the surface of my decking before gluing on the vinyl and I know the SC factory glues carpet to the sides of brand new shiny aluminum which has to be more slick than spar on plywood.

Screws are not the best option but frequently used here, I guess easiest since they're readily available. As done by the factory most times, large flange rivets are best for anchoring the decking to the ribs, the screws only hold by a couple teeth in the thin AL and will work loose over time way sooner than rivets. There's 2 ways of putting on decking, attach it and then put covering on or wrap each piece and then attach. It's your call, either is acceptable but screws will pierce the carpet and leave a hole unless you use screw washers if you wrap first.

If your set on using screws then I believe these are the best after using them I find they don't let go of anything easily.

Sharkx SS marine deck screws

sharx.gif
31MIU6QReTL._SR600%2C315_PIWhiteStrip%2CBottomLeft%2C0%2C35_SCLZZZZZZZ_.jpg
 

Tuna MT

Seaman Apprentice
Joined
Jun 13, 2017
Messages
30
Thanks Watermann!!

The factory floor panels were screwed down with these:


I really want to use screws so I can pull the floor up.

I am going to wrap each piece then put the panel down. I was just thinking about drilling the holes for fastening first so I can put some spar in them.
 

ezmobee

Supreme Mariner
Joined
Mar 26, 2007
Messages
23,767
Not a single one of my deck screws in two restores has loosened in 8+ years. Had issues with some of the machine screws holding trim and what not on but the deck screws have been perfect. I installed my deck boards and then touched up all the screws with more epoxy and then applied my vinyl flooring in the boat. I can understand your wanting the boards to be removable but I think you water sealing is gonna be a real trade off. I used stainless staples from Lowes for any and all stapling and they've held up.
 

Watermann

Starmada Splash of the Year 2014
Joined
Jan 12, 2013
Messages
13,777
Oh I see, yeah those are some really fine toothed SS self tapping screws. They would work way better than what guys find in the big box store. They use those to save time, no pre-drilling I guess. Drilling first, wrapping and once again finding the holes to drive a screw may be a bit tricky.
 

Tuna MT

Seaman Apprentice
Joined
Jun 13, 2017
Messages
30
I don't think complete water sealing is a reality for me. There are 9 pieces of plywood that will make up the floor from the consoles back. With that many seams, water is going to find a way in, I would think, especially since there is a gap between each piece to accommodate the carpet thickness. I mainly just want to preserve the plywood the best I can.
I didn't think about trying to find the holes after carpet. Maybe I'll drill the holes after carpet, squirt some of WOG's OTF in there with a syringe, and then drive the screws. I just read a discussion about this on another thread but I don't remember which one.

One of the reasons I want the floor removable is at some point I will replace the foam, but it is not going to be until winter. I know I should do it now but I feel it is more important to get the family out on the water this year. I drove wood dowels through the foam at various points and found there is anywhere from no moisture to 1 1/2".
 

Tuna MT

Seaman Apprentice
Joined
Jun 13, 2017
Messages
30
I decided to not use the Lancer 290 water based adhesive and I am using DAP Weldwood all weather outdoor carpet adhesive.
I carpeted a few panels and getting pedestal mount holes drilled in some other pieces.


Tuna MT

Seaman Apprentice
Joined
Jun 13, 2017
Messages
30
Any tips or suggestions would be GREATLY appreciated!!

Here are some more pics of the carpeted pieces in the boat:


Tuna MT

Seaman Apprentice
Joined
Jun 13, 2017
Messages
30
I have a bunch of Springfield Spring_Lock pedestals and bases with the seat mounts. I am considering something more robust for the driver and perhaps front passenger, like 2 7/8" Main$tays, since all of the bases I have say 'less than 5 mph' blah blah blah.

Is there a forum consensus on what the preferred pedestal system might be?

I am also looking for tips on hatch door construction for the live wells. I was thinking about using carpeted marine ply like I will for the 'dry' hatches except with a water resistant backing. The aluminum hatch doors I pulled out are bent, and are made for 5/8" ply instead of the 3/4" I am using. I would like to also use continuous aluminum 'W' hinges (or offset hinges) for the hatches. Should I use a 1" offset for 3/4" ply plus carpet?

Tune
 

Watermann

Starmada Splash of the Year 2014
Joined
Jan 12, 2013
Messages
13,777
Hey your carpet job is looking real nice.

I use solid bases that aren't removable for the helm and nav seating that are AD helm rated. I do use the B rated removable type for the the fore and aft fishing seats. I don't see the need to ever remove my helm chair, it's not a good idea.

y4myfeebWenlRYI46LFX22QdbkjGMMCjvDT0ggepSjP-iDL2ib-LyCvpibO3lvJwwKgLV_4we5a6LlAOPXxWOmIzOyEliyabTbY0VL2jtHAp6dp8iS_mpjp89ywMZPQBywnRIWpx32t7F9bl2_Y_zY3uhpq__4778ymy91DyQyMFGiSx3PhnW1k8GCYS0-HFTnSixvpYUz-ck1Dhg4SYVsFaQ


On the offset hinges, I think you're right and would need the 1" hinges to give you enough room to open them all the way and not bind.
 

fishrdan

Admiral
Joined
Jan 25, 2008
Messages
6,989
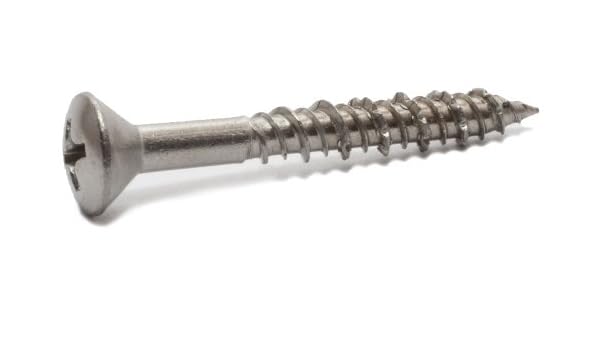
I used SS "truss head" screws when I attached my deck panels, too many of the original screws were messed up and I couldn't source extras. Kind of a laborious procedure the way I did it as the SS screws had issues cutting into the aluminum. I used a 3" long steel screw of the same size and thread pitch (with the head cut) off as a "tap" to thread all the holes, then ran the SS screw in to the hole. (When the steel screw cut into the aluminum it heated up, then the aluminum cooled and shrank so the SS screws were tight.) Basically, drill a deck hole, tap it with the 3" steel screw chucked into a drill, then insert SS screw.

My boat came with the "5mph" seat base/pedestals in all positions, and still has them.... During my resto I gathered a hoard of pics online getting ideas to incorporate into my build, and all of the "Crestliner" pics I found (before 2010 or so) had the 5mph base/pedestals in all positions. My take is it's a lawyer/liability thing, and what was once acceptable may not be any longer, manufacturer liability. I overnight on my boat, and it's nice being able to pull the seats to clear the deck. If in doubt, go for the sturdier 2 7/8" fixed pedestals.

My boat was originally decked with 1/2" (or 5/8" don't remember) and I replaced it with 3/4. The aluminum deck hinges were an issue, but I kept the original hinges which do not allow the hatch to flip open all the way and lay flat on the deck. It's not a huge deal as I installed spring loaded hatch lifts on the big hatches, to hold them open. Smaller hatches don't open the full 180*, but it's not an issue for me, they probably open 120* or a bit more. If you want the hatch to lay flat on the deck, replace them with 1" offset piano hinges.

Replacing the livewell hatches with plywood could be an issue if the livewell opening is "lipped", as the plywood wouldn't lay flat on top of the livewell. My aluminum livewell hatch (big one, 12"x36" or so) was a bit tweaked, but I was able to bang it back into shape. I didn't like how flimsy the hatch was, so I took a piece of 3/4 ply, split in half on the table saw to get a 3/8" thick piece and epoxied it inside aluminum hatch (plywood fits inside the livewell opening when closed). This made the hatch much sturdier when stepped on.

One thing about replacing the decking with 3/4" is you'll have to re-align the consoles and windshield for the thicker deck material. My consoles are built different than yours, plastic top and aluminum legs, so I was able to re-drill where they attached to account for the thicker deck.
 
Last edited:

Tuna MT

Seaman Apprentice
Joined
Jun 13, 2017
Messages
30
Half of my B rated bases are bent.
I am not putting any on the rear deck. I think two behind the op/nav and one up front. I like those bases you have there, Waterman. Are they Springfield?

I went and made my hatch holes a little different than the old aluminum hatch lids so now they won't work. I am considering getting some starboard to protect the bottom of the livewell lid from rambunctious walleye splashing it. Wrap carpet around sealed 1/2" ply and then attach the 1/4" starboard to the bottom. I don't know, I'll put more thought to it.

I think I am going to really like the 3/4" floors. The span over the gas tank is a bit much and the cross members they put in don't do much. The side panels of the consoles are rotten which is causing the dash and windshield to sag. Sag to the point the bottom of the glass where it curves is popping out of its gasket. I plan on using a different design for the consoles.


Almost 2 weeks ago, I went and bought a Boatmate tandem axle trailer to replace the overloaded single axle the boats on now. It will need tires, new fenders, new bunks, and then fit it to the boat. I can't find much info on proper bunk placement over at the trailer forum but I have pics of other similar boats and their trailers. Common sense tells me to place under the stringers.


Watermann

Starmada Splash of the Year 2014
Joined
Jan 12, 2013
Messages
13,777
I put quad bunks on my trailers and measured from the center of the boat to find where the bunks needed to be and transferred that measurement to the trailer. The location of the chines is the determining factor of where the bunks need to go not so much where the stringers are inside. That ends up giving you support on the very bottom and the outside of the boat.

y4mrDy0NXMkyB6SejO3ONt3qmbBv5Yq5Y92ejw9fhCk1-9BW6milFJ1FLu3uA4n2BvzLV4KroR83Wswe7xtGmWIDq-1_ghEHr2zmukTQxjU1oKUzyYlJrnK5pxsu5-zzNRcXgIhABBW3HjeEDDU90JZbjOtbmvfSZY43hEZXwozDYW1wzFjDGb6MGT-moi5PWOCu0XxF4hf0atIsxlGYzMoeA
 
Top