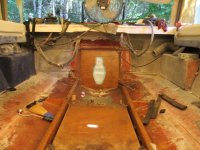
1998 Bayliner Capri floor.

TankerDan

Seaman
Joined
Oct 22, 2020
Messages
68
I hopped in the boat to see how bad the last glassing was since my back was hurting bad. At first it didn't look bad, then I got close to the transom where it was harder to reach and holy cow there are a lot of large air pockets. I'm not well enough yet to go back to work on it. I'm going to try to channel my inner Tom Sawyer and and talk a neighborhood kid into grinding it for me. If I can, it might be the best money I ever spent.
 

JASinIL2006

Vice Admiral
Joined
Feb 10, 2012
Messages
5,553
How big are the pockets and how many? If the concern is just prevent water intrusion (rather than being concerned about the integrity of your lamination), you can inject resin into the bubble and fill them up.

The injection won't work if a large proportion of the lamination is bad, but if you just have some bubbles and your afraid they might allow a path for water to reach the wood, you might be able to get away without grinding.
 

TankerDan

Seaman
Joined
Oct 22, 2020
Messages
68
How big are the pockets and how many? If the concern is just prevent water intrusion (rather than being concerned about the integrity of your lamination), you can inject resin into the bubble and fill them up.

The injection won't work if a large proportion of the lamination is bad, but if you just have some bubbles and your afraid they might allow a path for water to reach the wood, you might be able to get away without grinding.
I have a boat load of small ones, I had thought of popping and filling them but with so many it would be more time consuming them grinding and redoing. The real bad ones are an inch or long wide. It looks like I somehow managed slide the top of the glass down causing the bubble. I'm thinking I must have grabbed the stringer to help push myself up and my fingers pushed down the top of the glass. I'm also assuming its part structural, its the first layer of glass and the big pockets are about 1/4 inch above the fillets. The stringers themselves I coated with poly to seal them so I'm not as worried about moisture but I don't want to take the chance
 
Last edited:

Mad Props

Lieutenant Commander
Joined
Jul 8, 2016
Messages
1,766
Your okay... any of the big ones, pop an hole and fill with resin, but any of the small ones are okay...
Everyone here has such a high standard of what is acceptable for a hand layup (which is a good thing, we want to strive for perfection), but you have to realize that we are doing the same thing that they did in the factory, except maybe even better... These are not vacuum infused resin layups... Theres going to be bubbles. The key is to try to eliminate them to your best ability, and if you feel like its not great, just go on with another layer...
 

TankerDan

Seaman
Joined
Oct 22, 2020
Messages
68
I was out the last couple of days finishing the stringers and getting the transom built out to the proper thickness before a supposed record heat wave comes in this weekend with temps in the triple digits. Tomorrow I plan to be done with the transom and have the holes drilled to remount the gimble housing. It looks like the holes will need to be drilled level as opposed to at the same angle as the transom? I've spent so much time looking at it trying to figure it out my eyes ache-lol. ThanksIMG_0085.JPG
 

todhunter

Canoeist
Joined
Sep 15, 2020
Messages
1,252
Not sure what brand out-drive you're using, but my Mercruiser Alpha One required drilling the holes at the same angle as the transom - not parallel to the ground. I drilled my holes to 1/2", which is a little bit bigger than the studs, so there is a small amount of wiggle room.
 

TankerDan

Seaman
Joined
Oct 22, 2020
Messages
68
Not sure what brand out-drive you're using, but my Mercruiser Alpha One required drilling the holes at the same angle as the transom - not parallel to the ground. I drilled my holes to 1/2", which is a little bit bigger than the studs, so there is a small amount of wiggle room.
I should have mentioned Alpha 1 gen 2. Thanks I'd have hated to drill wrong and destroy the new transom
 

TankerDan

Seaman
Joined
Oct 22, 2020
Messages
68
I found my brain fart. I drilled the transom holes for the mounting studs, the studs didn't line up, knowing it came out of holes in the transom glass I knew there was something wrong staring me in the face that I wasn't seeing. I did a couple of honey do's and came back and there it was Somehow I managed to bend the top 2 mounting studs on the gimble housing. I don't know how I did it but they were definatly pointing up and out when I unscrewed them they has a heck of a wobble. I tried it again and the housing slid right in. DOH!!!
 

TankerDan

Seaman
Joined
Oct 22, 2020
Messages
68
Not even touching the boat, our record heat wave arrived and the last 3 days-counting today have been between 103-109 degrees. Way to hot to be out working. It feels like when I was stuck in Texas for 2 years, way to hot
 

Mad Props

Lieutenant Commander
Joined
Jul 8, 2016
Messages
1,766
I hear you... I don't know why I waited to long to start working on my trailer, but now I'm ready to paint, but its 95 and humid like everyday so I can't paint until the weather cooperates with the application requirements.
 

TankerDan

Seaman
Joined
Oct 22, 2020
Messages
68
Well, I've been back working the boat, I would have posted pics but misplaced my camera-oh well maybe I'll find it-. Anyway, transom done. Stringers done. Floor in. I was starting to get low on resin again, when before I ordered it I broke a tooth so my boat money had to go to the repair. So I'm now just buttoning it up untill I get more money, or am released by the doc to go back to work. So I've been using the last of the resin to seal the top of the deck, I didn't want it bare if it had to wait all winter and absorb moisture from the air. Got one layer of deck tabbing done and the transom around the key hole gel coated blue instead of the original gray to match the hull strip. So I'll spend my time now rebuilding the seat risers, battery platforms-ect. Then be ready for spring to start on it again. But hey, I'll have the time to clean it up good at least
 

TankerDan

Seaman
Joined
Oct 22, 2020
Messages
68
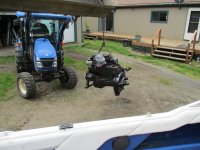
Time to reinstall the engine. I spent the winter grinding off all the exterior corrosion, new hoses, water pump, front and rear crank seals and repainted the engine. I've put off reinstalling it for a few weeks from fear. When I was grinding the transom I ground the edges at slightly different angles so the new wood looked like it wasn't mounted flat. I put a 4ft. level across it and measured to the transom edges I didn't touch and it was good. I put a square across it and it was good. But darn it it looked bad. So I put it in and low and behold it was perfect. Terrified for nothing
 

Attachments

  • IMG_0097.JPG
    IMG_0097.JPG
    6.1 MB · Views: 10

Mad Props

Lieutenant Commander
Joined
Jul 8, 2016
Messages
1,766
Time to reinstall the engine. I spent the winter grinding off all the exterior corrosion, new hoses, water pump, front and rear crank seals and repainted the engine. I've put off reinstalling it for a few weeks from fear. When I was grinding the transom I ground the edges at slightly different angles so the new wood looked like it wasn't mounted flat. I put a 4ft. level across it and measured to the transom edges I didn't touch and it was good. I put a square across it and it was good. But darn it it looked bad. So I put it in and low and behold it was perfect. Terrified for nothing
Jealous of your engine hoist šŸ¤£
 

TankerDan

Seaman
Joined
Oct 22, 2020
Messages
68
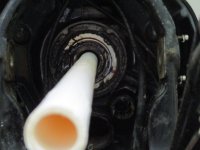
Trying to align the engine. I didn't have a helper so it was adjust, hop out of the boat, check, climb back in over and over and over again. legs aching, back hurting, getting highly short tempered because I just can't even get it close. Then I read an article to use a 1 inch pipe as an alignment tool, closest I found was 1 1/16 diameter, sanded it off until I could tap it in and found the front was way to high. Lowered it until the pipe was centered, then used the alignment bar. 10 minutes without help and it was good. If anyone has this problem using the pipe to get close is a good way to go
 

Attachments

  • IMG_0099.JPG
    IMG_0099.JPG
    3.4 MB · Views: 6

TankerDan

Seaman
Joined
Oct 22, 2020
Messages
68
Hey guy's I'm having a brain fart here. I'm dry fitting the front seat risers, platforms or what ever it is the front back to back seats sit on. Some idiot-me- didn't think to measure from the centerline to the inner edges of the risers so I'm not sure if they are too far in or out from the center line. I'm more concerned about the drivers side, am I right thinking the center of the seat should be center of the steering wheel? I don't want to be stuck with an off set wheel. Thanks
 
Top