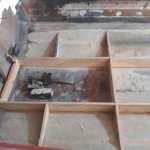
1998 Bayliner Capri floor.

GSPLures

Chief Petty Officer
Joined
Sep 3, 2019
Messages
564
Slowly chiseling out the transom. I found its easier if I make cuts through it so it looks kind of like a checker board then chisel out the smaller squares, and make shallower cuts as I get deeper. I don't know if it saves time but it saves my aching back. I got it down to about 1/4 inch when I ran into the screws for the fishfinder, and external wire holders. i wonder if the transom would have lasted longer if the installer-not me- had used sealant on the screws. Smh
You will find lots of things that previous owners improperly did during a rebuild. When I pulled the carpet up on mine I found a 2'x2' section of the deck was cut out and ply just laid in place without any glass or waterproofing not even screwed down, then carpeted over. Makes you wonder if it is pure laziness or a true lack of knowledge.

On a brighter note, at least you know it is done right after your done.
 

88 Capri (2022 SOTY)

Master Chief Petty Officer
Joined
Aug 25, 2019
Messages
819
I found the same thing myself but I also had a bad gimbal housing seal that was bad so that exasperated everything.
 

TankerDan

Seaman
Joined
Oct 22, 2020
Messages
68
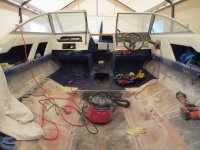
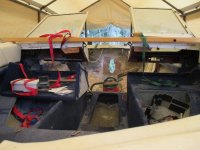
Got about 2/3s of the floor demolished and ground down. I'm having to go slow because of disc issues in my back and I don't want to spend a couple of weeks flat on my back. I didn't like how both sides of the dash sagged when the covers were removed under them so I put a 2x4 across and ratchet strapped the dash to it for support. Hopefully I don't hit my head on it too many times. The rot stopped about a foot short of the front bulkhead, but I'm not taking any chances and will rip it all out. I don't want to redo it in 5 yearsIMG_0072 (1).JPGIMG_0074 (1).JPG
 

TankerDan

Seaman
Joined
Oct 22, 2020
Messages
68
I was looking on the Us Composites site and am wondering if the 404 tooling poly resin, or the the 435 standard layup resin would be better. Thanks
 

todhunter

Canoeist
Joined
Sep 15, 2020
Messages
1,308
I used the 435. Don't be afraid to pick up the phone and call them. Very nice and helpful folks.
 

GSPLures

Chief Petty Officer
Joined
Sep 3, 2019
Messages
564
I just started using the 435 (I was buying local until price increases). It is a way better product than what I was getting locally, seems to wet out a lot nicer and kicks faster. US composites is a high volume company so they have fresh stock that doesn't sit around according to the gentlemen I spoke to on the phone. They are very helpful.
 

TankerDan

Seaman
Joined
Oct 22, 2020
Messages
68
Those cut resistant sleeves I bought mainly to keep dust off my forearms are the best $12.00 I ever spent. I was cutting out the bow section with a saw blade on my 4 1/2 inch grinder and was in an awful position to be cutting because of the lack of room. I must have slightly bound the blade or something because it kicked back and hit my right wrist. It pulled down the sleeve and bound up the grinder until I could get it turned off. I wasn't even scratched but will most definitely pay more attention in the future
 

todhunter

Canoeist
Joined
Sep 15, 2020
Messages
1,308
I ran the grinder with a 40-grit flap disc across my finger in January. It cut very deep, but it healed, but I don't think I'll ever have a finger print in that area any more. Be really careful with a grinder - it's really dangerous.
 

88 Capri (2022 SOTY)

Master Chief Petty Officer
Joined
Aug 25, 2019
Messages
819
I ran the grinder with a 40-grit flap disc across my finger in January. It cut very deep, but it healed, but I don't think I'll ever have a finger print in that area any more. Be really careful with a grinder - it's really dangerous.
I myself either used a flapper wheel or muli-tool, seen too many injuries with a cut-off wheel over the years.
 

GSPLures

Chief Petty Officer
Joined
Sep 3, 2019
Messages
564
I'm glad you are ok. I had a few near misses when the wheel got pinched and pulled the grinder out of my hands.
 

TankerDan

Seaman
Joined
Oct 22, 2020
Messages
68
Well hopefully I'm done grinding-its the third time I've said this- I've managed to hit the same spot on the same finger 3 times with the flap disc. Poly resin is on the way. Tomorrow I make a template and start building the transom.
 

TankerDan

Seaman
Joined
Oct 22, 2020
Messages
68
I'll finally be mounting the new transom tomorrow. So I was thinking, the old aft stringers were 3ft. long and tabbed into a bulkhead with the front motor mount. then another stringer about 5 ft. long tabbed into the aft and the front bulkhead. So I'm wondering if I should just use the same design or cut the stringers to the full length then install the bulkhead and tab it to the stringers which I think would be easier for me but not sure if it would be as strong. I'm hoping I've explained well enough to be understood, and can get input from anyone more knowledge about this then me. Thanks
 

todhunter

Canoeist
Joined
Sep 15, 2020
Messages
1,308
I ended up doing what you're describing. My boat originally had the bulkhead as one complete piece and the stringers were broken up into separate pieces fore and aft of the bulkhead. When I rebuilt mine, I did full length stringers and pieced together the bulkhead. It made sense in my mind that this way was better. Honestly though, after getting 2 layers of tabbing down on everything and capping the stringers, I'm not so sure it will matter in the end. It's how I wanted to do it, and it's how I did it, and at worst, I think it will be at least as strong as the boat was originally built.
 

GSPLures

Chief Petty Officer
Joined
Sep 3, 2019
Messages
564
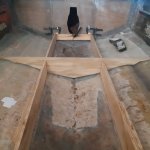
The way I did mine was I made the stringers one solid piece and then made the bulkheads one solid piece. I cut a 1" notch in the stringers where the bulkhead sits then cut slots in the bulkhead where the stringers sit so you could slide it over the stringers and they sat flush. Almost like a 3d jigsaw puzzle if that makes sense.

It helps hold everything in place when put together. Then I PBed and tabbed with everything in place. The one picture is before I notched the stringer and the other is after
 

Attachments

  • 20200920_164636_compress62.jpg
    20200920_164636_compress62.jpg
    723.2 KB · Views: 23
  • 20200923_142545_compress29.jpg
    20200923_142545_compress29.jpg
    683.3 KB · Views: 23

TankerDan

Seaman
Joined
Oct 22, 2020
Messages
68
Thanks for the feedback. I figure I'll probably go with the full length stringers. I thought seriously about notching them like GPSLures did but then remembered my carpentry skills are sorely lacking so I'm going with what sounds better for my skills
 

GSPLures

Chief Petty Officer
Joined
Sep 3, 2019
Messages
564
Thanks for the feedback. I figure I'll probably go with the full length stringers. I thought seriously about notching them like GPSLures did but then remembered my carpentry skills are sorely lacking so I'm going with what sounds better for my skills
Its not to hard I just used a jigsaw. Doesnt have to be perfect since you have to fillet the corners anyway. Just have to make sure you fill any gaps so it is solid.

What I did to measure it was flipped the bulkhead upside down and sat it on the stringers where it needed to be and marked the bulkhead on the top. Then used a square to bring the marks to the bottom and notched it to about an inch up top (so they wouldnt break while handling). Then once those are notched I put it over the stringers (first pic in previous post) and marked it on the stringers. From there I notched the stringers then notched more out of the stringers until it sat flat.
 
Top