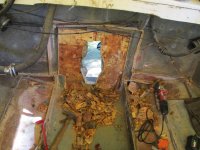
1998 Bayliner Capri floor.

TankerDan

Seaman
Joined
Oct 22, 2020
Messages
68
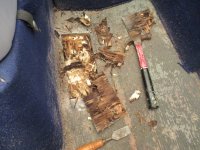
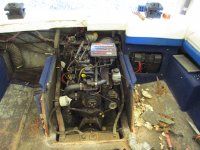
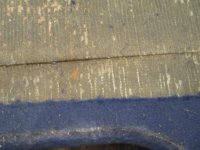
So knowing that sooner or later I'd be joining the floor and stringer club I spent the winter watching Friscoboater's videos and reading the threads. But I thought it would be 1-2 years down the road before it was my turn-wrong. There was an ominous crackling when I kneeled down to put the plugs back in the engine to start it. When I went to stand back up I could see some flex in the floor and more crackling-inset many 4 letter word here. I also found that between the seats the floor panels didn't line up any more. one was higher then the other and moved-many more 4 letter words. So as I start the demo I'm left with one(so far) question. Who is the absolute idiot the designed the lower half of the dog house? Really? Glassing it to the floor? Thanks for the extra work BaylinerIMG_0032.JPGIMG_0034.JPGIMG_0035.JPGIMG_0033.JPGIMG_0032.JPGIMG_0034.JPGIMG_0035.JPGIMG_0033.JPG
 

chevymaher

Commander
Joined
Mar 29, 2017
Messages
2,921
Yes the style I got where it all comes out is alot easier to work with.
 

TankerDan

Seaman
Joined
Oct 22, 2020
Messages
68
Got the drive off, engine disconnected then stared at it wondering how I'm going to get the engine out without renting or building a gantry. Then my inner country bumpkin told me to put my engine hoist in my utility trailer, strap it in so it won't move. then pushed the trailer-carefully- up to the transom and fully extended the boom. and it lined up perfectly. I got the ram about half extended when it just plain quit. So I block up the engine, remove the ram and it won't work at all now. I'm looking at it, I can't move the boat now, the engine is blocked up about 2 feet above the mounts then my inner redneck came out. Call my neighbor and chain it up to the bucket. engine is out and on the garage floor. Here's the kicker I had to get it up and on my engine stand, just for kicks I tried the hoist again. It worked perfectIMG_0039.JPGIMG_0042.JPGIMG_0043.JPG
 

chevymaher

Commander
Joined
Mar 29, 2017
Messages
2,921
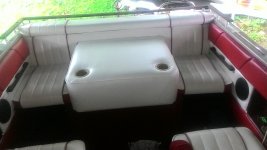
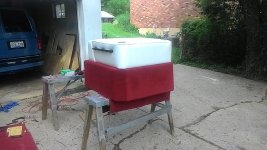
I can get measurements and tell you what it is made of. I rebuilt the lower red part so I got all that and glassing it in. In detail. I can take a bunch more pics for you. The white part flips up. The back slides under the seat. There are 2 L brackets it screws down with. The second picture is in the boat. Lower seats are removable. Which is nice for swimming and fishing you can stand back there.
 

Attachments

  • P_20180517_094728.jpg
    P_20180517_094728.jpg
    343.5 KB · Views: 17
  • P_20180518_091634_LL.jpg
    P_20180518_091634_LL.jpg
    278.5 KB · Views: 17

TankerDan

Seaman
Joined
Oct 22, 2020
Messages
68
I can get measurements and tell you what it is made of. I rebuilt the lower red part so I got all that and glassing it in. In detail. I can take a bunch more pics for you. The white part flips up. The back slides under the seat. There are 2 L brackets it screws down with. The second picture is in the boat. Lower seats are removable. Which is nice for swimming and fishing you can stand back there.
That looks similar to what I was imagining mine looking like. I am thinking of making it 2 piece so if needed I could take the original top portion off if needed when the back seats are in
 

TankerDan

Seaman
Joined
Oct 22, 2020
Messages
68
I'm waiting for a 12 point socket set to come in so I can get the exhaust pipe off the gimble housing and remove it and the transom plate, I got rid of all my 12 points years ago-lol. But while I wait I'm slowly grinding out the part of the deck I've removed so far. I'm at the outer edge where it connects to the hull and am wondering if there is a flat spot on the hull for the edge or if it is angle cut is packed full of pb. Mainly I don't want to cut a hole in the hull trying to find out. Thanks
 

88 Capri (2022 SOTY)

Master Chief Petty Officer
Joined
Aug 25, 2019
Messages
819
Dan I have an 88 BL Capri which I'm sure has a different construction method but I had a semi-flat area where my floor contacted the hull. I did the same as you are working towards the outside because this is my first boat so learning as I go.
 

TankerDan

Seaman
Joined
Oct 22, 2020
Messages
68
Well I haven't been able to get as much quality time with the boat as I wanted. Just cutting out the floor still. but my gosh, I'm wearing a Tyvek suit, forearm protectors, latex gloves and elastic foot coverings that are mid calf length swim goggles and a good mask yet glass still gets in. I've read about this but until you've experianced it nothing nothing can prepare for the itch and stinging. And I'll still have a ton of grinding ahead of my. Ah, well not everything can be fun
 

Scott Danforth

Grumpy Vintage Moderator still playing with boats
Staff member
Joined
Jul 23, 2011
Messages
49,540
Use a goos shop vac with a bag, use duct tape to hold the hose near your work to suck as much as possible

It helps
 

todhunter

Canoeist
Joined
Sep 15, 2020
Messages
1,308
You can use a vacuum with a bag as Scott suggested, or get a cyclone dust separator to add in-line with your vacuum. It's amazing how much dust the cyclone collects and keeps out of the vacuum. Some of the super-fine particles still make it past the cyclone, so I also ran a felt "filter saver" over my filter and occasionally pulled it out and cleaned it.

If you have built a tent over your boat to contain the dust, be aware that running the vacuum for any significant period without a way for the tent to pull in make-up air will cause the tent to get sucked down on you. I had to re-build my tent twice to get it right.
 

GSPLures

Chief Petty Officer
Joined
Sep 3, 2019
Messages
564
A tip that was given to me and seemed to work well.
Once you are done working take a cold shower(not super cold but not warm) use bar soap and rinse, don't dry use lotion all over, then take a normal shower and wash all lotion off.
 

chevymaher

Commander
Joined
Mar 29, 2017
Messages
2,921
For me do not touch or rub yourself while working. anytime you get out of the boat use a hose and cold water on your arms. Toward the end 85 degrees or not I had a sweat shirt on.
 

TankerDan

Seaman
Joined
Oct 22, 2020
Messages
68
Looks like I had more rot in the stringers then the transom, only the bottom inch or so. Chiseling it out is back breaking and tedious. Daddy's little helper checking on my progressIMG_0067.JPGIMG_0068.JPG
 

TankerDan

Seaman
Joined
Oct 22, 2020
Messages
68
Slowly chiseling out the transom. I found its easier if I make cuts through it so it looks kind of like a checker board then chisel out the smaller squares, and make shallower cuts as I get deeper. I don't know if it saves time but it saves my aching back. I got it down to about 1/4 inch when I ran into the screws for the fishfinder, and external wire holders. i wonder if the transom would have lasted longer if the installer-not me- had used sealant on the screws. Smh
 
Top