1996 BF50 Honda Bogging out when trying to plane

Noah4200

Petty Officer 3rd Class
Joined
Oct 17, 2022
Messages
90
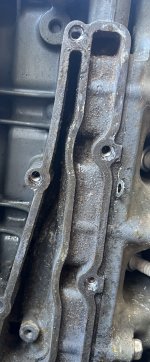
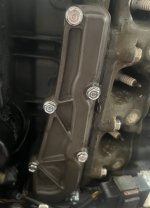
Got it back on! It’s just a hair more to the left bc of a few holes drifting but not enough to cause issues. If you didn’t see it before you would never know. The oring has plenty of wiggle room on the mating surface. That whole ordeal sucked but have a fresh anode and jacket is cleaned out
 

Attachments

  • 9DA6CC0F-12A3-4A75-83BE-E663BF042276.jpeg
    9DA6CC0F-12A3-4A75-83BE-E663BF042276.jpeg
    708.5 KB · Views: 0
  • 04D4D5EF-DDF3-43FA-8BD1-2F983942E683.jpeg
    04D4D5EF-DDF3-43FA-8BD1-2F983942E683.jpeg
    1.9 MB · Views: 0

Noah4200

Petty Officer 3rd Class
Joined
Oct 17, 2022
Messages
90
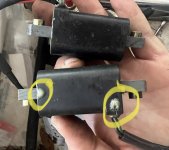
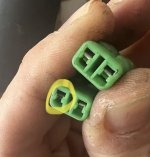
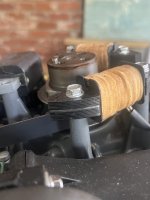
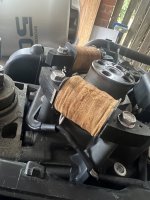
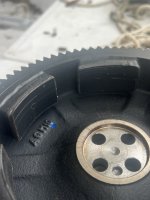
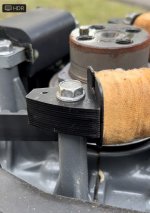
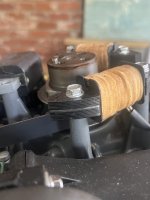
So i’m swapping the exciter and ignition coils now to try to remedy the deteriorating iginition symptoms and i found some interesting gunk on the case of the exciter coil as well as a dark colored contact on the terminal. I’m praying this is my problem. I’ve also noticed lines on my brand new flywheel. I’ve included pictures of all. The marks on the charging coils were from the old flywheel, one of them. I actually tried to file down slightly to remedy it when it was making contact before finally just changing it. Today there was a few little burrs of material I picked off. Not sure what would be making contact with the new flywheel now as everything looks ok and is non adjustable. It’s quiet when it runs. What if the old exciter coil is damaged and swollen and using glue or whatever and that is my ignition problem? The plastic did look slightly chewed up on the face. This could be huge.
 

Attachments

  • A8159CC6-1D63-446A-B3CB-0D44D057E287.jpeg
    A8159CC6-1D63-446A-B3CB-0D44D057E287.jpeg
    403.8 KB · Views: 8
  • C9DB8FEA-D823-4E71-B773-D9CA3C99FA2C.jpeg
    C9DB8FEA-D823-4E71-B773-D9CA3C99FA2C.jpeg
    244.6 KB · Views: 8
  • 87415404-E235-46A7-AB8C-208766F9D5F3.jpeg
    87415404-E235-46A7-AB8C-208766F9D5F3.jpeg
    1.3 MB · Views: 8
  • D430B725-97F1-467C-B136-5952F7C9EC0B.jpeg
    D430B725-97F1-467C-B136-5952F7C9EC0B.jpeg
    1.2 MB · Views: 7
  • 52F40C6B-DC18-4BC6-A85F-DADE988E862C.jpeg
    52F40C6B-DC18-4BC6-A85F-DADE988E862C.jpeg
    1.3 MB · Views: 8

Noah4200

Petty Officer 3rd Class
Joined
Oct 17, 2022
Messages
90
Ok guys haven’t tested the motor yet but i’m confused. Pulled up some old pics and the brand new OEM flywheel (which makes zero noise) seems to have done all the new damage in the pics. This particular charging coil had no damage with the old delaminated flywheel. The coils are non adjustable and fit precisely in their mounting positions. How would my old clanking flywheel not hit this but then i out on a brand new flywheel and this happens?
 

Attachments

  • 5ACC10FB-3EE9-4376-B4C4-0DDE4440873F.jpeg
    5ACC10FB-3EE9-4376-B4C4-0DDE4440873F.jpeg
    1.4 MB · Views: 2
  • 22D4EB27-0595-4AA7-8A84-687DEFDEF8B7.jpeg
    22D4EB27-0595-4AA7-8A84-687DEFDEF8B7.jpeg
    1.3 MB · Views: 2

MattFL

Master Chief Petty Officer
Joined
Oct 20, 2010
Messages
865
I think the point is moot anyway because that won't affect the performance of the coils. Mine were starting to bump the flywheel again after I changed the timing belt a few months ago, so I took a sander to that part of the coils and filed them back a bit, painted for corrosion protection and it's still running great. That's just a stack of metal plates to enhance the field in the coil, it won't hurt them to be scratched.
 

Noah4200

Petty Officer 3rd Class
Joined
Oct 17, 2022
Messages
90
Ok thanks. I’m gonna sea trial the new swaps asap. If it still starts degrading after getting warm i’m gonna need a game plan. At that point it’s either CDI, fuel pump (although i pumped bulb during bogging and didn’t help) or carb/fuel passages (maybe the tiny holes in the throat or the fuel delivery Tees and piping). Although the carbs wouldn’t make sense to run fine at first then fall out. So i think there is a really good chance it’s solved but it’s gonna be a blow coming home from the trial if not and i’ll have to come up with a game plan. Thanks
 

MattFL

Master Chief Petty Officer
Joined
Oct 20, 2010
Messages
865
Just for a data point, do you also have an oil pressure gauge available? Or at least is the oil pressure idiot light working? It will be on before the motor starts and should turn off as soon as there is oil pressure.
 

Noah4200

Petty Officer 3rd Class
Joined
Oct 17, 2022
Messages
90
I started it up…sounds about the same. Water jacket holding great. The top green oil light works. Will sea trial asap
 

Noah4200

Petty Officer 3rd Class
Joined
Oct 17, 2022
Messages
90
I’ve mention this earlier but pulling the middle plug wire doesn’t change the running very much compared to the outer two cylinders. It is more noticeable when i rev the RPM higher tho. Is this just due to the nature of the balance of the engine? Outer cylinders will throw off balance more?
 

MattFL

Master Chief Petty Officer
Joined
Oct 20, 2010
Messages
865
It's difficult to say why from here, but clearly your middle cylinder isn't contributing as much as the other two at idle. Have you synchronized the carburetors since it has been apart?
 

Noah4200

Petty Officer 3rd Class
Joined
Oct 17, 2022
Messages
90
Ok guys finally got it out and after new coils (pulsar, stator and ignition) the same thing happened. I was already to day it’s CDI time but looked down and saw the red temp light on!!!! This was in the evening so i was able to see it clearly when i hadn’t in the sun before! No alarm tho. Once i got home and let it cool i started it and light was off. So this whole time ive been overheating going into limp mode and haven’t known it bc no alarm and light is very faint in direct sunlight!!! I feel like an idiot. The boat pees fine, has a new impeller and as shown earlier i already tackled the water jacket. Now it’s becoming clear why the boat had NO tstat in when i got it. So im guessing the passages in the head are clogged?! i’ve been reading and it looks like the older saltwater motors are high pressure low volume and very susceptible to this. My plan is to pull the thermostat (has new tstat) check that passage and start doing an intensive flush with a chemical I’ve even considered using 20 to one muriatic acid as seen on danger Marine youtube. I’m going to pull lower use an electric pump and connect to the water tube and get a bigger pee nipple fitting and run a hose back down to reservoir. How strong of chemical and for how long? The test i saw vinegar and salt away did very little and 20:1 muratic did much better. I’m thinking if i use a stronger acid i may only want to flush for a few hours versus a few days with something weaker? I will also use the hose into the tstat housing and also up the water tube to forces out after the acid. Help appreciated
 

MattFL

Master Chief Petty Officer
Joined
Oct 20, 2010
Messages
865
I did not know these older motors had a limp mode!?

You've got the right idea, but the wrong approach IMHO. I did a lot of research before descaling my own motor. Long story short, strait acid is going to be really rough on the metal in the engine, including the anodes. A buffered acid will get rid of the calcium build up and not be as bad for the metal. After a ton of reading, I personally decided to use Rydlyme 50/50 with water and it worked fantastic. Here's my personal experience:

There are tons of videos on youtube. Acids will dissolve the build up, the trick is not hurting the metal.
 

Noah4200

Petty Officer 3rd Class
Joined
Oct 17, 2022
Messages
90
Yes they definitely do have limp mode…in the owners manual it shows how it cuts the power. This was an another clue in hindsight being cut on plane at the same RPM levels. The bogging out off idle and eventually sputtering and dying was do to just pure heat at the end, unfortunately. No steaming or smoking or melted valve covers or anything but makes me cringe thinking about it. What’s weird is why the buzzer didn’t sound. Weeks earlier the buzzer was going off for a faulty trim switch (trim level warning) and i unplugged the trim connections to stop the noise. Do you guys think unplugging my trim connections is why my temp buzzer isn’t working or do i need to look for a separate reason. The red light works just no buzzer. From what i’ve read the rydlyme IS muratic acid right? I know muratic can be hard on metal but this motor is 27 years old and i don’t think it should be a problem right? Any coating is long gone and opening up passages is what is needed. I mean people port and polish their engines by opening up passages…we are just talking a microscopic amount of metal dissolved at worst. I have thought about my brand new anodes tho and that is a valid point. Don’t really want to pull that water jacket or carbs off to remove them since everything is nice and sealed. I have the muratic on hand and was thinking just like 30-60 minutes of a 2% mix. Then do a 50% vinegar cycle on the electric pump overnight. Another option i’ve read about is citric acid which is used my mercedes and also dissolves shells too. Just don’t want to waste 40$ for a designer bottle with similar ingredients. Also in hindsight the last day the boat ran good… at the end of the day my dad and i got in the sand. It feels good to be at the end of this nightmare. Had the buzzer sounded i would never have gotten all the coils and electric components. Oh well about 100$ out and now i have spares for the apocalypse :)
 

Noah4200

Petty Officer 3rd Class
Joined
Oct 17, 2022
Messages
90
Matt was one bottle of rydlyme enough? I was under the impression it would take 2 or 3 to mix 50/50 in a bucket and have enough to cycle? thanks
 

MattFL

Master Chief Petty Officer
Joined
Oct 20, 2010
Messages
865
One bottle was more than enough, I think I used a little more than half the bottle.

We have muriatic acid for the pool and Rydlyme is not the same. I couldn't tell you chemically what's different, but they behave different right from the moment you open the bottle. I understand not wanting to spend on an old motor, but my fear would be strait acid might take the last of some thin eroded sealing surfaces causing you more of a headache, such as a leaking head gasket or base gasket. Those would be a nightmare to fix on an old salty motor. It's possible my fears are unfounded, but better safe than buying a new motor IMHO. ;) If all was good before you got into the sand, then you may just have sand packed up in there somewhere. Whether any chemical would dissolve the sand I'm not sure. Maybe try mixing some sand from the same area in a bucket with whatever chemical to see if it dissolves. But that said, you can see in my pictures in the post I linked that after flushing my own motor with Rydlyme, there was a pile of sand in the bottom of the bucket, which was completely unexpected. It must have been bound up in the salt deposits.
 

Noah4200

Petty Officer 3rd Class
Joined
Oct 17, 2022
Messages
90
I agree Matt. Big dilemma now is that rydlyme says to remove the anodes also. I have brand new gaskets and anodes on both sides and really don’t want to rip into it all until next service interval. I’m just gonna have to leave them in and hope that not too much life is taken off them…even 30% would be fine at this point. Since maybe the majority is just sand perhaps i need to concentrate more on pressurizing the thermostat housing and then the water tube back and forth and use mild stuff until i see what comes out.
 

MattFL

Master Chief Petty Officer
Joined
Oct 20, 2010
Messages
865
Any acid will be rough on anodes. Acids take electrons and anodes give electrons, that's why they interact so actively. I left my anodes in, mostly because after 20 years in salt I thought trying to take them out was going to do more damage (broken bolts, etc..). If the sand is packed in there, especially after some time, I really doubt trying to get it out with water pressure is going to work. Hopefully a chemical will remove whatever is holding it up in there (maybe the passage is restricted by build up), or worst case is probably physical removal. But I would personally try a rinse with a strong descaler like Rydlyme before anything else.
 

Noah4200

Petty Officer 3rd Class
Joined
Oct 17, 2022
Messages
90
Ok guys I did 3 hours of flush with some barnacle buster…was the only thing local. Then I mixed 3:1 vinegar and warm water and am doing that night now plan to let it go all night. Here is the problem…i foolishly tried to flush the vinegar solution up the exhaust tube in the lower unit to back flush. Well within a minute water started dripping out of the intake silencer drain nipple. I about lost it. So foolish i know. Anyway…I took out the plugs and turned it over and saw a lot of moisture spray out and also drained the float bowl..let it fill with fuel and drain again. Oil looks the same. What did i just do? I’m trying to find a cooling system diagram so i can understand what happened. Should i change oil tomorrow? Anything else. Again i know i am foolish it’s just been a long day
 

Noah4200

Petty Officer 3rd Class
Joined
Oct 17, 2022
Messages
90
I’m fatigued but maybe this wasn’t supposed to happen.
 
Last edited:

Noah4200

Petty Officer 3rd Class
Joined
Oct 17, 2022
Messages
90
ok it would have filled the exhaust chamber and tube and without any exhaust pressure would have made its way up to the exhaust valves and which ever one was open during at that point would have made its way on top of the piston and then the slight overlap would have allowed it out the intake and the carbs. Good news is it stayed in the combustion chamber above the piston and i expelled it immediately and then neutralized it. I absolutely would not have done this but i swear on a flushing forum some guy recommended this! lol. Always use your OWN brain 😂 Will finish it up tomorrow. Let me know if there is anything else i need to address due to this mishap before i fire it up
 
Top