1996 BF50 Honda Bogging out when trying to plane

MattFL

Master Chief Petty Officer
Joined
Oct 20, 2010
Messages
850
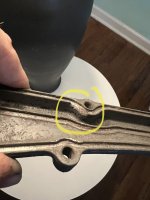
If you've got copper tube the right size, I guess you could try putting a short piece of tube around the stub sticking out to try to keep the weld off of the aluminum. I have zero experience welding though so don't take it from me! lol But I would think the heat from the welding would helpfully help loosen it up a bit. If for whatever reason you end up having to drill it out, put the plate back on (or hold it there) and get the pack of center drills from Harbor Freight and use one of those to very carefully put a small hole in the center of the bolt. From there you can increase drill bit sizes until the bolt is gone. Reference the thread I linked. Good luck and let us know what happens!
 

Noah4200

Petty Officer 3rd Class
Joined
Oct 17, 2022
Messages
90
thanks matt! i read your ordeal and laughed bc i was just “testing” the bolt out too for later and it snapped lol. Then i just kept going! I’m thinking of using some bottle brushes to ream all the passages out while i’m in here. Was able to get the anode out with an impact screwdriver so that’s good. If i stick a long brush in the passages and loosen stuff will it clog things once it’s all back together?
 

MattFL

Master Chief Petty Officer
Joined
Oct 20, 2010
Messages
850
There's always the possibility that if some bigger chunks break off, they could clog smaller passages. But if it looks dry and flaky, maybe that's unlikely, you'll have to make an educated guess at it. ;)
 

Noah4200

Petty Officer 3rd Class
Joined
Oct 17, 2022
Messages
90
So what are these bolts made of bc i couldn’t get the weld to hold on them with the gasless mig with flux core ? stainless steel? Any ideas…i had it in HIGH and feed on 2/10. Will try more tomorrow.
 

MattFL

Master Chief Petty Officer
Joined
Oct 20, 2010
Messages
850
They're some sort of chrome plated steel. No idea what alloy, but they sure do rust easily, so a poor choice for a boat motor IMHO.
 

Noah4200

Petty Officer 3rd Class
Joined
Oct 17, 2022
Messages
90
Guys i’m about to have a nervous breakdown over this-i’ve out about 1300$ into this motor since last year and i was inches away from having the issues resolved and this now damn jacket cover risk bricking my motor. I’ve tried everything to get something to stick to these SS screws….cleaned the crap out of them…preheat…different materials and shapes of nuts. I can’t get a decent bond. drilling and tapping 5 holes just seems like hell. I’m not even sure i could get a decent tap on the lower holes bc of clearance (thank God i didn’t snap the VERY bottom holes). I’ve had nearly 100% success using a welder for this type of thing in the past. Running out of options…either start drilling or see if a shop with a better welder can TIG some nuts on or something….this is rough 😞
 

MattFL

Master Chief Petty Officer
Joined
Oct 20, 2010
Messages
850
Now that you've gotten them really hot, is there enough sticking up that you can grab it with some vice grips and see if they'll back out, while being careful not to mangle it too much?
 

Noah4200

Petty Officer 3rd Class
Joined
Oct 17, 2022
Messages
90
Ok well i’m over the hump- i drilled them all out. Waiting for a m6 x 1.0 helicoil kit (35$). If i had known how much better good drill bits are i wouldn’t have spent so much time welding. These Norseman bits are ABSOLUTELY amazing!!! like not even the same thing as the home depot stuff. I used a center drill bit and the cover to start the holes 3/5 were dead on…2 are slightly off but there is wiggle room in the case holes. Only fear know is tap clearance bottom left. If i have to i’ll take off the oil filter or use some sort of socket instead of a T handle but i think i can get 1/4 turns in. Got the new ignition and exciter coils in today. The more i read about my deteriorating misfire with heat the more i’m positive it’s one of the coils. Will keep you posted
 

Attachments

  • CC3FD711-3A53-4D74-B85D-94AC54FD95E7.jpeg
    CC3FD711-3A53-4D74-B85D-94AC54FD95E7.jpeg
    1.8 MB · Views: 3
  • B25CE217-C0EE-4755-9A34-4661C78F95B4.jpeg
    B25CE217-C0EE-4755-9A34-4661C78F95B4.jpeg
    950.2 KB · Views: 3

MattFL

Master Chief Petty Officer
Joined
Oct 20, 2010
Messages
850
Great job with the drilling. I'm not sure how deep you went, but in the thread I linked above there was some spectacular advice to stop drilling as soon as the shavings changed color (steel to aluminum), so as not to drill into the empty space in the block, as that could cause a problem. Let us know how it goes!
 

Noah4200

Petty Officer 3rd Class
Joined
Oct 17, 2022
Messages
90
i just stuck one of the bolts thru the case and made note of the length and paid attention to the depth. Most I could feel when i reached the end…a few didn’t feel as much i’m sure i ground on them slightly for a few seconds much didn’t go through or anything. Did you use Helicoil brand kit?
 

MattFL

Master Chief Petty Officer
Joined
Oct 20, 2010
Messages
850
Yes, here's a link to the kit I used. The threads were perfect for the OEM bolts. I'm not sure what alloy metal they used as far as its resistance to corrosion with salt. I've used them in aluminum before with success, but this is the first one I've used where salt will be involved. Time will tell how it holds up.


Noah4200

Petty Officer 3rd Class
Joined
Oct 17, 2022
Messages
90
ok i got the same one be here tomorrow . Did you find aluminum hard to tap especially with left over SS ? I know there is special aluminum cutting fluid not sure what fluid you used. Thanks
 

MattFL

Master Chief Petty Officer
Joined
Oct 20, 2010
Messages
850
I did not have any steel left, I got 100% of the screw out. But after that the aluminum tapped super easy, it's soft metal. I think I used 3-in-1 oil, not a special cutting oil of any kid. Turn it in a little, back out some, in a little more, etc.. so it clears the chips as you cut. Blow the hole out with air when you're done to get the shavings out, watch your eyes!
 

Noah4200

Petty Officer 3rd Class
Joined
Oct 17, 2022
Messages
90
Ok thanks…2 of mine are slightly off center so there is a little steel left from 4 to 7 o’clock. I hope it doesn’t cause issues
 

Noah4200

Petty Officer 3rd Class
Joined
Oct 17, 2022
Messages
90
Still waiting on helicoil. Yeah some of my holes drifted and left some old screw material. If i pick it out it will be an oval. 2 screws have a little trouble starting when the cover is full seated but if i pull it back just a hair all bolts go i the holes and don’t look cocked when seated. The cover holes are have quite a bit of wiggle room so my off center was should be ok. I found this though and am concerned- probably why there was crust on this edge. Def not a new fracture. Should i use a bunch of gasket gunk, maybe JB welt it up or just get a new cover for 50$.
 

Attachments

  • D1B36DC0-07D3-45AF-98AE-39F1055C89DB.jpeg
    D1B36DC0-07D3-45AF-98AE-39F1055C89DB.jpeg
    506.8 KB · Views: 3

Noah4200

Petty Officer 3rd Class
Joined
Oct 17, 2022
Messages
90
i ordered a new cover…also going to use a dremmel to smooth the taper on the holes like original so bolts clear better
 

Noah4200

Petty Officer 3rd Class
Joined
Oct 17, 2022
Messages
90
Ok finally got new cover. Since it’s so clean with no pitting do you guys think i should install without any RTV? I hate to gunk it all up if i don’t have to. How are these normally installed? thanks
 

Attachments

  • 5F108C81-0E62-40D4-AF85-1E0629D55EB1.jpeg
    5F108C81-0E62-40D4-AF85-1E0629D55EB1.jpeg
    955.3 KB · Views: 2

MattFL

Master Chief Petty Officer
Joined
Oct 20, 2010
Messages
850
You'll have new screws (easy disassembly), and the factory gasket is an o-ring I believe, so you can easily re-use it if it had not been in there long. Install the o-ring with just a little lube and see how it seals. If it leaks, disassemble, clean it up and add sealer.
 

Noah4200

Petty Officer 3rd Class
Joined
Oct 17, 2022
Messages
90
Thanks sir i was thinking same thing. Just been second guessing myself lately!
 
Top