1995 Larson 174 SEI Complete Rebuild

Mechanicalmike08

Petty Officer 1st Class
Joined
Aug 29, 2018
Messages
308
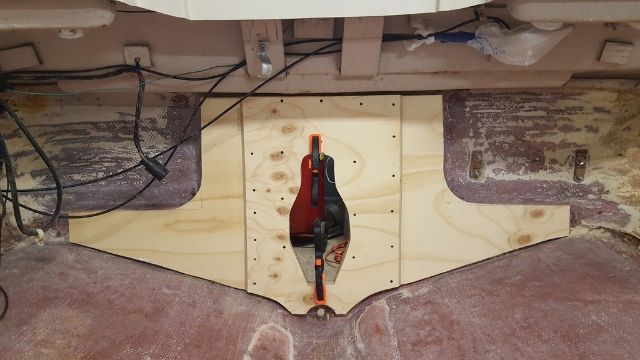
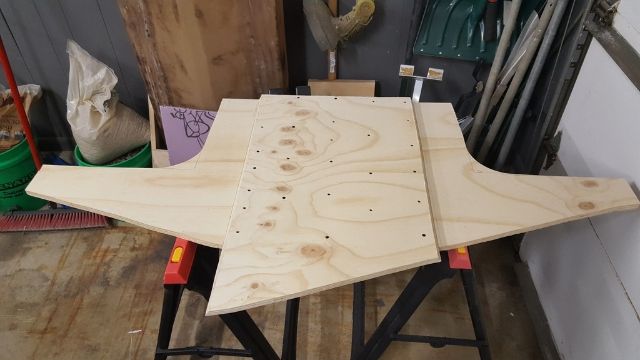
Well boys spent the weekend blowing insulation in my garage walls to keep it nice and toasty. But my US composites order showed at my work Monday, got my first smell of resin. Reminds me of bondo. Spent Monday night patching the holes in the walls but tonight got the majority of the transom cut out and the two pieces are glued together. I will cut the second layer to match the other after they dry, figured it be easier to match them that way. Looks like a good fit so far, small gap for PB everywhere should be nice. Going to leave those fillets at the corner and fill in with either PB or foam and them glass over it. Also cut the second layer with a 30° angle on the side to have to use less PB to blend it in.

Hopefully tomorrow I can cut out the gimbal hole.
 

Mechanicalmike08

Petty Officer 1st Class
Joined
Aug 29, 2018
Messages
308
Hey guys so I sent an email to US composities to ask a couple recommendation to see what they had to say and it seems much different from what I have read and been told on here. Here are my questions:
1. If I do a layup and the resin starts to kick and harden can I keep going with another layer with new resin or should I wait for a full cure?
2. Once a section is fully cured how long do I have to do another layer before having to sand or prep the surface again?
And there Answers:
1. Yes. Keep going. As long as resin is still tacky. Only mix enough to work with at a time without wasting resin. (1 quart is usually ideal.) Once mixed, pour out resin on surface to cool down, so it will give you a little more working time. Stacked thick in a cup, resin will overheat and turn into a rock.
2. Usually 2 hour wait in between layers allows styrene to evaporate. Once hard and non-sticky, you will need to sand 80 – 100 grit, a light scuff to bond next layer.

In my very first thread I asked about working times and was advised very differently. Can someone give some more insight? I was told previously you had days-weeks before needing to sand the new poly.
 

Woodonglass

Supreme Mariner
Joined
Dec 29, 2009
Messages
25,927
I'm not sure where you got your previous info but...It's usually not advisable to so another layup after 2-3 days have gone by. As long as the surface is still a bit tacky and NO contaminants have reaches the surface you can do a quick wipe down with Acetone and proceed. It usually takes a week or more for poly to fully cure and not be tacky but...Contaminants always seem to find a way to contaminate the surface. Better to be safe than sorry after 2-3 days.
 

JASinIL2006

Vice Admiral
Joined
Feb 10, 2012
Messages
5,667
I'm confused by your question #2 and by their answer.

You asked "Once a section is fully cured how long do I have to do another layer before having to sand or prep the surface again?" That is a bit confusing because when doing layups with multiple layers, you don't want the resin to fully cure. You want it to kick of (i.e., get hard), but you want it to remain a bit tacky to allow a chemical bond to occur with the next layer. If you are doing multiple layers, you can add a layer as soon as the previous layer is hard. You have a fairly wide window before the resin is fully cured (up to 24 hours maybe), UNLESS you add styrene (aka wax) which prevent air from reaching the surface of the lamination; the styrene allows the surface to fully harden (cure) and to be non-tacky. You really only want that on very top layer, so normally you don't add styrene to the resin until your last layer.

Their response to your question seems to assume you're using styrene in each layer (maybe because they think you want it to "fully cure"?). If you do use styrene in any layer but the top, you have to do what they instruct: let it fully cure/dry, then scuff it up (some would suggest an acetone wipe, too) before additional laminations.

The sensible thing, is to just not use styrene until you lay the top lamination. That way, you get better adhesion between layers, you don't have to wait around for hours, and you don't have to sand/wipe the surface between layers. You also don't have to buy as much styrene.

As far as the first question, the time required for resin to kick will depend on temperature (of the air, the surface your laminating, and the resin) and the amount of MEKP you add. You can slow down the reaction by cooling your work environment and/or resin, or by using a bit less MEKP. You can speed up the reaction by warming things or using a bit more MEKP. You just have to be careful when monkeying around the amount of catalyst or you can weaken the finished product. I believe Woodonglass' thread on doing decks and transoms talks about acceptable ranges of MEKP. After a quart of two, you will get a good idea of how much time you have to work before the resin kicks. If you're really worried, just start by mixing two cups at a time until you get a feel for it. If you are precise in your measurements, you can scale up (or down) the amount you want to mix.

Does that help?
 

Woodonglass

Supreme Mariner
Joined
Dec 29, 2009
Messages
25,927
Uhmmm JAS I think you're a bit confused. "Surfacing Wax " is applied to the final coat of poly based products to make them cure. It Does have styrene in it but it also contains Paraffin. This mixture seals the surface, keeping air away and thus curing the resin. All Poly based products are "Air Inhibited Cured", Styrene is in ALL poly resin. It's the substance that breaks down the fibers in the CSM to help Bind all the ingredients into one homogenous mass. If the Surfacing wax is not added the resin will stay tacky for quite some time. The more heat the less time it takes to fully cure but Poly without the surfacing wax, will take a week or more to come to a full cure. As I stated the key to having a good lamination is to ensure the surface is still tacky and free of any contaminants.
 

Mechanicalmike08

Petty Officer 1st Class
Joined
Aug 29, 2018
Messages
308
I also think I confused them with the wording of my question.

So I understand if it’s still tacky but firm you can keep going with a new layer. I guess what I am really wondering is if in one night I can only get one layer of the tabbing down and have to quite for the night can I come back the next day or possibly 2 days later and just put the second layer down without sanding the entire surface again?

Or for maybe even a better example I’m sure I will get the transom glassed in and “Done” but then it might take 2-3 days or maybe a week to get the stringers figured out and bed in with PB, then at that point do I have to sand and prep the glass on the transom where tabbing the stringers in will contact that new glass that has been curing for 2-3 days or possibly a week on the transom?
 

Woodonglass

Supreme Mariner
Joined
Dec 29, 2009
Messages
25,927
JAS, you might have been thinking of PVA (Poly Vinyl Alcohol) It is Sprayed on after Gelcoating and or Laminations to get a final cure. It creates an almost Plastic film over the surface that is washed off after 24 hours.

MM08,

As stated 2-3 days for NEW resin and glass will only require an Acetone wipe down. For OLD glass that's been ground down it's Always just a wipe down with Acetone to get it ready. You NEVER need to sand again on old glass. Sooo if your Grind the stringer channels today and don't glass till next month all you have to do is sweep up all the dust, wipe with warm soapy water, Dry, then a final wipe down with Acetone and start applying resin. Only when you want to lay new glass on NEW glass do you have the 2-3 day window. As long as the resin is still tacky it allows the styrene in the new resin to sorta Eat into the last layer and makes for a much stronger chemical bond between the two laminations. Hope this helps. USC gives pretty good advice but...they're in the business of selling products so you have to be a bit careful with their instructions. Most of the guys on here are speaking from a LOT of experience. As we all know THAT IS the best teacher!!!
:D
 

Mechanicalmike08

Petty Officer 1st Class
Joined
Aug 29, 2018
Messages
308
Alright I got it now, Sorry i just want to be sure I got it right as i want to make a good strong repair.

Got the Keyhole cut last night, Looks to be pretty good. Flat and all my thickness is ±.015" . I will have to be careful around the center of the hole with my clamps as the board is a little away from the hull but the hull is flat and true. PB will take care of that.

Plan is tonight to sand and prep the transom for resin and then clean up the garage/ dust and work areas to give me some more working room. Friday will be coating the wood and getting the layer of CSM on the Hull side. Then install Saturday morning and hopefully a lot of glass work Sunday. Will see if it goes as planned.


AShipShow

Lieutenant Commander
Joined
Jul 8, 2016
Messages
1,791
Looks real good! However, if I can make a suggestion... instead of the semicircle above the transom drain, I would just cut it straight across a couple inches up from the lowest point.

if you ever get water in your bilge, you want it to be entirely below the wood... structurally isn't gonna make a difference, plus it will easier to glass than that half circle.
 

Woodonglass

Supreme Mariner
Joined
Dec 29, 2009
Messages
25,927
I think he's gunna totally fill the semicircle with PB and then Re-Drill the Drain hole. At leas that's what I'd recommend.
 

Mechanicalmike08

Petty Officer 1st Class
Joined
Aug 29, 2018
Messages
308
Looks real good! However, if I can make a suggestion... instead of the semicircle above the transom drain, I would just cut it straight across a couple inches up from the lowest point.

if you ever get water in your bilge, you want it to be entirely below the wood... structurally isn't gonna make a difference, plus it will easier to glass than that half circle.

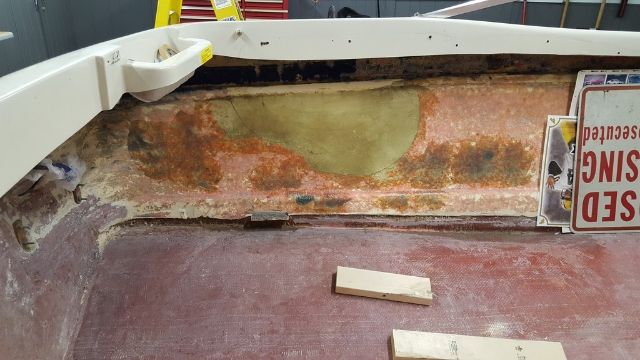
Yep the plan is to fill it in with PB and blend it out and then re-drill the hole once its all set up. I think i am going to even just glass over everything and then drill the hole.

Got it all sanded and edges smoothed out. Tonight will be the first resin/ glass experience. I plan to make a small test batch of PB as well to use up on the sidewall as I have never made it before and dont want something to go wrong when I do the transom install.
 

Mechanicalmike08

Petty Officer 1st Class
Joined
Aug 29, 2018
Messages
308
Well guys first coat of resin on the plywood is down, I'm a little worried. It's been about an hour and it's still just tacky, I mean it's on the way but with everyone talking about 20min work times I expected more.

I will say I only went about 1.5% because I wanted a good soak in coat. The garage is 60-65

how hard or tacky should it be when it "kicks"
 

Mechanicalmike08

Petty Officer 1st Class
Joined
Aug 29, 2018
Messages
308
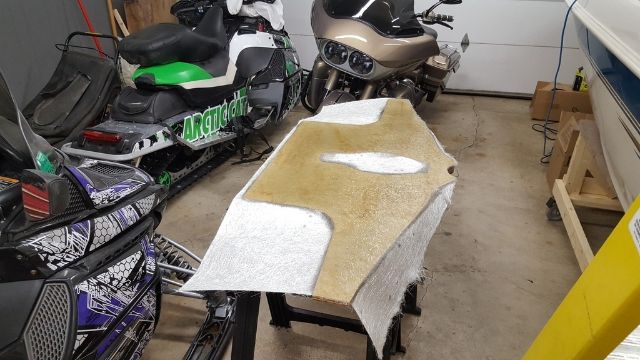
Well I might have let my nerves get the best of me with that last post. I think I did mix it to light but it finally got pretty tacky. So I tipped it up and put down some more resin, then laid down the CSM. Went pretty well I think, seem to get a bunch of small bubbles between the CSM and resin but the bubble buster did its job. I can see how hard it would be to wrap around edge once I got to the edges.


I also tried my hand at some PB, went well I think. I'm glad I got the big bucket of Cabosil. I was smart about it and after I was done with the resin on the CSM I quick mixed in some cabosil and chopped strand so I didn't waist any resin. I then spread more on the areas I need to blend in on the side walls. So far I only waisted about 8oz from the first batch before I thought about using it on the side walls.


One final question for the night on the PB, is the cabosil just to thicken it enough so it stays where you want? Or does it serve any strength purpose? I only ask because the first batch I used not as much cabosil and still was able to shape it nicely and have it stay in place.
 

chevymaher

Commander
Joined
Mar 29, 2017
Messages
2,921
It be just fine. you used plenty of hardener. It takes a while when it is chilly. 3 hours.
 

harringtondav

Commander
Joined
May 26, 2018
Messages
2,439
Stating the obvious. Don't forget the steering arm clearance cut outs . And to repeat my earlier diatribe: Leave your bilge cut-out as is, and proceed per the Master Woodonglass . The bottom of that keyhole takes the most of the out drive's thrust. Make sure it's rock solid to the keel, and up to at least 2" above the bottom transom plate bolts.
 

Woodonglass

Supreme Mariner
Joined
Dec 29, 2009
Messages
25,927
In cooler temps you can mix at a 2% ratio if you want. Cabosil is just a thickener. The Chopped fibers give it more mass and strength. You want it thick enuf so that it will stay in place on a vertical surface.
 
Top