1993 4HP Johnson

saltchuckmatt

Commander
Joined
Jul 19, 2019
Messages
2,641
So you think it's the switch, rather than a loose connection?

See my video I just posted. I don't see a telltale, but not 100% what I'm looking for since the water flow schematic shows it from the side only.
Yes, the switch completes the grounding. (Normally open) so when you pulled the wire apart you stopped the grounding. Your switch is not releasing. You could try wd40 and pushing it a bunch of times but switch is a common failure.

Water is coming out the exhaust relief holes so that's good but not an indication of whether you are getting enough. I would pull the foot, check or replace the pump and grease the driveshaft. Pretty easy to do and well worth it.

Expect a rash of comments about having not having enough of your motor in the water.
 

floatfan

Petty Officer 2nd Class
Joined
Feb 28, 2011
Messages
184
Yes, the switch completes the grounding. (Normally open) so when you pulled the wire apart you stopped the grounding. Your switch is not releasing. You could try wd40 and pushing it a bunch of times but switch is a common failure.

Water is coming out the exhaust relief holes so that's good but not an indication of whether you are getting enough. I would pull the foot, check or replace the pump and grease the driveshaft. Pretty easy to do and well worth it.

Expect a rash of comments about having not having enough of your motor in the water.
Thanks. Makes sense. The kill switch assembly seemed like it was working (I could hear an audible "click" when I'd press it), but I'll get one ordered.

New water pump and lower unit gear oil will happen this weekend. I'll grease the driveshaft while it's apart.

I thought it was plenty deep for testing? The intakes are under the water. I wasn't putting it in gear yet. But, I agree I need a better barrel. This was a quick "use what I had" setup, as evidenced by the ratchet strap around the top of the tote to keep it from busting apart 😁

Thank you for all the input! 🍻
 

tphoyt

Lieutenant
Joined
Jun 10, 2010
Messages
1,257
Yea you do need more water. The screens are just for the pick up. The pumps are not self priming.
The water level needs to be above the pump for it to work properly.
 

saltchuckmatt

Commander
Joined
Jul 19, 2019
Messages
2,641
Thanks. Makes sense. The kill switch assembly seemed like it was working (I could hear an audible "click" when I'd press it), but I'll get one ordered.

New water pump and lower unit gear oil will happen this weekend. I'll grease the driveshaft while it's apart.

I thought it was plenty deep for testing? The intakes are under the water. I wasn't putting it in gear yet. But, I agree I need a better barrel. This was a quick "use what I had" setup, as evidenced by the ratchet strap around the top of the tote to keep it from busting apart 😁

Thank you for all the input! 🍻
Grease the splines but not the top, it won't go in all the way if you do. If the gearcase won't drop down (lack of greasing)then post again....some tricks but it's bad news. Your probably fine.

Three bolts on the bottom, take your time and don't force them and then the gearcase will pull off.....at least you hope!
 

floatfan

Petty Officer 2nd Class
Joined
Feb 28, 2011
Messages
184
Yea you do need more water. The screens are just for the pick up. The pumps are not self priming.
The water level needs to be above the pump for it to work properly.

Aha, now I get it. I won't run it again until I get a proper barrel. Thanks
 

floatfan

Petty Officer 2nd Class
Joined
Feb 28, 2011
Messages
184
You will need a new kill switch part number 75 on this part list. Not always fun to replace by the way.

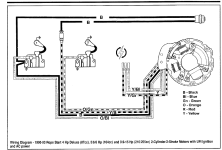
@saltchuckmatt ...I have looked front to back in my service manual, and can't find the kill switch anywhere. I found a wiring diagram (pic below), which shows the stop button/kill switch, but nothing about removing or servicing it. In fact, my manual doesn't show the tiller handle anywhere, other than in the throttle cable adjustment section. Hate to be a bother, but would you happen to have any schematics or know of anywhere I could find a "how to" of taking apart the tiller handle to replace the kill switch?
 

Attachments

  • wiring diagram.png
    wiring diagram.png
    82.5 KB · Views: 4

saltchuckmatt

Commander
Joined
Jul 19, 2019
Messages
2,641
@saltchuckmatt ...I have looked front to back in my service manual, and can't find the kill switch anywhere. I found a wiring diagram (pic below), which shows the stop button/kill switch, but nothing about removing or servicing it. In fact, my manual doesn't show the tiller handle anywhere, other than in the throttle cable adjustment section. Hate to be a bother, but would you happen to have any schematics or know of anywhere I could find a "how to" of taking apart the tiller handle to replace the kill switch?
Well I assume you see it on the tiller, correct?

Not sure I've scene it on any videos or manuals. Threading the wires through is somewhat the hard part. Also, removing the pin connection from the rubber plug can be tricky without the omc tool. Some guys just cut the wire and use a butt connector.

Tilt the tiller up and study the switch and you should be able to figure it out.

Oh and send a picture of it's location.
 

floatfan

Petty Officer 2nd Class
Joined
Feb 28, 2011
Messages
184
Well I assume you see it on the tiller, correct?

Not sure I've scene it on any videos or manuals. Threading the wires through is somewhat the hard part. Also, removing the pin connection from the rubber plug can be tricky without the omc tool. Some guys just cut the wire and use a butt connector.

Tilt the tiller up and study the switch and you should be able to figure it out.

Oh and send a picture of it's location.
Oh yeah, it's definitely on the tiller haha.

I guess I should've taken a look at it before I just assumed I'd need an instruction sheet. I'll check it out when I get home after work.
 

saltchuckmatt

Commander
Joined
Jul 19, 2019
Messages
2,641
Oh yeah, it's definitely on the tiller haha.

I guess I should've taken a look at it before I just assumed I'd need an instruction sheet. I'll check it out when I get home after work.
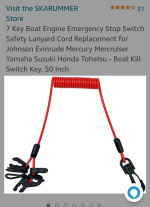
Hey, I might have got ahead of myself here. There is supposed to me a man overboard clip on the kill switch....(part number 78 on the breakdown) if that is not in it will not spark. I guess I just assumed you had one.

If you don't have one you can take a piece of fat wire and put it around there and test.

Clips and lanyards are available all over.
 

Attachments

  • Screenshot_20220915-130814~2.png
    Screenshot_20220915-130814~2.png
    348.1 KB · Views: 1

tphoyt

Lieutenant
Joined
Jun 10, 2010
Messages
1,257
I’m getting confused but that’s not hard to do either.
In post #8 you said you had spark.
Did I miss something here that caused you to lose spark?
 

floatfan

Petty Officer 2nd Class
Joined
Feb 28, 2011
Messages
184
Hey, I might have got ahead of myself here. There is supposed to me a man overboard clip on the kill switch....(part number 78 on the breakdown) if that is not in it will not spark. I guess I just assumed you had one.

If you don't have one you can take a piece of fat wire and put it around there and test.

Clips and lanyards are available all over.
No, the lanyard is there and in place (and a spare is actually stored on the tiller handle, too). It's a push button stop with the safety kill lanyard connection. I'm going to hit it with some WD40 when I get home, but from yesterday, it LOOKED to be working properly (push button, hear/feel small "click"). I also removed the safety lanyard, and it seemed to close the circuit. Maybe some WD will do the trick, due to it being sitting for a couple (or more) years.
 

floatfan

Petty Officer 2nd Class
Joined
Feb 28, 2011
Messages
184
I’m getting confused but that’s not hard to do either.
In post #8 you said you had spark.
Did I miss something here that caused you to lose spark?
Yeah, that was my fault. I was attempting to check spark by myself on Tuesday and THOUGHT I had spark...but after tearing apart & cleaning the carb yesterday, and still no luck, I enlisted my son to pull the starter rope while I checked for spark. Nada...until I disconnected the black/yellow & black wire terminal for the kill/stop switch.
 

saltchuckmatt

Commander
Joined
Jul 19, 2019
Messages
2,641
No, the lanyard is there and in place (and a spare is actually stored on the tiller handle, too). It's a push button stop with the safety kill lanyard connection. I'm going to hit it with some WD40 when I get home, but from yesterday, it LOOKED to be working properly (push button, hear/feel small "click"). I also removed the safety lanyard, and it seemed to close the circuit. Maybe some WD will do the trick, due to it being sitting for a couple (or more) years.
Stuck closed.... Okay. Wasn't sure and I wanted to make sure before you went to the trouble of replacing it.

You should probably check the wire from where you popped it out of the rubber plug back to the switch for any chaffing and contacting a ground but the switches fail often.
 

floatfan

Petty Officer 2nd Class
Joined
Feb 28, 2011
Messages
184
Just an update. After rebuilding the carb, then replacing the water pump and changing out the lower unit oil today, and buying a bigger barrel to test it in, it's running great.

I will have to replace the stop/kill switch, I guess. All wires too and from seem to be fine, and while the switch seems to be working (depresses with a click), it must be faulty.
 

oldboat1

Fleet Admiral
Joined
Apr 3, 2002
Messages
9,612
Water level should be 4 to 6 inches, give or take, above the pump (pump is located at the top of the lower unit). Water needs to be well above the mating point on the leg. If the top of the head gets too hot to comfortably touch, the motor is running too hot (upwards of 160F if you have and infrared tester).
 

floatfan

Petty Officer 2nd Class
Joined
Feb 28, 2011
Messages
184
Water level should be 4 to 6 inches, give or take, above the pump (pump is located at the top of the lower unit). Water needs to be well above the mating point on the leg. If the top of the head gets too hot to comfortably touch, the motor is running too hot (upwards of 160F if you have and infrared tester).
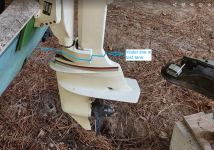
You think my water level is still too low? I filled it to where I thought I could see the visible water line on the transom of the boat, thinking that's where it would be while underway. It's only maybe 4-6" above the mating point, however, so not the pump. Can you tell I'm used to a bigger motor that I can put muffs on? ;)

water line in test tank.png
 

floatfan

Petty Officer 2nd Class
Joined
Feb 28, 2011
Messages
184
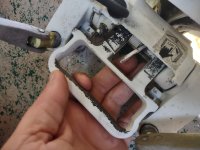
I should probably know, but what is the purpose of this handle? It has a spring and possibly a latch tab inside it (metal piece), though it doesn't have tension on it. I thought it may be for lifting the motor from inside the boat, but if so, I can't figure it out for the life of me.IMG_20220919_173823867.jpg
 

racerone

Supreme Mariner
Joined
Dec 28, 2013
Messages
37,818
It is a handy handle to lift motor out of the trunk and over to the boat.-----Had to add a plastic shim to a lanyard switch earler this year.---A no money fix.
 

floatfan

Petty Officer 2nd Class
Joined
Feb 28, 2011
Messages
184
It is a handy handle to lift motor out of the trunk and over to the boat.-----Had to add a plastic shim to a lanyard switch earler this year.---A no money fix.
Thanks. So, when permanently mounted, no purpose.

I went ahead and ordered a new kill switch assembly from here today. Didn't want to drop $150, but wanted it fixed.
 

oldboat1

Fleet Admiral
Joined
Apr 3, 2002
Messages
9,612
another five or six inches of water. The kill switch closes the circuit (grounds out the coils) when the red button is "in". When it's held out by the lanyard clip, the ignition is not shorted out -- motor operates.

Don't rev in the barrel, al least for anything but a short burst or two. Check temp on top of head -- 160F is too hot and will be too hot to comfortably touch.
 
Top