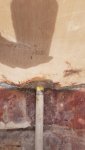
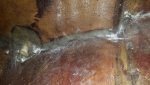
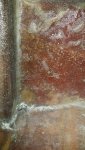
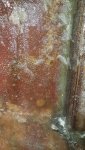
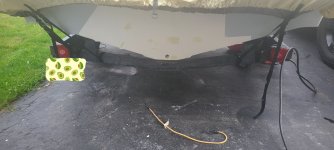
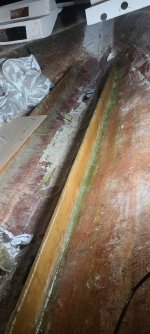
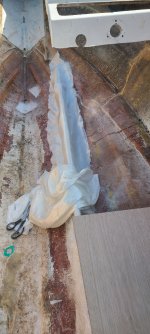
So first time really glassing anything. Coated my transom in a layer of chop strand then 3 layers of 1708 n that went well. Then used cabosil and chopped fibers to create peanut butter bond to the hull and clamped it overnight with a clamp i made.That went good. I then made peanut butter fillets on the sides and bottom of the transom then tried to glass the transom to the hull n it all went out the window. I've got good sized air bubbles on the bottom and sides where the fillets are. Can I just grind them out and lay new glass? Or patch them with peanut butter n chop fibers? I'm thinking my fillet wasnt rounded enough. I read the tutorials and still with rolling out the bubbles the chop strand is really difficult. Much more so than the 1708 to eliminate air bubbles.
Is it gonna be kept on a trailer or in a slip? 2000e is basically a barrier primer, intended to be applied to specific mil thickness, then top coated with anti fouling if wet slipped. If kept on a trailer, there is no need for the 2000e, Interlux VC would be the epoxy product to use stand alone for trailering.So this might be a stupid question. Googled it with no luck. Do I need to paint over interlux 2000e with a bottom coat? Or can I just leave it.
Thanks. It will be trailered most of the time, only use in fresh water. I wanted to use the 2000e because I have some gelcoat cracking. I tried to Dremel out and fill as much as I could, but I wouldn't mind the extra protection. So from what I understand, 2000e as a primer then interlux vc if trailered or another suitable anti-fouling, if wet slipped, would be most appropriate?Is it gonna be kept on a trailer or in a slip? 2000e is basically a barrier primer, intended to be applied to specific mil thickness, then top coated with anti fouling if wet slipped. If kept on a trailer, there is no need for the 2000e, Interlux VC would be the epoxy product to use stand alone for trailering.
2000e alone has no antifouling properties for wet slip use, its like driving a car with just primer on it, kinda a rough surface and will chalk from UV light.