1991 Bayliner Trophy 2002 Transom Repair

Status
Not open for further replies.

j_k_bisson

Lieutenant Junior Grade
Joined
Oct 6, 2010
Messages
1,082
Update 01-20-2011 Cont'd

Update 01-20-2011 Cont'd

Next I let it sit for 5-10 minute after reappling the lamp. While the lamp was on it. I cleaned the second pervail I used with MEK and rinsed with water. Then I sprayed the whole area with parting film #10. Here is the outcome of the spraying step.

DSCN1232-1.jpg

You need to make sure you spray everywhere with the parting film. I missed a spot and got some bubbles in the gell. I'm not worried about them because there will be a washer for the motor bolts over it. But I did learn a lesson. Here is a pic of the bubbles in the gel.

DSCN1235-1.jpg

YD correct me if I am wrong on the bubbles and cause. I would like to know for sure. Anyways I went back and reapplied the parting film to the area after I noticed them. Question to YD and Opps. Do I need to wash off the parting film with water before I start sanding? Or is it acetone? I can't remember what YD told me. Anyways everything is moving forward nicely. Tonight sanding and buffing.
 
Joined
Aug 17, 2009
Messages
941
Re: Update 01-20-2011

Re: Update 01-20-2011

Nice work big guy!! I will definitley try the prevail sprayer method the next time I work with gel coat. Did you still have to spray a coat of mold release agent over the gel for it to cure properly? Or was there wax in the gel coat when you mixed it up?
 

Yacht Dr.

Vice Admiral
Joined
Feb 26, 2005
Messages
5,581
Re: 1991 Bayliner Trophy 2002 Transom Repair

Jk yup use water to wash off the PVA..
Ill get back to you on the bubbles when I get home.

Greg..he used pva over his gel.

YD.
 

Yacht Dr.

Vice Admiral
Joined
Feb 26, 2005
Messages
5,581
Re: 1991 Bayliner Trophy 2002 Transom Repair

Okies..Im home now and can see what your talking about with them bubbles..

From my angle they look like Fisheyes ( from contamination in the area ).

When you were buffing .. did you happen to run across the repairs with your wheel ? or mebbe splater some compound on the repair ?.. and I just have to ask ( because I have even done this before.. ) Did you use a rag from your pile of used rags to wipe with acetone..or a Brand new one..

One other thing..

When I showed you the PVA at the shop you said .. " Yup got that stuff ".. but in your pics your parting film is clear..and not green like I had. Is that clear stuff PVA ( poly vinyl acetate ) ??

YD.
 

j_k_bisson

Lieutenant Junior Grade
Joined
Oct 6, 2010
Messages
1,082
Re: 1991 Bayliner Trophy 2002 Transom Repair

Okies..Im home now and can see what your talking about with them bubbles..

From my angle they look like Fisheyes ( from contamination in the area ).

When you were buffing .. did you happen to run across the repairs with your wheel ? or mebbe splater some compound on the repair ?.. and I just have to ask ( because I have even done this before.. ) Did you use a rag from your pile of used rags to wipe with acetone..or a Brand new one..

One other thing..

When I showed you the PVA at the shop you said .. " Yup got that stuff ".. but in your pics your parting film is clear..and not green like I had. Is that clear stuff PVA ( poly vinyl acetate ) ??

YD.

Yes I did use a new rag but I wiped a very large area. I did not rewipe after the large area. It could be contamination now that I think of it. From the surrounding area.

The Parting Film No. 10 Clear "is a water solution of water soluble film forming materials. That is all it says. Don't know what it is. Does it matter? Do I still wipe it off with water?

Probably won't get to it tonight. Just got home and the wife has things for me to do.
 

Yacht Dr.

Vice Admiral
Joined
Feb 26, 2005
Messages
5,581
Re: 1991 Bayliner Trophy 2002 Transom Repair

Yup..wipe it with water..

:)

YD.
 

j_k_bisson

Lieutenant Junior Grade
Joined
Oct 6, 2010
Messages
1,082
Re: 1991 Bayliner Trophy 2002 Transom Repair

Did not get a chance to work on the boat. But tonight I will definately be finishing this area off. YD I remember when I was spraying the gel and switched over to the new Prevail, it seamed that the aresol (in liquid form) started shooting out from the prevail with the gel. Have you ever seen this before? Is it a possible source of contamination? Also I might have put the gell on a bit thick in this one area. Another is how long do you let it breath before you start appling the parting film?


Jeff
 

Yacht Dr.

Vice Admiral
Joined
Feb 26, 2005
Messages
5,581
Re: 1991 Bayliner Trophy 2002 Transom Repair

Hmm..dont know why my post didnt show..oh well Ill do it again :)

Yup .. with a New preval you cant tip it too much or it will shoot out its co2 ( thats why I clean the preval and save them..lower pressured ones can tilt more without spittering ( for them hard to get spots )).

As far as how long I wait..its not about time..its about cure. I wait untill the gel has tacked up ( not wet anymore ).
Even then you dont want to just one coat the PVA..you shoot it just like spray paint..a little at a time untill its covered.
Thats why I use the green stuff..I can see when its covered :)

If you sprayed your gel too thick too soon you would have runs..I hope thats not the case.

YD.
 

j_k_bisson

Lieutenant Junior Grade
Joined
Oct 6, 2010
Messages
1,082
Re: 1991 Bayliner Trophy 2002 Transom Repair

Hmm..dont know why my post didnt show..oh well Ill do it again :)

Yup .. with a New preval you cant tip it too much or it will shoot out its co2 ( thats why I clean the preval and save them..lower pressured ones can tilt more without spittering ( for them hard to get spots )).

As far as how long I wait..its not about time..its about cure. I wait untill the gel has tacked up ( not wet anymore ).
Even then you dont want to just one coat the PVA..you shoot it just like spray paint..a little at a time untill its covered.
Thats why I use the green stuff..I can see when its covered :)

If you sprayed your gel too thick too soon you would have runs..I hope thats not the case.

YD.

No runs in the gel, but The co2 was really shotting everywhere. Especially in this area. The gell was still wet when I applied the PVA. That could be the issue as well. We'll find out tonight when I get around to sanding it. I'll let you know how the voids are. I f I have to I'll re spray it. I have enough for one more light spray again if I need to. About 2-2.5 oz's. I plan on ordering a qt for the stress crack areas anyways. But that will be later in the spring. I need to start into this motor. Thanks for all the help.
 

j_k_bisson

Lieutenant Junior Grade
Joined
Oct 6, 2010
Messages
1,082
Update 01-22-2011

Update 01-22-2011

Well started into the project last night around 8pm again and finished up cleaning the garage around 2am. But the buffing and waxing is done for the whole boat finally!:D Learnt a couple of things along the way as well. Here we go step by step.

Started off with washing the Parting Film off with water and a rag. It came off very nicely. After washing it off I noticed a bit more smaller pin size pits around where the large ones where. Deffinately need a bucket of watrer around when washing this stuff off. It comes off like runny snot and really makes the rag slimmy. Need to ring out the rag a couple of times while doing it.

Lesson one learnt: Make sure you have it all off or the sand paper really gums up quickly!

Next I took a black permanent Sharpie marker and wrote all over the patch area. Not too much but enought that when you wipe the area with a acetone damp rag it smears everything. Here is a pic of what it looked like after smearing it.
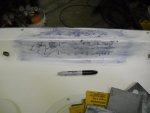
DSCN1240-1.jpg

Next I started off with 220 grit sand paper and a block to knock down the orange peel. It was pretty deep. Once I had sanded all the "black" off I switch to progressively finer grits. Each time taking the marker and acetone rag to mark off the area. The black shows the scratches from the previous grit sand paper. You know visually if you sanded the area enough by weather there is any "black left" Its a great system. You go up to 1000-1200 grit sand paper, steping from the following. 220-320-400-600-800-1000-1200. The finer you go with the sand paper the less the buffing stage needs to work to take out the final scratches. Here is a pic after fully sanding the area.
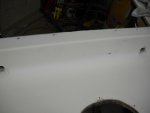
DSCN1241-1.jpg

Lesson two learnt: Make sure you do not dome the area out too much before spraying the gel. Also need to mke sure that the area is perfectly flat as well before applying the gel. If not you will sand through your gel. I did on the one side. This is where you see the darker gel showing thru.

Lesson three learnt last night: When spraying gel into a tight area where you can not hold the Pervail vertically, (like my vertical wall you see here), you get the Pervail to discharge co2 along with the gel. This will cause the pit and bubble holes in your gel. You need to empty half the co2 out of the pervail before spraying. You will notice all the pits around the other end.

I was deffinatelly going to respray last night and sand it again tonight until I looked and I do not have enough gel to do it again. So I am just going to cover it with a transom saver bar along that vertical edge. The fiberglass is sealed with the new gel like I wanted and the area is flat like I wanted. So it stays as is. Sorry YD, not to your standards.:facepalm:

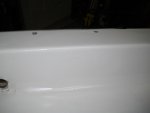
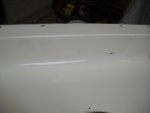
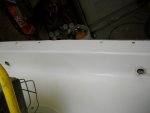
I next started buffing the splash well. I used the little 3" kit from Harbour Freight in a electric right angle drill. I work pretty good. Better in my opinion that my 8" buffer and sponges. I tried them first and I was having trouble getting the unit in there. I also buffed the whole area using the wool bonnett that came with the kit. I also used the Meguires Heavy buffing compound. No 3M finness It compound. I think the wool is the way to go. It took half the time it would have if I tried to use the sponge. Just make sure you keep the pad moving. But you do not need to go too fast with it. Here is how it came out.
DSCN1242-1.jpg

DSCN1243-1.jpg

DSCN1244-1.jpg

I forgot before that I wiped the area around the freshly sprayed gel with a acetone rag to remove all the over spray. This was to clean up the over spray so I did not need to sand the area. I would recommend this to be done before the PVA is appied. Acetone and PVA do not mix well.

After I was all done last night I cleaned up and put all my buffing and waxing stuff away. Also cleaned up the garage. I can actually see my work bench now. Haven't seen that for a month or two.:D

Tonight it goes on to assembly. Need to finish the following.

1) Mount all the fittings and connectors I took off in the splash well.
2) Run the steering cable, control cables from the front.
3) Mount and finish running the trim tab pump and lines.
4) Install the other battery and finally hook up all the elctrical.
5) Remove the old antenna and install the new one.
6) Get some Starboard and fill hole from old fishing tackle box location.
7) Wash and wax the deck hatches. (I thought I was done, guess not. DAMN!!!:mad:)
8) Wipe off all accumilated dust.
9) Reload all boating equipment into boat (Anchor, safety equipment, etc)


Then done the hull! Still need to rebuild the windsheild. But the hull is going outside for that. Thanks for all your help again YD. Could not have done the gel without you. I still have a couple of areas that need attention, but that will be after the motor is rebuilt and running. Likely late spring.
 

proshadetree

Lieutenant Commander
Joined
Jul 19, 2008
Messages
1,887
Re: Update 01-22-2011

Re: Update 01-22-2011

Looks like YD hooked you up that repair appears awesome in the pics man.
 

Yacht Dr.

Vice Admiral
Joined
Feb 26, 2005
Messages
5,581
Re: Update 01-22-2011

Re: Update 01-22-2011

JK.. come on by anytime and Ill give you some more gel..

How was that Sea Ray gel match to your boat ?

YD.
 

j_k_bisson

Lieutenant Junior Grade
Joined
Oct 6, 2010
Messages
1,082
Re: Update 01-22-2011

Re: Update 01-22-2011

Looks like YD hooked you up that repair appears awesome in the pics man.

Yes he did. If it where not for him it would not be fixed! The repair does not look that good in person. Still some sanding scratches outside of the repair area that I did not notice before buffing. I still need to learn the finer points of this art!
 

j_k_bisson

Lieutenant Junior Grade
Joined
Oct 6, 2010
Messages
1,082
Re: Update 01-22-2011

Re: Update 01-22-2011

JK.. come on by anytime and Ill give you some more gel..

How was that Sea Ray gel match to your boat ?

YD.

The gel matched perfectly. I can not tell the difference. The only way you can tell the area is there appear to be a fine blend line (step) around the new gel to the old. I am assuming that this line is there because I did not sand enought with the higher grits. Is this true? Sorry missed your call. Feeding the kids lunch. Trust me nothing get in their way of them and their food!
 

j_k_bisson

Lieutenant Junior Grade
Joined
Oct 6, 2010
Messages
1,082
Update 01-23-2011

Update 01-23-2011

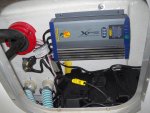
Last night work from 8pm to 2:30am. Got a ton done again. The end it near! Last night finished the following things;

1) Cleaned and installed the steering cable
2) Cleaned and installed the control cables
3) Cleaned and installed the driver side side-panel
4) Installed the fuel filter and full system
5) Installed the fuel vent
6) Installed the rest of the trim tab system
7) Cleaned and installed speedo line
8) Ran the depth fined wire *still need tomound transducer to hull, just hanging*
9) Install the other battery and box

Still need to fill the purge the trim tabs. Also need to hook up the ground wire for the trim tabs. Did not have a piece of 14ga black wire at 12:30am last night. Here are the pics.

DSCN1246-1.jpg

DSCN1247-1.jpg

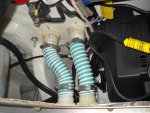
Thank god I got rid of the water pick up shut off. How in the hell you I get my hand down in there to use it.

DSCN1248-1.jpg

DSCN1249-1.jpg

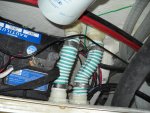
The fuel filter is only hanging there for now. Need to make the kicker bracket and install it. The filter uses the same mounting bolts. I try to utilize the british engineering idea. If a bracket does not have three uses it not good enough! Start over! LOL

DSCN1252-1.jpg

To say that the back hatches are a bit full is a understatment. Still need to add a couple of zip ties to clean up the last wiring additions.

Tonight need to do the following:

1) Install the new antenna
2) Extend and install the groud wire for the trim tabs
3) Mount the transducer and wire holders on the transom
4) Wrap up and connect the the transducer wire in the dash

Need to start planning on the transom cap molding, and the hull rub rail. Then the hull is complete.
 

proshadetree

Lieutenant Commander
Joined
Jul 19, 2008
Messages
1,887
Re: Update 01-23-2011

Re: Update 01-23-2011

Do you see the light? right there at the end of the tunnel. There is a motor waiting for you there. Head for the light, thats where the lake is. Looks fabulous man.
 

j_k_bisson

Lieutenant Junior Grade
Joined
Oct 6, 2010
Messages
1,082
Update 01-24-2011

Update 01-24-2011

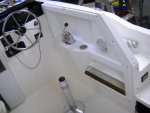
Well here is the light. I finished off all the wring, plumbing, and controls last night for the hull only. Have not run through the full electrical system check yet. Also still need to fill and purge the trim tab system. There maybe a probem with that system as well.:facepalm: Figuring it out with Tabman right now on another thread. Here is the completed pics.

DSCN1253-1.jpg

DSCN1255-1.jpg

Still need to figure out what I am going to do reguarding the splash well molding. Going to wait untill I come to mounting the new motor. Will cover it with a piece of packing tape. Plastic will keep the moister out. The bronze splash well drains I order from Great Lakes Skipper come in Wensday. Just waiting for them t come in.

DSCN1257-1.jpg

Need to pick up that piece of starboard for the old tackle locker opening. 1/4"x9"x19" Will be stopping by Laird Plastics some time this week or next to pick it up. The door stays until early spring. It may look horiable but it closed and keeps water out for now.
DSCN1259-1.jpg

Drains come in Wensday so the get installed right away, then the boat goes out side. Right after the windshield rebuild starts. Need to dissassemble, clean, strip, paint, and then reassemble. I hoping to be done this upcoming weekend and be ready for install a week from today.

Need to ask what I should do about the next part of this project. I will be starting the motor rebuild. Should I start a new thread for that in the Johnson/Evinrude directory, or just keep going here?
 

mcgyver

Petty Officer 2nd Class
Joined
Oct 3, 2009
Messages
123
Re: Update 01-24-2011

Re: Update 01-24-2011

Jeff, looks fantastic! You are my inspiration dude...... How did you seal the splashwell/hull joint? It looks as if there is just epoxy in there? is that going to be strong enough when you get some hull/cap movement? or will it crack? I'm thinking of grinding down an inch each side and also laying in a strip or 2 of 1708...as that WAS the source of all my problems (transom and stringers rot) I'm doing my damnest to prevent any water from EVER entering that area and I would be worried with small cracking if it was just "filled" What are your thoughts? Also can you explain how you installed those 2 brass thruhulls in the splashwell? how did you flange over 1 side and did you just use 5200 or something?
Thanks
Doug
 

j_k_bisson

Lieutenant Junior Grade
Joined
Oct 6, 2010
Messages
1,082
Re: Update 01-24-2011

Re: Update 01-24-2011

Jeff, looks fantastic! You are my inspiration dude...... How did you seal the splashwell/hull joint? It looks as if there is just epoxy in there? is that going to be strong enough when you get some hull/cap movement? or will it crack? I'm thinking of grinding down an inch each side and also laying in a strip or 2 of 1708...as that WAS the source of all my problems (transom and stringers rot) I'm doing my damnest to prevent any water from EVER entering that area and I would be worried with small cracking if it was just "filled" What are your thoughts? Also can you explain how you installed those 2 brass thruhulls in the splashwell? how did you flange over 1 side and did you just use 5200 or something?
Thanks
Doug

I used epoxy mixed with silica andchopped glass. The gooped it in like the factory did. I plan on using a piece of aluminum for the capping. Just like factory. The stresse did not crack the original epoxy. The water intrusion did through the thru hull splash well drains.
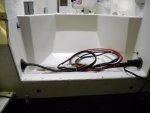
As to the bronze splash well drains. They come in on Wensday this week. So I have not put them in yet. I have sealed the holes with epoxy though. I'll use 4200 for the sealling compound. I'll post it when I get there.
 
Status
Not open for further replies.
Top