1990 4.3 block and 1995 heads, which rocker tightening specs to follow?

stresspoint

Lieutenant Junior Grade
Joined
Sep 19, 2022
Messages
1,046
It's a misprint
Me I pay no attention to books for valves. Turn motor until intake or exhaust is down. Then adjust the opposite valve that is not down. Mark with grease pencil and rotate some more until all have been marked
or get a cardboard box and chop it up to shield the oil from the push rods. start the motor , starting with #1 cylinder back each rocker off or tighten till it just clicks then crank down 1/4 a turn .
lash done , clean up mess ,put covers back on and go boating :).

OP , i found there are 3 different length push rods in 4.3 line of motors.
early non vortec, vortec with roller cam , vortec with roller cam and lifters all use different push rods.
also vortec motors have 2 different stud sizes fat and skinny , the rockers are also different between the 2.
do research if mixing 4.3 parts as they are not a 1 size fits all even although with the correct parts and some machine work all will fit together and get you some good power and a smooth running motor that will pull an easy 6 k rpm (i know these things :) )
 
Last edited:

Lou C

Supreme Mariner
Joined
Nov 10, 2002
Messages
12,756
In the old days we’d go to the junkyard get a Chevy valve cover cut off the top half of it & temporarily install it that would keep the oil from going everywhere. Hard to do with marine manifolds in the way.
The variations in parts with the 4.3 is why I just stuck with the original casting # heads instead of going to Vortec when I changed my cyl heads…
 

Lou C

Supreme Mariner
Joined
Nov 10, 2002
Messages
12,756
Yes the roller cam came on in the 87-88 time frame, my old one has the roller
 

stresspoint

Lieutenant Junior Grade
Joined
Sep 19, 2022
Messages
1,046
should be roller cam from 88 up.
it should be ,however , i have a 88 motor that is a flat tappet up in the shed , it got us confused when i was playing the 4.3 fiasco /game.
its defiantly an 88 engine , pre vortec flat tappet , i ran it with vortec heads and roller rockers ,aside from the water that kept entering the oil from an invisible crack in the block that went to a return oil gallery.

OP should be able to set the lash easily now the motor has ran and all the lifters are fully primed, it can make a difference trying to set lash if there are a couple of soft lifters.
 
Joined
Apr 19, 2023
Messages
12
ok, I got it all done and she sounded good. With the earmuffs on but about 5 min in I started hearing a ticking with the rockers and it got louder. I just took off the valve covers and a couple nuts backed off a couple threads. Should I use the white thread sealer on the nuts to get them to stay in place?
 

stresspoint

Lieutenant Junior Grade
Joined
Sep 19, 2022
Messages
1,046
put the nuts on a metal plate , on the top of the nut you will see indents like a square pin punch has been used .
give those areas a " strait down" whack with a punch again , this will tighten the threads again so the nuts wont back off .
personally , i don't like using thread sealers or thread lockers on rocker nuts, replacing the nuts is a better option ,however a couple of good solid taps in areas mentioned will tighten the threads back up
 
Joined
Apr 19, 2023
Messages
12
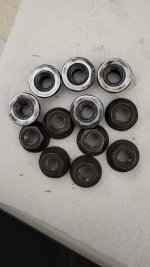
My nuts don't have a indent. Pic is a couple top & bottom. Would replacing these nuts be a better option?
 

Attachments

  • nuts.jpg
    nuts.jpg
    939.6 KB · Views: 4

froggy1150

Master Chief Petty Officer
Joined
Nov 3, 2017
Messages
846
Those don't look like crush nuts. They need to be "all metal" lock nuts. If they turn easy at all with a wrench or even with fingers play it safe and get new. A couple of bucks is good insurance
 

Scott Danforth

Grumpy Vintage Moderator still playing with boats
Staff member
Joined
Jul 23, 2011
Messages
49,766
Looks like the nuts from non-adjustable valve train. in an earlier post, you said you tried to go from zero lash to 1 full turn and you couldnt without the nut bottoming out.

that is because your supposed to bottom the nuts and torque to spec on non-adjustable valve train.

the 4.3 came with both adjustable valve train in the earlier motors and non-adjustable valve train in the later motors.
 

Scott Danforth

Grumpy Vintage Moderator still playing with boats
Staff member
Joined
Jul 23, 2011
Messages
49,766
dont just replace the nuts. make sure the rocker studs are correct for non-adjustable vs adjustable.

if the rocker stud is one diameter for the shank and the threads, its for adjustable valve train.

if the rocker stud is two diameters, where the shank is larger than the threads, its for non-adjustable valve train.
 

stresspoint

Lieutenant Junior Grade
Joined
Sep 19, 2022
Messages
1,046
My nuts don't have a indent. Pic is a couple top & bottom. Would replacing these nuts be a better option?
well that sheds a light on why your nuts backed off , you have something going on there with the rocker posts on your heads
.
i cant remember off hand , but i think the rockers are also different adjustable and non adjustable so do a comparison before you continue to use the motor..
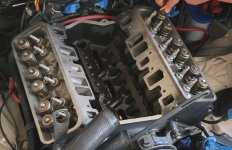
? can you post up a pic of the rocker posts without the rocker.

as Scott described , those nuts are for "non adjustable " rocker assembly which you just lock down to (from memory) 25 foot pound and be done.
there is one thing i recommend and that is to bring each piston to TDC compression stroke so as you don't stress the threads and get correct torque when tightening.
 
Joined
Apr 19, 2023
Messages
12
This is the pic from putting on the heads after remanufacture. This is a 1990 everything except the heads are 1995 (old winterizing lesson) & before now boat shops have done all the work. I'm starting to think I might have a bad lifter and it's supposed to be done with the 1995 method of tightening to 40#'s, seems high but the manual says so... The test run seemed good but a 1 very small backfire at WOT.
This all started me working on it. 1 year ago this month another shop, I took in for a Gimble bearing and carb remanufacture and they messed with the original alternator. This shop messed up the alternator(changed pieces that didn't work) and put back in 180 degrees backwards and wrong firing order. Then I took to a different shop and they keep replacing items and not fixing the problem, so I called then shop I wished I could get into (6month backlog) and he diagnosed it over the phone and he was 100% correct, 1 tulip & 2 bent valves & cracked head).
Thanks for all your help!
 

Attachments

  • close up heads.jpg
    close up heads.jpg
    583.5 KB · Views: 3

alldodge

Moderator
Staff member
Joined
Mar 8, 2009
Messages
42,215
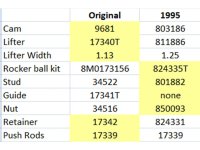
This is what I would do. Everything in yellow keep (original) and buy new
GM V6.jpg
 

stresspoint

Lieutenant Junior Grade
Joined
Sep 19, 2022
Messages
1,046
you have non adjustable rockers , if the book says 40 then that is where you should put them.
measure all your push rods to be double sure that they did not get mixed up or the incorrect ones fitted , as i posted , there are 3 different lengths.

you can check for a soft lifter by pushing down on the top of the rocker @ TDC compression stroke once the lash is tightened ( in your case when the rocker nut is tensioned), if you see a variation in movement in one or two from the others then chances are those lifter is soft.

addressing the high rpm backfire :
as i found out , the timing has to be set spot on with the shunt wire if you are using the OEM distributor or the motor will give i stutter / pop at the higher end of the limiter IE: wont reach max RPM.
also check the small ground wire that attaches to the distributor is in place and making a perfect connection.
 
Joined
Apr 19, 2023
Messages
12
Before last year the boat ran great since 1998 (that's when the 1995 heads were changed) and the push rods and lifters I didn't change & they all seemed to be the same size. Last night I was pushing on all the rods and no movement but I just cracked it up to be that if one was going I might not be able to move it.
The distributor was changed to a digital. I have the timing set at 6% BTDC as my air cleaner cover says but I'm wondering if the digital should be different ( the 2nd shop put in on). On timing advance it adjusts to 12% BTDC when on the gas.
 

stresspoint

Lieutenant Junior Grade
Joined
Sep 19, 2022
Messages
1,046
there are a couple of people here that will help you with timing that motor
to the correct spec with whatever the digital distributor you have fitted.

you may still have to use the shunt wire depending on what set up was installed ,
i think 6 deg is a little shy ? if you have HEI set up , thinking it should be more like 8.
the total also seems a bit shy as well. but this depends on the set up you have, those specs on the F/A are for OEM set up with shunt wire in place not for aftermarket.

i cant help much as i set base timing and then do my final timing on the water to get optimum performance.

good news is ,it sound from your description that your lifters are working fine, so stick the rocker covers back on and start looking elsewhere for that top end miss , I'm guessing the timing is off slightly.
 
Joined
Apr 19, 2023
Messages
12
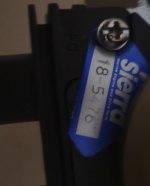
Thanks, I ended up replacing the lifters anyways since I was 1/2 way there. Just waiting on the new gasket to deliver to put the intake back on. I did buy an old Sears timing light & rpm gauge so I can test it on the lake and make adjustments. I guess that makes sense since I was thinking I just didn't adjust it enough but I was thinking of going closer to 0 TDC. I found the only marking on the distributor. Sierra 18-5476.
Do I have to upgrade to a digital tachometer now too? My original gauge didn't work anyways but I just ordered a old factory shelf find. I think I just ordered another paperweight if I need digital.
 

Attachments

  • dis.jpg
    dis.jpg
    69 KB · Views: 0

Lou C

Supreme Mariner
Joined
Nov 10, 2002
Messages
12,756
If all you have is the zero mark on the timing tab you should put timing tape on the harmonic balancer for a more accurate job. Mine (1988 4.3 4bbl) is set at 6*BTDC. I have the old school style timing tab with the hash marks on the tin timing cover.
 
Top