1988 Bayliner Capri 1650 Restoration

Poinzey

Cadet
Joined
Mar 26, 2013
Messages
21
Re: 1988 Bayliner Capri 1650 Restoration

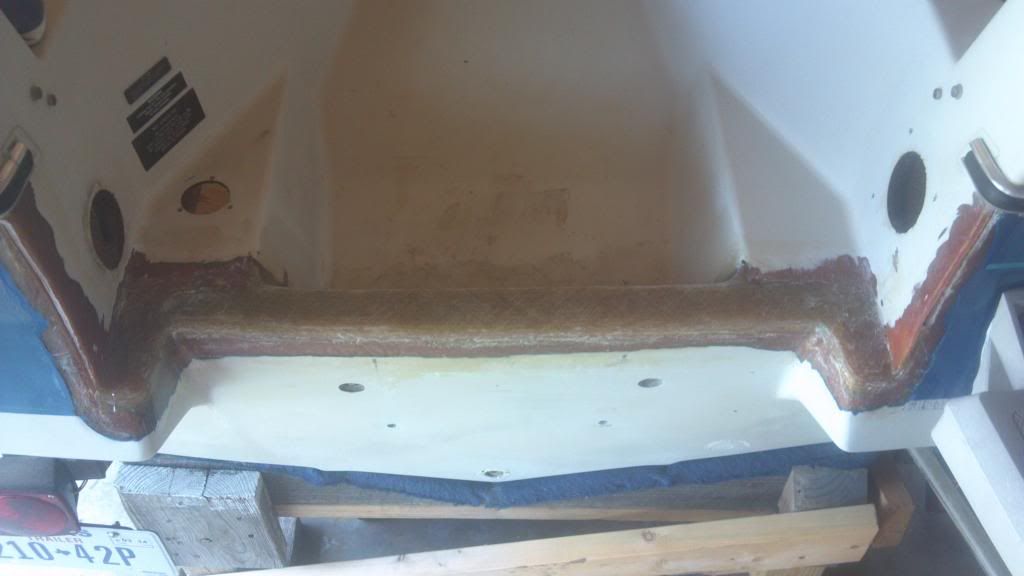
further, I did not take the cap off at all. What I did was cut the cap directly above the wooden part of the transom. If you look at a couple of the top view pics of the splashwell, I cut about to where the points are coming off the rear of the splashwell. My actual transom is only 24" wide, so it was fairly easy to slide the new wood in from the top and work with it that way. It is definitely not the easiest to work under the splashwell on the inside, but it is doable. I debated that cut for a long time also. What I finally decided was that having a solid stern was more important than the ease of construction. I have recently had a friend actually sink a boat("fish-n-ski" bass boat) several times before he was able to find a leak at the stern between the cap and hull. Luckily his foam floated the boat with the cap several inches above the water! I am hoping my modifications will give me a fairly solid stern so that no leaks occur. Current plans are to use pb on the seam up to the rub rail, then use 5200 on the inside across the rear and coming up the sides a foot or two. I should have more pics this weekend if you would like some from other angles. :)
 

further

Lieutenant Junior Grade
Joined
Jun 18, 2009
Messages
1,034
Re: 1988 Bayliner Capri 1650 Restoration

Yes do post more pics please. I'll be watching your restoration as your layout of stringers and transom is exactly like mine. Good luck and thanks for the info.
 

Poinzey

Cadet
Joined
Mar 26, 2013
Messages
21
Re: 1988 Bayliner Capri 1650 Restoration

Here is a top view of the transom. I made the cuts on eitherside in line with the part that is jutting out the rear.
2013-06-27_13-30-04_818_zps41a8b33c.jpg


Here is a corner view showing the buildup. You can see the lighter resin where I am filling back in for the cutout portion.

And another view of the corner. I had to cut out the innerportion of the splashwell at the rear due to damage from someone tightening theengine bolts too much.


And a view of the inside of the splashwell. I still have afew layers to get the top evened out.

Interior view of the splashwell corner. You can see the light coming through the areas I still need to fillet and tab.


Here you can see where I?ve started grinding up into thecap. Still a ways to go to get to the top. I want to get a good fillet on thisjoint and at least two layers of 1708 on it.


Poinzey

Cadet
Joined
Mar 26, 2013
Messages
21
Re: 1988 Bayliner Capri 1650 Restoration

Rear view of splashwell:


Starboard side, I've started filling in the vertical joints now:


Port side:


Starboard interior transom/kicker/splashwell joint:


Here you can see the splashwell/transom joint easier. Since I was replacing the rear wall of the splashwell, it made this part a lot simpler. I used a sawzall to make a fairly nice straight cut across the back of the well.


A note here: when grinding on the well, be careful. I found that the glass making up the well is not as thick, mine was maybe 1/4" thick.
 
Last edited:

further

Lieutenant Junior Grade
Joined
Jun 18, 2009
Messages
1,034
Re: 1988 Bayliner Capri 1650 Restoration

Looking good Poinzey. I'm thinking I'm gonna go with the removing the rear of the cap method. I have access issues on the rear seat boxes and I think removing it will provide better access to remove them cleanly without cutting through the hull (which I've done in couple spots already :facepalm: But still considering doing it your way.

How thick did you go with the knee boards? you use the old ones as template?
 

Poinzey

Cadet
Joined
Mar 26, 2013
Messages
21
Re: 1988 Bayliner Capri 1650 Restoration

Thanks! Urs is too! I was gonna suggest the same thing in your thread. I think Jig or Jg posted a pic in ur thread with his recommended cut lines. I would go with that on yours, especially if you transom is the full width of the beam. O, I keep forgetting, here is a Photo and image hosting, free photo galleries, photo editing style="border:none;" /></a><a href="http://s1314.photobucket.com/user/tewing69/library/1988 Bayliner Capri 1700 BR" target="_blank"><img src="Photo and image hosting, free photo galleries, photo editing style="border:none;" alt="tewing69's 1988 Bayliner Capri 1700 BR album on Photobucket" /></a></div>"]link [/URL]to my photobucket. Everyone feel free to browse the pics. There is a ton more than what I linked here. My next order of resin should be here Monday evening, so until then I'm gonna get a lot more grinding done and figure out the rear seating.

For the knee boards, I went with two layers of 1/2" ply sandwiched with a layer csm binding them together. Here is a quick n dirty pic of the wood layout for it all. O, no template. I had to make all from scratch. There are still a couple of mods I need to make to accommodate more drainage holes and wiring.
The rectangles you see on top of the stringers are the second outer layer of the knee boards. The Inner layer goes to the bottom of the stringers, but the second sits on top. I was trying to stagger all my joints between layers for more strength. We will see how this translates to the real world after some time on the water. :D
 
Last edited:

Poinzey

Cadet
Joined
Mar 26, 2013
Messages
21
Re: 1988 Bayliner Capri 1650 Restoration

Just to share the joys of working outside in Texas, here is a lil guy that joined me for a day of grinding.

and before anyone asks...yes he is alive, and don't blow smoke up his a**!!!(thought he was dead till that test, and he did NOT fly away!!! he just fluffed his wings and turned and stared at me!!!:eek:) For reference he is about 3" long.
 
Last edited:

Poinzey

Cadet
Joined
Mar 26, 2013
Messages
21
Re: 1988 Bayliner Capri 1650 Restoration

Got all the gel coat out of the ski locker:


And...since I can be a little optimistic on my timelines sometimes:rolleyes:...two weeks! In two weeks, my goal is to have it splashed on labor day weekend! I might need to stock up on Advil!!!:facepalm:
 

Poinzey

Cadet
Joined
Mar 26, 2013
Messages
21
Re: 1988 Bayliner Capri 1650 Restoration

Status update: capping the front portion of the stringers and making final adjustments to install the flooring...


Side glass for the stringers:


Now to cap the stringers and get ready for the floor! :)
 

Poinzey

Cadet
Joined
Mar 26, 2013
Messages
21
Re: 1988 Bayliner Capri 1650 Restoration

Drats! There goes the two week deadline! Lol Ran low on resin getting the rest of the stringers and floor in. I'll have to place another order Tuesday to get enough to cover the floor and seats. So far, that is 8.5 gallons actually in the boat so far, with about 1 gallon of waste total, and a half in reserve. On the positive side, it interupts my "ADHD" long enough to concentrate on finishing the splash well. For quality results, you really have to take your time. I have a great admiration for you guys that do body and glass work! I'm learning how to fair in with the glass bubbles now. I have always been better at rough in type work instead of finishing, but there is a nice feeling of satisfaction after getting a nice smooth glossy finish done! Needless to say, I am in the middle of that process now with the top of the transom.

Summary of the last weeks work:
Got the front of the stringers glassed in and capped, looks like i need at least two cross braces up front to support the floor and consoles.


Set the bow section of flooring.


Getting center section ready.


Set the center section, slight screw-up on the port side, o well...more pb!


All the floor pieces in. It is much more enjoyable working in the boat now!


Glass on...Glass off...Glass on...Glass off... Ah, only two or three more coats today and she should be smooth as glass!
 
Top