1987 Sea Ray Seville Bow Rider Restore Project

Lukie46

Seaman
Joined
Mar 7, 2012
Messages
51
Re: 1987 Sea Ray Seville Bow Rider Restore Project - Trasnom Water Proofing

Re: 1987 Sea Ray Seville Bow Rider Restore Project - Trasnom Water Proofing

I did not re-wet the poly once it got tacky. I put the CSM on top of the tacky poly resin and then wetted down the CSM until it was transparent. Would this have caused air bubbles?
 

rickryder

Commander
Joined
Jun 24, 2010
Messages
2,722
Re: 1987 Sea Ray Seville Bow Rider Restore Project - Trasnom Water Proofing

Re: 1987 Sea Ray Seville Bow Rider Restore Project - Trasnom Water Proofing

Yes wet out a coat and lay the csm then wet out again.....

It's true csm will fall apart the more you play with it.... I buy some diposable chip brushes and dab at the csm.... sometimes the roller will push it and create bubbles.....it's a trial and error thing till you get the hang of it ;)

Not to worry..... grind down bubbles and messed up spots and fill in voids with patches of csm or PB the spots

The biax will be so much better to work with :D
 

britisher

Petty Officer 1st Class
Joined
Feb 23, 2012
Messages
369
Re: 1987 Sea Ray Seville Bow Rider Restore Project - Trasnom Water Proofing

Re: 1987 Sea Ray Seville Bow Rider Restore Project - Trasnom Water Proofing

Hi, I've just ordered my supplies from US Composites and one of the things they put in my list was a bubble buster roller. I have seen them before. The roller is designed with discs and gaps, no real covering like a normal roller. The roller works by squishing the surface and I would guess bursts the bubbles or at least rolls them flat. That said, I'll tell you how expert I am when I do it. I will no doubt not do the greatest job, but hey ho.
 

Lukie46

Seaman
Joined
Mar 7, 2012
Messages
51
Re: 1987 Sea Ray Seville Bow Rider Restore Project - Seat and Side Panel Replacement

Re: 1987 Sea Ray Seville Bow Rider Restore Project - Seat and Side Panel Replacement

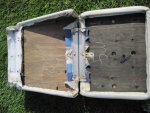
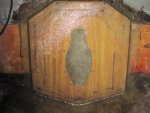
IMG_2158.jpgIMG_2156.jpgIMG_2157.jpgGuys I have a few questions in regards to replacing my boat seats and side panels. The side panels that I am talking about are right next to the driver and passenger seat and they hold my stereo speakers and help keep the fishing rods in place for storage. It is too cold in Michigan to fiberglass, so if figured I might as well work on my boat seats. I need to completely replace them. The driver and passenger are both back-to-back seats (lounge). I need to replace the plywood, but I am not exactly sure what type of plywood it is (or was). I am not sure if it is exterior plywood with a sealer or if it is pressure treated. How can I tell? I have the same question on the side panels. I am not sure if it is pressure treated plywood or exterior grade plywood with a sealer.
 

Woodonglass

Supreme Mariner
Joined
Dec 29, 2009
Messages
25,926
Re: 1987 Sea Ray Seville Bow Rider Restore Project - Seat and Side Panel Replacement

Re: 1987 Sea Ray Seville Bow Rider Restore Project - Seat and Side Panel Replacement

I'd use 1/2" Arauco plywood from Lowe's or HD. Buy a Gallon of 3:1 Epoxy form USC and give the wood two coats paying close attention to the edges. Do that and they'll last for decades.
 

rickryder

Commander
Joined
Jun 24, 2010
Messages
2,722
Re: 1987 Sea Ray Seville Bow Rider Restore Project - Seat and Side Panel Replacement

Re: 1987 Sea Ray Seville Bow Rider Restore Project - Seat and Side Panel Replacement

I'd use 1/2" Arauco plywood from Lowe's or HD. Buy a Gallon of 3:1 Epoxy form USC and give the wood two coats paying close attention to the edges. Do that and they'll last for decades.

x2 thats the way to do it ;)
 

britisher

Petty Officer 1st Class
Joined
Feb 23, 2012
Messages
369
Re: 1987 Sea Ray Seville Bow Rider Restore Project - Seat and Side Panel Replacement

Re: 1987 Sea Ray Seville Bow Rider Restore Project - Seat and Side Panel Replacement

Before yu go down the road of rebuilding these back top back seats with new plywood and I guess fresh vinyl, you might want to check out pricing on new back to back seats where the frames are made from roto molded plastic. They will never, ever rot. Sometimes it can be cheaper to simply buy new. On my SR the passennger layout is a wide bench at the back in front of the full width engine cover/sunpad. Then there are 2 swivel seat. The helm seat had already been replaced by the PO with a seat that was nice, but far too large so wouldn't swivel. The passenger seat was the original SR seat and was looking in bad shape. I deconstructed it and the ply inside was mush (like the rest of the damn boat) and the plasticky foam shell was crap. I Craig's listed the big seat and junked the passenger seat. I found some neat sports seats made by Veada.com and they work out about $200 each. I consider that a good price for brand new and no more worries about rot.
 

Lukie46

Seaman
Joined
Mar 7, 2012
Messages
51
Re: 1987 Sea Ray Seville Bow Rider Restore Project - Boat Seat Upholstery Staples

Re: 1987 Sea Ray Seville Bow Rider Restore Project - Boat Seat Upholstery Staples

I need to install new seat covers for my boat. I have read a lot of articles regarding monel versus stainless steel in regards to staples. I live in Michigan and am not using my boat near salt water. Is it alright to use the stainless steel staples, or should I use the monel? The money is not the issue for me as much as the availability. The Home Depot near my house does not carry them.
 

Woodonglass

Supreme Mariner
Joined
Dec 29, 2009
Messages
25,926
Re: 1987 Sea Ray Seville Bow Rider Restore Project - Boat Seat Upholstery Staples

Re: 1987 Sea Ray Seville Bow Rider Restore Project - Boat Seat Upholstery Staples

SS will be fine.
 

rickryder

Commander
Joined
Jun 24, 2010
Messages
2,722
Re: 1987 Sea Ray Seville Bow Rider Restore Project - Boat Seat Upholstery Staples

Re: 1987 Sea Ray Seville Bow Rider Restore Project - Boat Seat Upholstery Staples

I used SS on my seats and the boat only sees salt water... so far so good it's been a year....i don't know what 5 years down the road will do...

I guess you could order them online but that will take a few days to get...
 

tinkeringwackyone

Chief Petty Officer
Joined
May 2, 2008
Messages
415
Re: 1987 Sea Ray Seville Bow Rider Restore Project - Boat Seat Upholstery Staples

Re: 1987 Sea Ray Seville Bow Rider Restore Project - Boat Seat Upholstery Staples

Good Looking project Lukie, welcome aboard. Sorry I haven't been on the forum for quite some time. Sounds as though you are going down the right path. It's a lot of trial and error. I wish I had used the 1708 and poly, but that's for next time.

I will keep an eye on your build and watch your progress.
I used SS staples as well, no salt water around here.

Good luck my friend

Sail on.....tink
 

tinkeringwackyone

Chief Petty Officer
Joined
May 2, 2008
Messages
415
Re: 1987 Sea Ray Seville Bow Rider Restore Project

The carpet I used was an exterior carpet that was on sale dirt cheap (40 bucks). Its a little thin on the backside so when I glued it down I had to be careful of the amount of glue and how hard I pressed, otherwise it would seep through. Worked out really well. I would recommend a cheap outdoor carpet and your choice of color.

As far as the vinyl on the seats, they were in pretty good shape for the most part. I didn't have to replace anything, even though there are a couple spots where they were cracking.

Sail on.....tink
 

Lukie46

Seaman
Joined
Mar 7, 2012
Messages
51
Re: 1987 Sea Ray Seville Bow Rider Restore Project - Transom Installed

Re: 1987 Sea Ray Seville Bow Rider Restore Project - Transom Installed

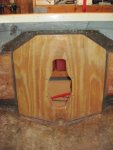
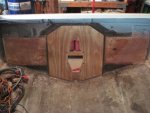
Well, I finally installed the transom. I still need to to do some sanding, tabbing, and skinning. I did have some trouble with the "peanut butter". I think I mixed too much fiberglass in the peanut butter and it created some pockets of too much fiberglass and not enough resin. I ground out as much as I could see and reapplied a new batch of peanut butter and it came out much nicer. Unfortunately, I can't guarantee that there aren't any hidden below the surface.
transom_2.jpgIMG_2183.jpg
 

rickryder

Commander
Joined
Jun 24, 2010
Messages
2,722
Re: 1987 Sea Ray Seville Bow Rider Restore Project - Transom Installed

Re: 1987 Sea Ray Seville Bow Rider Restore Project - Transom Installed

Looks real good!
 

Lukie46

Seaman
Joined
Mar 7, 2012
Messages
51
Re: 1987 Sea Ray Seville Bow Rider Restore Project - Transom Tabbed and Skinned

Re: 1987 Sea Ray Seville Bow Rider Restore Project - Transom Tabbed and Skinned

Well, I finally finished tabbing and skinning the middle transom. I think it came out well. I spotted a couple of small bubbles, but all in all, I am happy with it. The black lines on the transom were made from using a marker which I used to help me line up the fiberglass. I figure it will look fine once I gelcoat it.

IMG_2202.JPG
 

Lukie46

Seaman
Joined
Mar 7, 2012
Messages
51
Re: 1987 Sea Ray Seville Bow Rider Restore Project - How Do I Scarf The Stringers?

Re: 1987 Sea Ray Seville Bow Rider Restore Project - How Do I Scarf The Stringers?

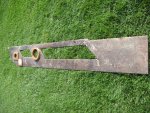
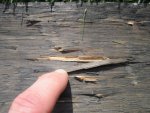
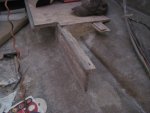
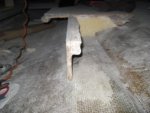
Guys, I need help understanding how to scarf in my stringers. I am not sure if I scarf the face (wide) side of the stringer which I know has the greatest surface area and greatest strength or if I am supposed to scarf the wood on the edge side. I am also not sure what material I should use to bond the wood together. I am using poly resin for my restore, however, I am using epoxy resin to waterproof areas such as my wood framed seats, so I can use epoxy resin. I also have used PL adhesive to laminate the transom pieces together. Once I do have the pieces joined together, what is the correct way to fiberglass the scarf section? The stringer is only 1/2" plywood with a 3/4" x 1 1/2 plywood cleat. I have included a couple of pictures. Thank you all for your help.

IMG_2204.JPGIMG_2205.JPG
 

rickryder

Commander
Joined
Jun 24, 2010
Messages
2,722
Re: 1987 Sea Ray Seville Bow Rider Restore Project - How Do I Scarf The Stringers?

Re: 1987 Sea Ray Seville Bow Rider Restore Project - How Do I Scarf The Stringers?

Are you scarf joning or butt joint splice? I like the butt join myself. First remove cleat back 16" Make 2 pieces of 1/2" ply the height of your stringer and 32"long....Sand the glass and expose the wood on existing stringer....install new stringer butting the old one...coat the stringers and splice blocks with Titebond lll glue clamp together and screw them together. Let dry for 48 hours then you can glass them to the hull. Of course you will have to keep the new stringers about 1/4" off the hull and PL or PB fillet them before you do your tabbing and glass layup.
 

Lukie46

Seaman
Joined
Mar 7, 2012
Messages
51
Re: 1987 Sea Ray Seville Bow Rider Restore Project - How Do I Scarf The Stringers?

Re: 1987 Sea Ray Seville Bow Rider Restore Project - How Do I Scarf The Stringers?

The only issue I may have with that is my gas tank is in the area of the splice. I am not sure if I will have the room to add the 1/2" plywood to the inside of the stringer on both sides at that location. It was already pretty tight.
 

tpenfield

Moderator
Staff member
Joined
Jul 18, 2011
Messages
17,985
Re: 1987 Sea Ray Seville Bow Rider Restore Project - How Do I Scarf The Stringers?

Re: 1987 Sea Ray Seville Bow Rider Restore Project - How Do I Scarf The Stringers?

Just took a look at your thread this morning . . . nice work.

Maybe a quick measurement of the distance between the stringers and the width of the tank will tell if you can do a lap joint. Otherwise, you could do a wood lap on the outboard sides and a glass epoxy lap on the insides to take up less space.
 

rickryder

Commander
Joined
Jun 24, 2010
Messages
2,722
Re: 1987 Sea Ray Seville Bow Rider Restore Project - How Do I Scarf The Stringers?

Re: 1987 Sea Ray Seville Bow Rider Restore Project - How Do I Scarf The Stringers?

How about taking the old stringer out back to the bulkhead and making that your splice area? Hard to tell what's going on in the pic.
 
Top