1985 Bayliner 2750 Ciera Sunbridge Resto

eggs712

Petty Officer 1st Class
Joined
May 8, 2012
Messages
348
and one more video.
Yep you are correct, thanks for the help again. The threaded freeze plugs on both sides are missing, but that's a quick easy fix.

Hopefully I didn't burn up the new impeller, but I did verify that my temperature gauge works LOL
 

eggs712

Petty Officer 1st Class
Joined
May 8, 2012
Messages
348
I started up the motor again last night with the new freeze plugs in; only took a pump of the throttle and it fired right up. The temp came up to about 160° when I could see the thermostat open up via the gauge. However, the manifolds were still too hot to the touch and steam began to come out the exhaust after a few minutes. The temperature gauge never showed overheating, so I believe I need to pull the risers and search for clogs/rust.
 

Attachments

  • 20230502_202518.mp4
    35.3 MB · Views: 0

eggs712

Petty Officer 1st Class
Joined
May 8, 2012
Messages
348
I also began replacing the old plastic thru-hulls with 316 stainless ones (all above the water line) after getting stung by a yellow jacket making a nest inside a broken thru-hull.
20230502_204053.jpg

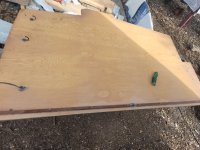
I also replaced the forward bilge pump and float switch, then test fit the hatch over it. I'll use neodymium magnets epoxied into the wood instead of a hinge. The hatch has an 1/8" wobble corner to corner, so I can cheat out some of the magnets like a shim to fix that.
20230501_205452.jpg
 

eggs712

Petty Officer 1st Class
Joined
May 8, 2012
Messages
348
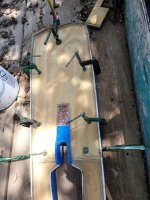
I also began fixing the bow pulpit
20230429_164339.jpg

20230429_170406.jpg

I cut out the inner skin with a cutoff wheel and die grinder in the corners
20230502_134318.jpg

I began fixing the badly cracked spots by glassing back to original thickness on the inside
20230502_170728.jpg

20230502_170723.jpg

Then I glued two layers of 1/2" ply into the part with PL Premium.
20230502_190744.jpg

20230502_194532.jpg
 

eggs712

Petty Officer 1st Class
Joined
May 8, 2012
Messages
348
I cleaned out the thermostat housing with lots of flaky rust, raw water hoses, and pulled both risers. I managed to poke a hole through one riser while cleaning rust, so it's time to replace both risers. The manifolds weren't bad at all thankfully.
 

Drivewayboater2

Petty Officer 1st Class
Joined
Aug 21, 2019
Messages
337
Looking good! Just finishing up my pulpit as well. Is there a nav light that goes on it?
Where did you procure the 316 Stainless through hull fittings?
 

eggs712

Petty Officer 1st Class
Joined
May 8, 2012
Messages
348
Looking good! Just finishing up my pulpit as well. Is there a nav light that goes on it?
Where did you procure the 316 Stainless through hull fittings?
Mine has a remote spotlight on the pulpit. It works, but the dash switches for it are toast. The port and starboard lights are midship on each side.

I had to get the through hull fittings on Amazon, I haven't seen any locally
 

eggs712

Petty Officer 1st Class
Joined
May 8, 2012
Messages
348
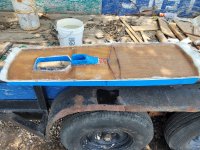
I decided to beef up my bow pulpit since it's such a large cantilever. I added 1/2" plywood as far up as it would fill, used a layer of CSM and 1708 over the whole thing, then started adding layers of 1708 to the part of the pulpit that rests of the boat. I ran out of resin before I could finish
20230503_133324.jpg

20230505_131502.jpg

I also peeled off the wallpaper of the main head/cabin wall and began painting it with Rustoleum and added hardener.
20230505_101034.jpg

20230505_133517.jpg
 

Maggers

Recruit
Joined
Jul 30, 2023
Messages
2
I had to create an account just to follow and let you know of my situation. Last year my friend and I bought a 2750 Bayliner Ciera from 1986. We are 22 years right now, and have absolutely 0 boating experience. Luckily we have great people around us willing to help, and I love doing research like this. I’ve learned how to weld/fabricate and built a car myself just with the help of YouTube!

This project has been on stand-by since we purchased it tho. Needs a full resto in the interior, but the engine was rebuild and stores inside ever since, so there is at least some positives..

Anyway, to keep it short, i just wanna say that you for inspiring and motivating me to continue this hard ass project. 1 question. Do you have a site that offers lots of spare parts like the acryllic window you purchased? I am from Europe, but i do not mind spending the extra Buck, to get the proper American parts that was made for the boat.

Thanks in advance, and you have gained another follower/supporter of your amazing work!57953212-B527-4AEC-A2B4-684D0EDB6D25.jpeg
 

eggs712

Petty Officer 1st Class
Joined
May 8, 2012
Messages
348
I had to create an account just to follow and let you know of my situation. Last year my friend and I bought a 2750 Bayliner Ciera from 1986. We are 22 years right now, and have absolutely 0 boating experience. Luckily we have great people around us willing to help, and I love doing research like this. I’ve learned how to weld/fabricate and built a car myself just with the help of YouTube!

This project has been on stand-by since we purchased it tho. Needs a full resto in the interior, but the engine was rebuild and stores inside ever since, so there is at least some positives..

Anyway, to keep it short, i just wanna say that you for inspiring and motivating me to continue this hard ass project. 1 question. Do you have a site that offers lots of spare parts like the acryllic window you purchased? I am from Europe, but i do not mind spending the extra Buck, to get the proper American parts that was made for the boat.

Thanks in advance, and you have gained another follower/supporter of your amazing work!View attachment 386168
I'm glad you could find this thread motivating! Getting to use a restored boat is extremely rewarding, I just try to keep some forward progress going whenever possible. Spare parts are rare to come by. You could look at boat graveyards and ebay for some stuff, but you likely won't find anything for your specific boat without luck.
Acrylic sheets are pretty cheap and easy to cut with woodworking tools, so I just bought a sheet and used the old window as a template.
 

Maggers

Recruit
Joined
Jul 30, 2023
Messages
2
I'm glad you could find this thread motivating! Getting to use a restored boat is extremely rewarding, I just try to keep some forward progress going whenever possible. Spare parts are rare to come by. You could look at boat graveyards and ebay for some stuff, but you likely won't find anything for your specific boat without luck.
Acrylic sheets are pretty cheap and easy to cut with woodworking tools, so I just bought a sheet and used the old window as a template.
Appreciate you a lot. Will for sure spend hours on this Forum Reading up on everything. Especially glassing, as i believe that will be the most challenging part for me.

Hoping my fabricating skills will come in handy. I Wish you the best of luck with your resto, and I am looking forward to more updates.
 

garbageguy

Lieutenant Commander
Joined
May 8, 2012
Messages
1,582
Following this thread since its start, nice work, updates and pics! - and now it re-inspires and re-motivates me to keep working on (mostly O&M for now) on our 1998 25 ft Wellcraft. It was well-used and cared for, but nothing lasts forever. Looking forward to Maggers progress too
 

eggs712

Petty Officer 1st Class
Joined
May 8, 2012
Messages
348
It's been 100+° weather every day here this summer, so working inside the boat cabin is nearly unbearable. I've done a little here and there though:
-Remote aimable spotlight now works with new switches and an LED replacement bulb. I managed to use two momentary switches instead of forking out stupid money for a new joystick switch.
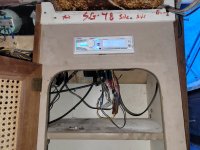
-I replaced the bad stereo head unit and speakers. The head is a cheap Boss unit and may not last many seasons, but it's a good bundle deal for the speakers.
20230611_190824.jpg

-The old two-tone trumpet horn had some broken/UV rotted plastic, so I replaced it with a new stainless steel unit.
-The forward folding anchor/masthead light was missing, so I replaced it as well.
20230806_173711.jpg
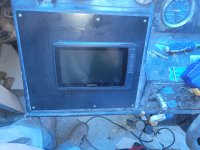
I flush-mounted my fishfinder, replacing the plastic board with painted aluminum.
20230611_135543.jpg
(The camera flash really made some micro scratches and finger smudges on the paint pop, it looks nicer in person)

I've started ordering new bow rail fittings to replace the cracking zinc ones with 316 stainless.
 

1975oday22

Chief Petty Officer
Joined
Sep 2, 2022
Messages
598
It's been 100+° weather every day here this summer, so working inside the boat cabin is nearly unbearable. I've done a little here and there though:
-Remote aimable spotlight now works with new switches and an LED replacement bulb. I managed to use two momentary switches instead of forking out stupid money for a new joystick switch.
-I replaced the bad stereo head unit and speakers. The head is a cheap Boss unit and may not last many seasons, but it's a good bundle deal for the speakers.
View attachment 386998

-The old two-tone trumpet horn had some broken/UV rotted plastic, so I replaced it with a new stainless steel unit.
-The forward folding anchor/masthead light was missing, so I replaced it as well.
View attachment 386999
I flush-mounted my fishfinder, replacing the plastic board with painted aluminum.
View attachment 387000
(The camera flash really made some micro scratches and finger smudges on the paint pop, it looks nicer in person)

I've started ordering new bow rail fittings to replace the cracking zinc ones with 316 stainless.
you took my idea did ya.....lol glad to see another fishfinder flush mounted..... your horns are nice btw. I am adding full blown airhorns to mine. keep up the great work and cheers.... when are you splashing?
 
Top