1984 Starcraft 16ft Glutton for Punishment [Splashed July 2019]

Status
Not open for further replies.

66Holiday924

Chief Petty Officer
Joined
Aug 21, 2017
Messages
584
I am going to replace my transom in the Spring. As of right now I am planning on using through bolts with SS washers and nyloc nuts. I am going to use Tef-Gel on my through bolts to help eliminate corrosion caused by contact between the SS bolts and the Aluminum skin. Additionally I am considering Nylon washers on the outside of the boat (where the washers butt up against the aluminum). And I am sealing everything with 5200 (which will be an added layer to the Tef-Gel). I'm leaning toward removing the bracket that the transom rests on, which is riveted, on my boat. If I do that, I will rivet it back on.
 
Last edited:

SHSU

Lieutenant Junior+Starmada Splash Of The Year 2019
Joined
Mar 8, 2017
Messages
1,749
Thanks all, that answers my question then. With all the hack jobs the previous owner did, wasn't sure if the bolts that I had through the transom were another one of his "Fixes". Sounds like I replaced the right rivets and now its just the bolts for the transom.

On a side note, Houston shut down because it went below freezing.... So I have been looking at different options on how to do some things. Have to keep reminding myself KISS (Keep It Simple STUPID!!!!)
 

Watermann

Starmada Splash of the Year 2014
Joined
Jan 12, 2013
Messages
13,804
You don't have to go all overboard worrying about the SS and AL and you don't need washers on the outside against the transom AL, just inside against the wood. 5200 is perfect, it will seal and be enough of a barrier.
 

SHSU

Lieutenant Junior+Starmada Splash Of The Year 2019
Joined
Mar 8, 2017
Messages
1,749
You don't have to go all overboard worrying about the SS and AL and you don't need washers on the outside against the transom AL, just inside against the wood. 5200 is perfect, it will seal and be enough of a barrier.

Thanks WM. Thats what I needed to hear.

On another note, me "researching" again. What about a galvanic corrosion system? See where people people put stainless steel bolts through the transom so they can attach a zinc anode on the exterior as as the sacrificial metal. Anyone have any thoughts on this? I do plan to run in lakes and Galveston Bay (Gulf of Mexico)
 

Watermann

Starmada Splash of the Year 2014
Joined
Jan 12, 2013
Messages
13,804
The anode on the motor (tab) should take care of that. Just be sure that you don't paint the anode and that it's clean where it attaches. Your trailering the boat and not leaving it moored will take some of the worry away, just be sure to rinse / flush with fresh water afterwards.
 

66Holiday924

Chief Petty Officer
Joined
Aug 21, 2017
Messages
584
I'm thinking about doing the nylon washers on the outside because the head of the bolts might tear up the paint that creates a barrier between the metals. I don't know if this whole galvanic corrosion thing is completely blown out of proportion or not. I know people worry about it. I don't know if it takes decades for corrosion to form, or a few years. I don't know much about it, other than it worries a lot of people, so it worries me. I don't think the Nylon washers hurt anything, and they cost nothing.
 

SHSU

Lieutenant Junior+Starmada Splash Of The Year 2019
Joined
Mar 8, 2017
Messages
1,749
The paint I am not so worried about and you will still have contact where you put the bolt through. I am still not a 100% confident in my understanding of what causes the degradation of the metals. All I know for sure is that zinc is for salt water and magnesium is for freshwater. They are lower then aluminum and will degrade first, but how to prevent the degradation I am not sure. Do I need to run a wire from all my stainless steel hardware to the anodes or will the contact that is already there be sufficient... I don't know. Like WM says since she will be a trailer queen a good flushing of freshwater will do a lot to help it, and researching I found that removing the power (Both Positive and Negative) wires will help electron bleed off into the hull when I am not on the water. Hoping someone with better understanding then I can help point me or tell me I am on the right track.
 

66Holiday924

Chief Petty Officer
Joined
Aug 21, 2017
Messages
584
The 5200 should take care of the point where the bolts pass through the aluminum skin. I'm going to use a product called Tef-Gel in addition, which is specifically designed for that application. My plan is to use the Tef-Gel, Nylon Washer and seal with 5200. I think the paint will suffice where the bolt heads are, as long as they don't disturb the paint during installation. I think it was Watermann that gave me the advice to hold the bolts still with a screwdriver and tighten the nuts down, which I will do, but in the event that the bolt head turns a little or is over tightened (disturbing the paint barrier), during installation, I'm gonna have the nylon washer barrier. The nylon washers are probably overkill, but they cost nothing... These are just my thoughts on it. When in doubt, over-engineer it!
 
Last edited:
BWR1953

Admiral
Joined
Jan 23, 2009
Messages
6,235
It's best not to overthink the situation.

It's a trailered boat so it just isn't going to run into galvanic corrosion issues which afflict boats that sit full time in saltwater. I'd just be sure to use enough 5200 in the through holes to reduce or even eliminate contact as much as possible, then I'd get on with my life. The nylon washers could help with the paint but either way is good enough for a trailer queen.

I had a 1985 Bass Tracker TX-17 that I used in both fresh and seriously brackish water. It even SANK in the brackish water one time, thanks to my uncle. :eek: :rolleyes:

I did give it a good washing after that event. :cool:

Never even washed the outside after regular use in the saltwater. Never disconnected the batteries. In the 8 years that I owned that boat, it never had any sign of galvanic corrosion. Nothing.

Too much research with too much time on your hands can make ya crazy. I know from personal experience. BTDT. :crazy: :lol:
 

jbcurt00

Moderator
Staff member
Joined
Oct 25, 2011
Messages
25,070
I used SS washers w all the thru bolts on the transom, no need for added nylon washers too.

Paralysis by analysis comes up fairly often.

Lots of info w the internet. Have to decide for yourself what to do and what not too.

I wouldnt connect any wiring fasteners, even in an attempt to ground them. Overkill, and IMO, more likely to cause problems rather then prevent them long term.

Stray current at a marina slip is also a problem no matter what efforts you go to on your boat, slip or dock electrical.
 

Watermann

Starmada Splash of the Year 2014
Joined
Jan 12, 2013
Messages
13,804
My Mercruiser has a complete anti electrolysis system on it like you're saying with every piece of the assembly having a conductor between them and the wires are all braided SS with SS fasteners. GASP! :lol:

Every bolt in your outboard is SS screwed into the AL castings with nothing to isolate them. The bolts going through your transom to hold the OB on are... hold on... GASP!!! SS with nothing but 5200!!!

My problem with nylon washers is them failing, cracking, degrading in the sun, then you have a leak.

Having a washer on the outside period creates just one more surface that has to be sealed, making double the contact surfaces for every washer put on and they are not needed against the AL on the outside only the softer wood on the inside. You don't have to crank them down that tight to grind into the paint and as said you hold the head still while tightening the nyloc nut on the inside so you don't spin out the 5200.

Relax and have fun while doing it right is the main thing when working on these fine old boats. ;)
 

Decker83

Commander
Joined
Apr 5, 2011
Messages
2,593
I agree with jb,wm and bwr. I just used the SS bolts, SS flat washers behind the nylock nuts with a whole lot of 5200. I also use mineral sprits to clean the 5200 mess up. A good rag soaked with it will clean up everything for you really easy..
 

SHSU

Lieutenant Junior+Starmada Splash Of The Year 2019
Joined
Mar 8, 2017
Messages
1,749
Thanks Guys,
You are right, I am over thinking this. :D As WM said before just have the anode on the motor and call it a day. The internet is great, but as ya'll pointed out, its easy to get caught up in it all. I will leave it alone and just continue to enjoy the process.
 

66Holiday924

Chief Petty Officer
Joined
Aug 21, 2017
Messages
584
You all talked me out of using the nylon washers on my transom too. There's just not enough information about it out there. I know you guys do good work and I'm going with your wisdom on this.
 

SHSU

Lieutenant Junior+Starmada Splash Of The Year 2019
Joined
Mar 8, 2017
Messages
1,749
You all talked me out of using the nylon washers on my transom too. There's just not enough information about it out there. I know you guys do good work and I'm going with your wisdom on this.

I can tell you, if these guys make a recommendation you always listen. If you deviate from it, always do your own due diligence, but 99.9% of the time they are spot on. Generally we get into trouble when we try to take shortcuts or cut a corner to save a couple dollars instead of listening to their wisdom.
 

SHSU

Lieutenant Junior+Starmada Splash Of The Year 2019
Joined
Mar 8, 2017
Messages
1,749
Got some more work time on the boat this weekend.

1st Photo:
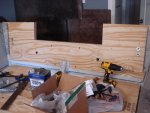
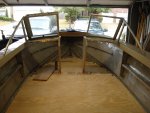
Dry fitting of the transom with holes drilled and a couple bolts installed. Really firms up the boat when its in place

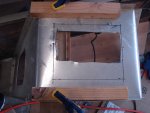
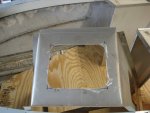
2nd/3rd Photo: I am guessing the previous owner either lost something he couldn't get or just wanted an extra access port to get under the front seat. You can see his poor attempt at cutting. I cleaned it up to match the two that the ODM cut on the sides

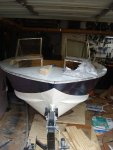
4th/5th Photo: Dry fitting the gunnel and windows to remember how/where things go back together. Really starting to take shape. Felt good to finally see it starting to look like a boat again. Then I took it all back apart....

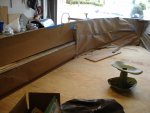
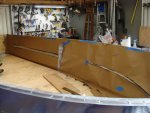
6th/7th Photo: Going to be putting Nautolex Vinyl along the sides. So I used my Contractor Paper to make a template/see how it would fit. Glad I did, because how it lined up surprised me a little and would have made me very nervous if I was doing it with the vinyl. Now I have a visual/idea how it will lay and I can work with that. Won't be installing the side vinyl until I get the gas tank finished and installed. Don't want to damage it by taking the flooring in and out.

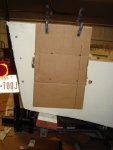
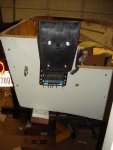
8th/9th Photo: Created a template and drilled holes to mount the Panther 55-0020 kicker bracket I picked up. Went pretty easy once the Admiral helped me figure out the proper height.

So with the dry fitting, figured out the seat posts we got when Gander Mountain was going out of business are way to high. Going to have to get some more, but for the price we paid, can't argue with it and might look to sell them on Fbay/Craigslist, but with that said....

Question:
Should I reinforce the flooring under where the seat bracket will be installed? I have the Tapper Lock base (Photo 10)
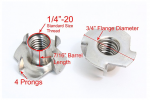
I read somewhere to use t nuts, I noticed their are a couple different varieties. Are these the correct ones people suggest (Photo 11)?
 

Attachments

  • photo283927.jpg
    photo283927.jpg
    1.3 MB · Views: 10
  • photo283928.jpg
    photo283928.jpg
    1 MB · Views: 9
  • photo283929.jpg
    photo283929.jpg
    1,007 KB · Views: 9
  • photo283930.jpg
    photo283930.jpg
    1.6 MB · Views: 12
  • photo283931.jpg
    photo283931.jpg
    1.1 MB · Views: 14
  • photo283932.jpg
    photo283932.jpg
    918.4 KB · Views: 14
  • photo283933.jpg
    photo283933.jpg
    1.2 MB · Views: 12
  • photo283934.jpg
    photo283934.jpg
    1.3 MB · Views: 10
  • photo283935.jpg
    photo283935.jpg
    1.6 MB · Views: 9
  • photo283936.png
    photo283936.png
    111 KB · Views: 10
  • photo283937.png
    photo283937.png
    281.7 KB · Views: 11

Watermann

Starmada Splash of the Year 2014
Joined
Jan 12, 2013
Messages
13,804
Looking good, nice progress! Yeah those are the right T nuts, on the underside of the decking I added a 3/4" backer piece of ply. Pre install the nuts using titebond glue or 5200 to keep them in place after tapping them in.
 

SHSU

Lieutenant Junior+Starmada Splash Of The Year 2019
Joined
Mar 8, 2017
Messages
1,749
Thanks WM, feels good to be making progress. Hope to splash by summer

Anyone have any thoughts on using a rubber pad between motor mount and the hull? See where people say it helps reduce vibration and seems to last longer then the cutting board option. Looking to install it between the outboard bracket and the hull as well as the kicker mount.
 

Watermann

Starmada Splash of the Year 2014
Joined
Jan 12, 2013
Messages
13,804
I wouldn't put anything between the motor and the transom that will deteriorate and or compress especially rubber which will/can tear. I had 2 holes to cover up on my SS transom that were non BIA standard and some minor pitting from the wood so I made up a replacement plate of .100 AL to replace wood pad.
 

SHSU

Lieutenant Junior+Starmada Splash Of The Year 2019
Joined
Mar 8, 2017
Messages
1,749
So no rubber, what about a sheet of UHMW? I ask, because the Kicker Bracket comes with Carriage bolt that extend past the bracket and would tear into the skin of the hull when tightened down. Should I allow this to happen and just 5200 to seal and not worry about it?
 
Status
Not open for further replies.
Top