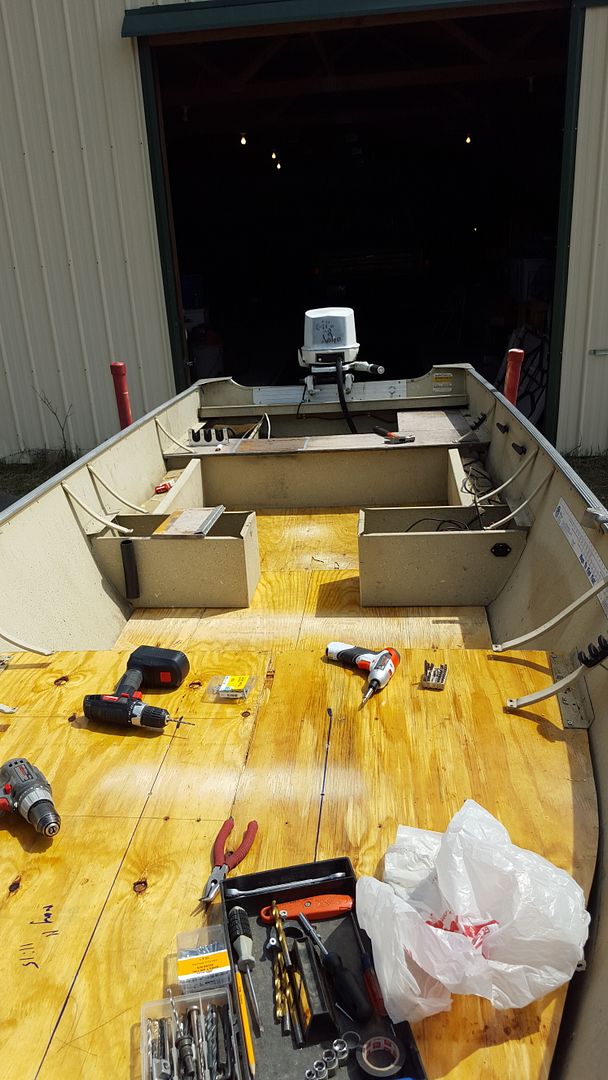
1984 16 foot Lund... Utility restoration

Frey0357

Petty Officer 1st Class
Joined
Mar 13, 2014
Messages
313
When I was removing the flooring in my boat it was very fast and efficient to simply drill the heads off of the rivets holding my flooring in and then snip off the remaining body of the rivets. This might be easier and faster than grinding.....just a thought

Ya know another trick I used was to cut the flooring in half to make it easier to handle, still can use it later for a template. I set the depth carefully on my circular saw and went to town.....that might help???

Frey
 
Last edited:
Joined
May 12, 2013
Messages
62
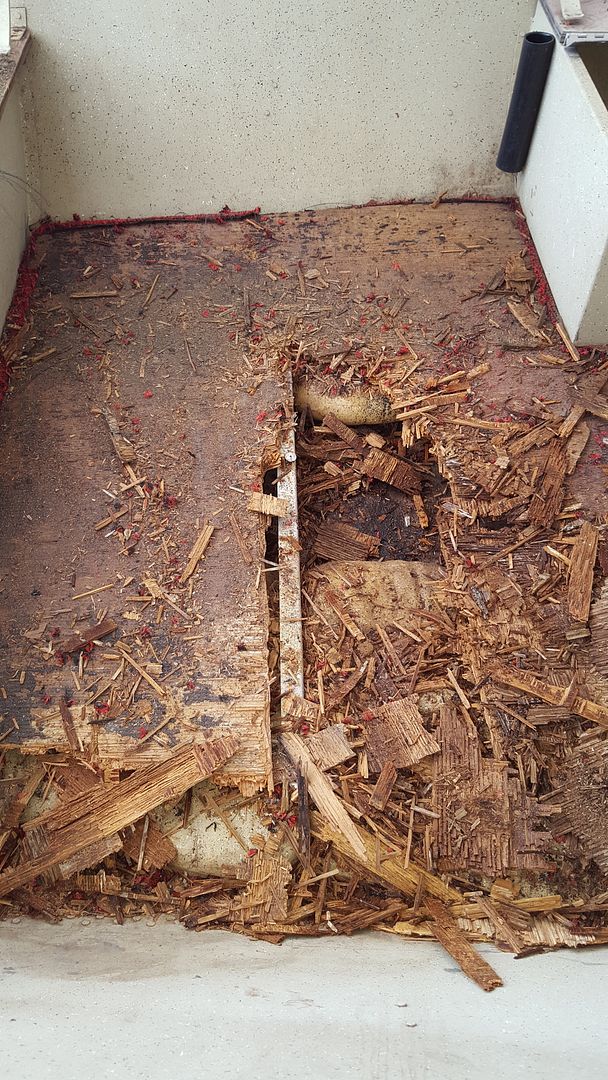
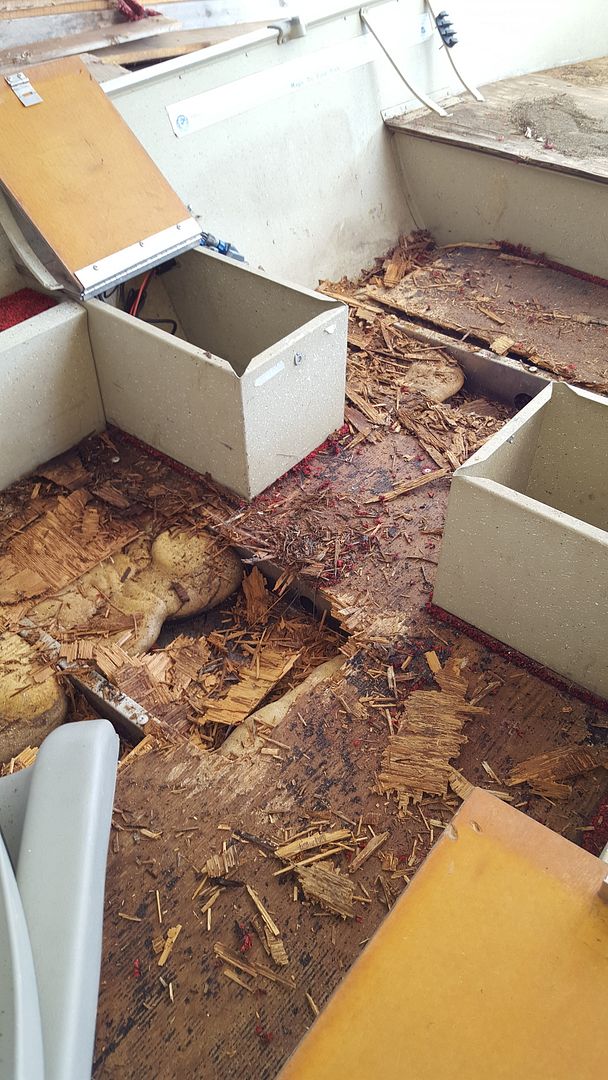
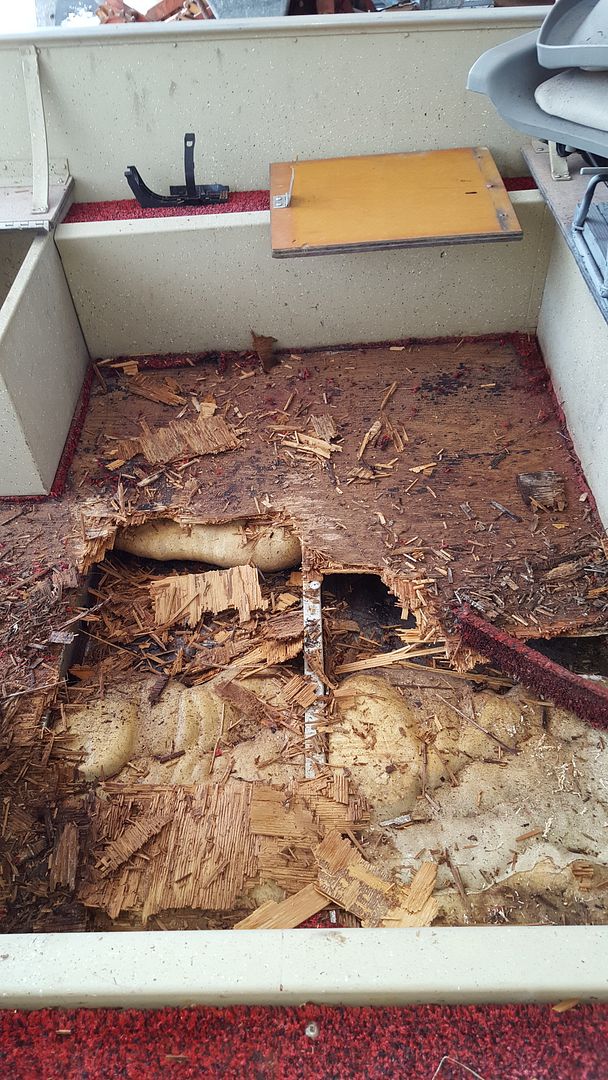
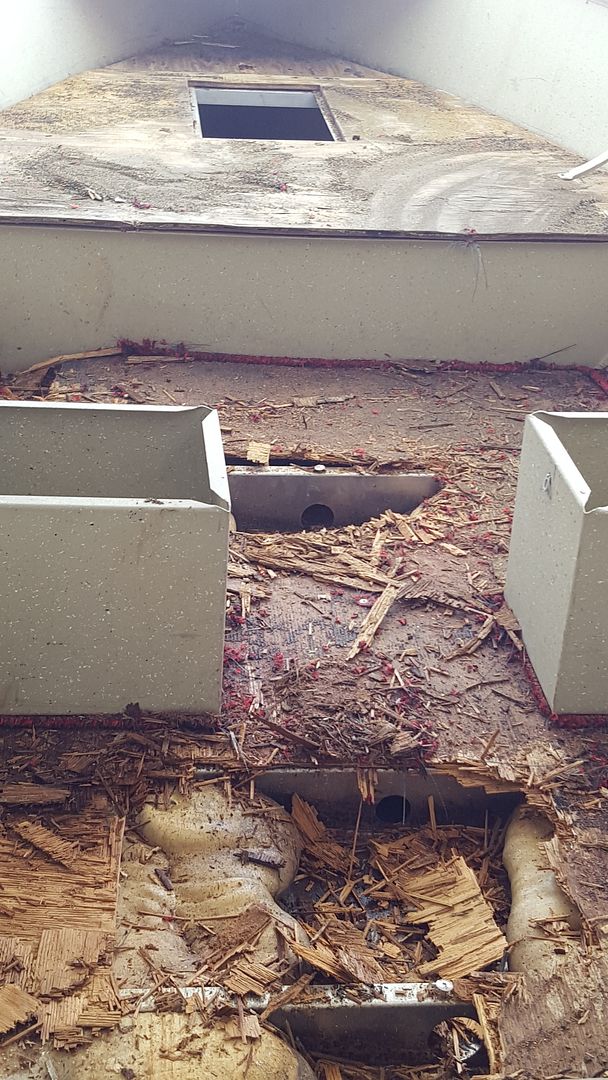
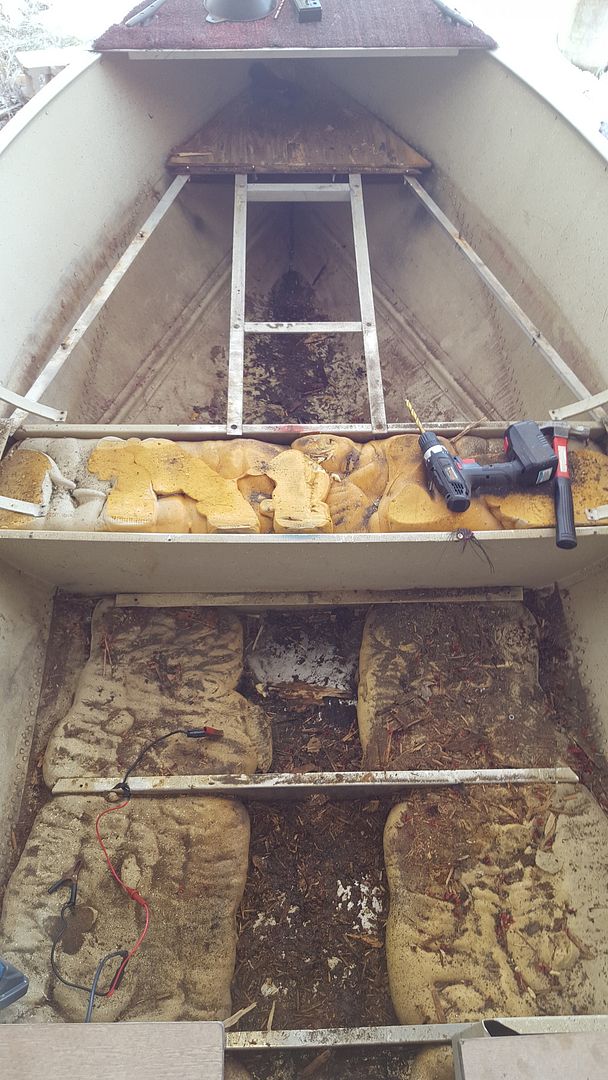
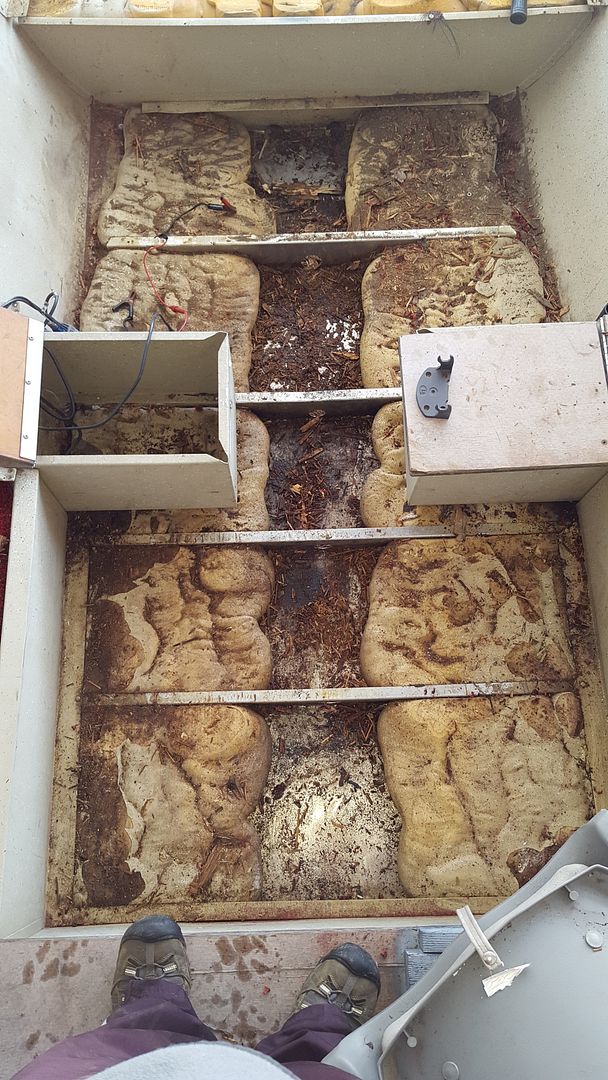
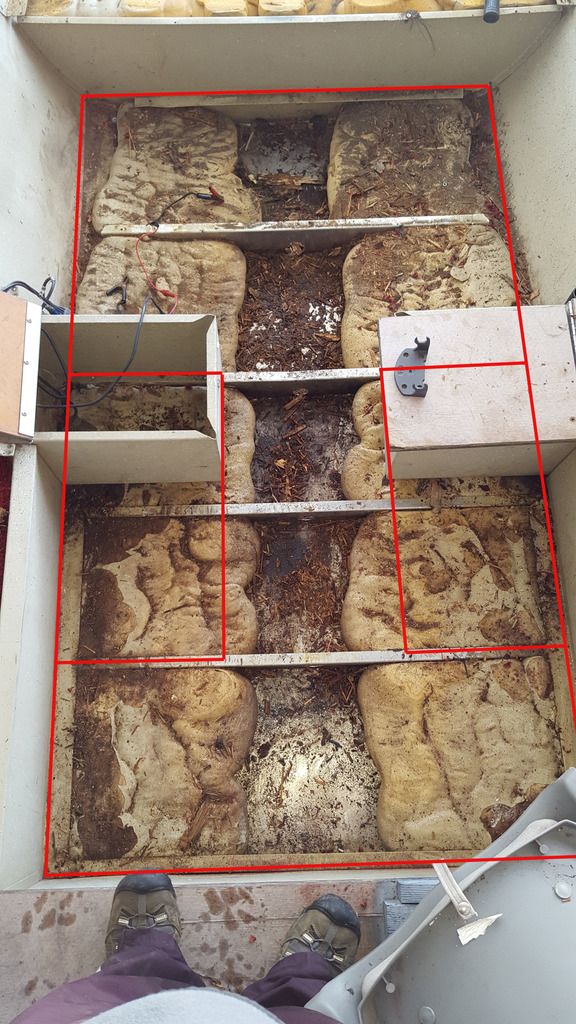
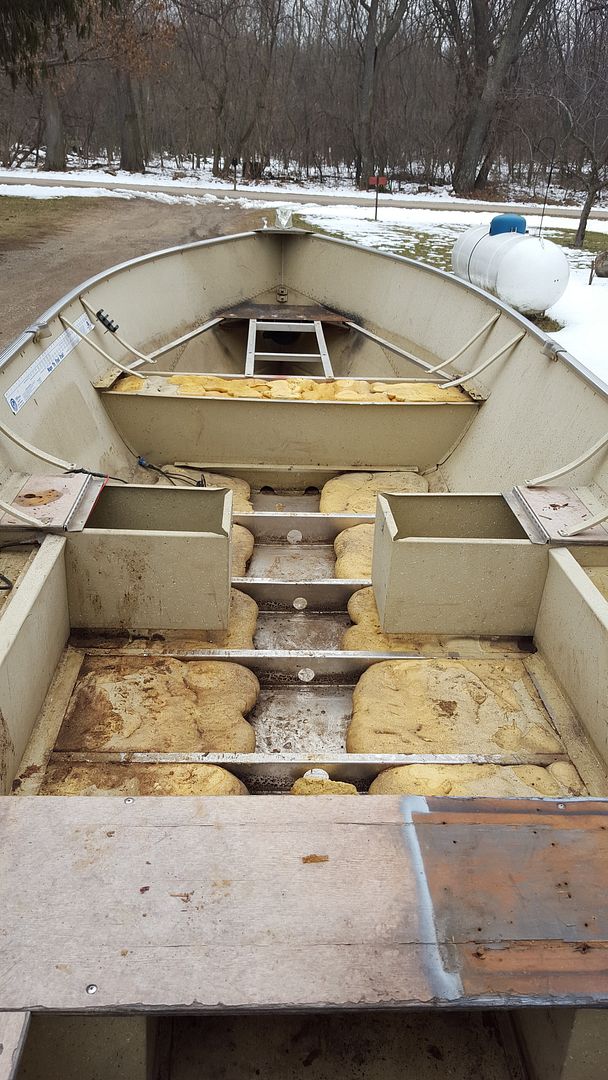
Well....These are places that I've stepped through......I got the carpet up a little while ago. I'm going to drill the large rivet's out this afternoon. This must have been the original flooring....So all in all....While it looks like a big mess. It'll clean up nicely. I expected having to measure for the new floor and that's exactly what I'll have to do. There's not much left for a template. After further inspection....It looks as if I may be able to apply the new floor in two pieces from the keel out.
Here are some pictures I've taken of the mess.....

Tell me what you think.....


Last edited:
Frey0357

Petty Officer 1st Class
Joined
Mar 13, 2014
Messages
313
FGuy,
Looks like a mess, but not unlike the one that I had with my vessel. My floor came out in pieces too, some of the time. To my surprise my foam was waterlogged! It is very hard to tell, but it is my recommendation that you check yours carefully, and do so all the way to the bottom of the foam block! You cant look at the top half. I probably removed 100 or more pounds of water soaked foam from my boat, check yours carefully!

Other than that, just measure carefully place the wood in after sealing it well and you will be on your way!

Frey
 
Joined
May 12, 2013
Messages
62
well... I wanted to remove it all in one piece. That's why I started taking the storage/seating box's off. I'm still thinking about doing that, but the carpeted box down the side is spot welded to the seating box. I don't think it's structural and I can weld aluminum but I don't want it to be that big of a project yet. looks like I'm going to have to do the floor in 3 pieces. I would have liked it to be seamless though.
some thought still needs to go into replacing this floor.
 
Joined
May 12, 2013
Messages
62
P.O. Had this rigged up at the bow.....It's aluminum, but it's being held together with stainless nuts and bolts. I'll see what supplies I have
and try to weld it all up.


^^^^^^^^This was the next evolution....Casting deck.^^^^^^^^^


More tear down that needs cleaning up......Tomorrow!!!

I'll break the shop-vac out tomorrow and post photos after the clean-up...My woman is ticked off right now....Guess I'm cutting it a little close. Puppies have an appointment at the Vets office in an hour and I'm covered...Head to Foot in boat dust and pigeon crap.

Later....
 

bonz_d

Vice Admiral
Joined
Apr 22, 2008
Messages
5,276
Indeed that looks like the S14only longer. I did basically the same thing in the bow of my S14 only instead of a hatch I hinged the deck at the forward seat. It is very solid and provides complete access and moved the 6 gal fuel tank up front. Or in this case could move a battery up there for a bow mount tolling motor.

Again I used 5/8" BCX plywood sealed with the "Old Timers Formula" and it's been performing very well. There is no bounce in the decking of my old one.
 

bonz_d

Vice Admiral
Joined
Apr 22, 2008
Messages
5,276
well... I wanted to remove it all in one piece. That's why I started taking the storage/seating box's off. I'm still thinking about doing that, but the carpeted box down the side is spot welded to the seating box. I don't think it's structural and I can weld aluminum but I don't want it to be that big of a project yet. looks like I'm going to have to do the floor in 3 pieces. I would have liked it to be seamless though.
some thought still needs to go into replacing this floor.

Missed this one. There seems to be more space in there than my S14, you may be able to do that in 2 pieces and still slide it under the seat boxes. When I did mine I left a small gap around the perimeter , fastened the plywood and then applied the carpet with Roberts carpet and tile cement from HD. I cut the edges of the carpet about 3/4" wider than the deck and then buttered up the ends and worked it down into the gap with a stiff putty knife. Going on 6 years ago and it's not lifting anywhere. Also as I was laying out the carpet I was rolling it out with a rolling pin with all my 185# on it.
 
Joined
May 12, 2013
Messages
62
This is my flooring idea for the boat......I've purchased a 19'x6' roll of marine grade carpeting (charcoal colored) from Fleet Farm for $.36 a square ft. I bought quite a bit extra because I want some for use later down the road....We'll see how it goes though. I measured the old plywood thickness...1/2" is what I got...Do you think I should bump up to 5/8 Bonz_d?.....How much weight will it add vs rigidity do you think. By the way....One of the foam pourings slipped out while I was kneeling on it. It still feels light as a feather.
Need to go buy some wood today or tomorrow and some carpet fastening materials. I still need to vacuum the boat out really well and get things all spic and span down below. I can't tell you how much fun I have doing this stuff. I just lose all track of time.
I've been tasked out today....So not much is going to get done in the boat. Tomorrow is all mine though....
Ummm!!!....As far as I know.
Let me know what you think of this flooring idea.

You know what?.....Now that I think of it. I may be able to make this a removable floor. So I would need to carpet the floor inserts first.


fishin98

Chief Petty Officer
Joined
Nov 28, 2009
Messages
521
I used stainless steel screws with collars to put my boat back together, floor,seats, everything, the old floor in my Alumacraft was 1/2", so I went with 19/32 BCX.
 

bonz_d

Vice Admiral
Joined
Apr 22, 2008
Messages
5,276
Looking good. 1/2" or 5/8", your call. I used 5/8". It's only slightly heavier but a whole lot firmer.
Next you do it the way you see best works for you. If you can figure a way to make it removable then do it. I for one will pay attention. If you looked at the Sea Nymph I'm doing now the plywood in that is not fastened down and I've used it that way all season last year. I'm even thinking of adding a strap made from an old winch strap to use as a pull to help lift it out. That ply is 5/8" and I've had a 300 lber. walk on it and it's solid.
 

Woodonglass

Supreme Mariner
Joined
Dec 29, 2009
Messages
25,927
This might enlighten you a bit... Looks like about 11lbs per sheet heavier.

PLYWOOD
1/4 inch(22.72 pounds per 4x8 sheet)
3/8 inch(33.92 pounds per 4x8 sheet)
1/2 inch (45.44 pounds per 4x8 sheet)
5/8 inch(56.64 pounds per 4x8 sheet)
3/4 inch (68.16 pounds per 4x8 sheet)
 
Last edited:
Joined
May 12, 2013
Messages
62
Finally got the casting deck off today. Cleaned most of the junk out of the center drain channel. I'm thinking it's going to be easiest for me just to do a 3-piece floor. One of the aluminum Z Channel ribs is cockeyed nearly three-quarters of an inch out of square. It's in an area where I need it to be squared up for an tidy anchoring point and it's not. I won't have anything to fasten to. So I decided on a 3-piece floor. If I snug everything up nice and tight. you'll hardly be able to see the seems.

 
Last edited:
Joined
May 12, 2013
Messages
62
Hey Bonz_d?
I have a question or make it several. When you laid your carpet how much gap did you leave on the edges when you fastened the flooring in?

Also... Did you leave a bead of Mastic on the edges when you tucked the carpeting over the sides?
And finally... Did you tape your wood seems with anything before laying down your carpet?
 

bonz_d

Vice Admiral
Joined
Apr 22, 2008
Messages
5,276
Sure wish I had taken more pictures when I did that. Like fitting the ply and then laying the carpet.

As I recall the seam between the ply and the hull was about just enough to push a 2" putty knife and the carpet in. so maybe 1/8". I actually compressed the pile of the carpet. I sealed the ply with the "Old Timers Formula" and then 3 or 4 coats of straight spar with a coat doing the ends with each coat on both sides, so the ends have 8 coats of spar.

I put the adhesive down with a 1/8" notched trowel, applying it as I went to keep the mess down. Yes I put adhesive all along the ends where it was to be tucked in. No I didn't tape the plywood seam as the adhesive filled that and the butt seam on the center seam was tight w/o any gap. With the carpet down you can't even feel the seam.

I was able to get the carpet down in one pcs. by spreading the sides slightly with a pipe clamp which raised those seat boxes enough that I was able to pull the carpet under then. I also did not apply any adhesive under the boxes because I figured that once the boxes were screwed back down that carpet wasn't going anywhere. I did butter up the ends before I tucked that area down.

Just take your time, think ahead and you will do just fine! Be more than happy to answer any questions as best I can.
 

fishin98

Chief Petty Officer
Joined
Nov 28, 2009
Messages
521
Bonz_d is correct on the 1/8 or less gap. Make sure when you lay your carpeting down that the pile all runs in the same direction, or it will be off color or not look right. Once your glue is down let it set a few minutes then lay your carpeting down. Use a piece of PVC pipe to roll it out the edges. Then when tucking your corners, glue the edges. Be careful not to get any glue onto the carpeting, as it is a @%^%$ to remove.
 
Joined
May 12, 2013
Messages
62
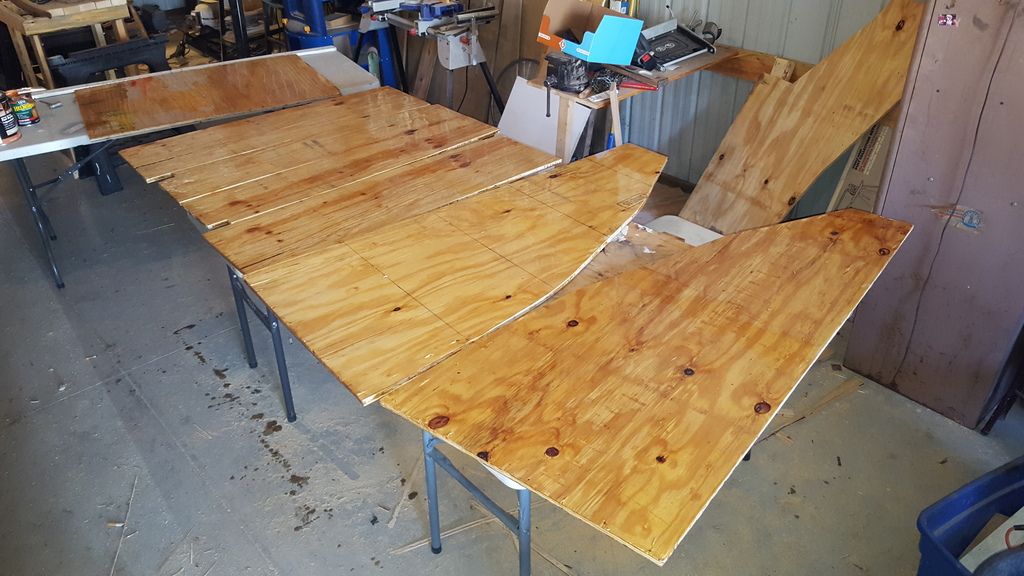
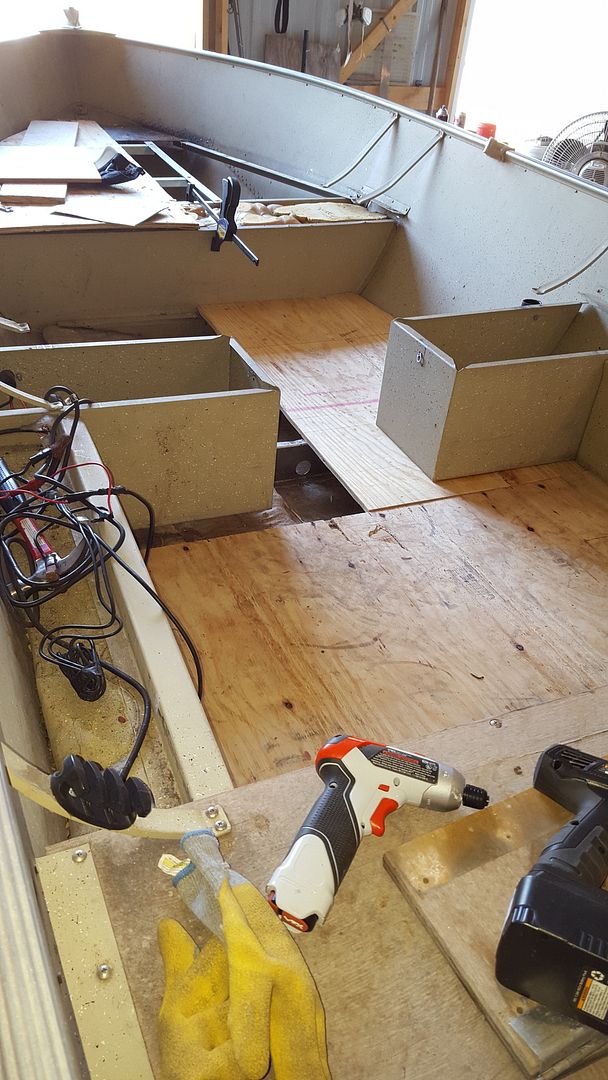
Well....I was able to get into the barn today and get a little work done. I've decided to go with 5/8 BCX for the flooring. 1/2 didn't seem sturdy enough for my weight after looking at it at the store. I'm using some old sheathing I had been saving as storage shelving to make up some templates for the flooring. Those curves towards the bow are a little more compound than I had expected...I figure if I'm going to make mistakes, It'd be better to do it on some scrap wood and then throw it in the done-age pile or burn it later . I'm glad I did....I've gotten all but one of the sections of flooring in the boat now. They all butted up perfectly. Some areas are still a little "Too Snug" (against the walls and storage boxes) so I'll need to shave a couple of areas back in order to get a putty knife in to pack the carpeting in tightly. You can see in the picture where I had to use a clamp to bring the seat box back to true. It was buckled nearly an inch out and I couldn't fit the floor template in otherwise. It seems that every area with foam installed has buckled or bowed those areas leaving bulges which has made measuring a little difficult. Plus....None of the aluminum Z-Channel is square anywhere on this boat. I kept my profiles accurate though. It is looking good so far. I may be able to finish up the flooring template tomorrow. Then just transfer the entire puzzle over to the 5/8 ply.


bonz_d

Vice Admiral
Joined
Apr 22, 2008
Messages
5,276
Looks like that is going to work just fine.

I've found that same issue with the Sea Nymph that I'm working on were nothing is square. That seat box in the bow is also normal, especially when they have been opened previously.
 
Joined
May 12, 2013
Messages
62
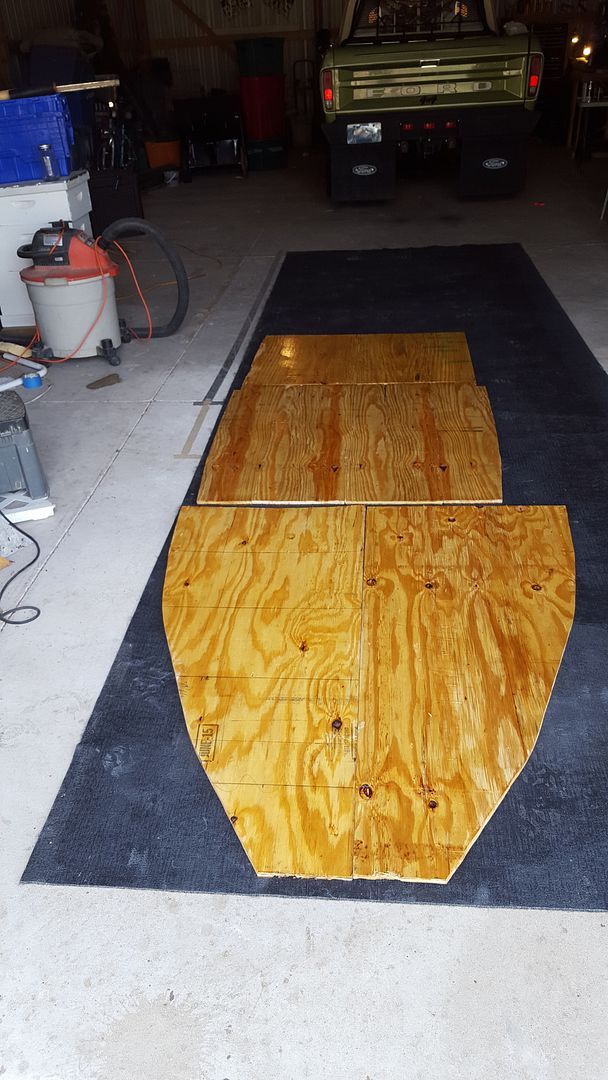
I was able to get some more work done on the Lund this weekend....I threw 4 coats of Polyurethane on the flooring. Both top and bottom....Nice stuff.


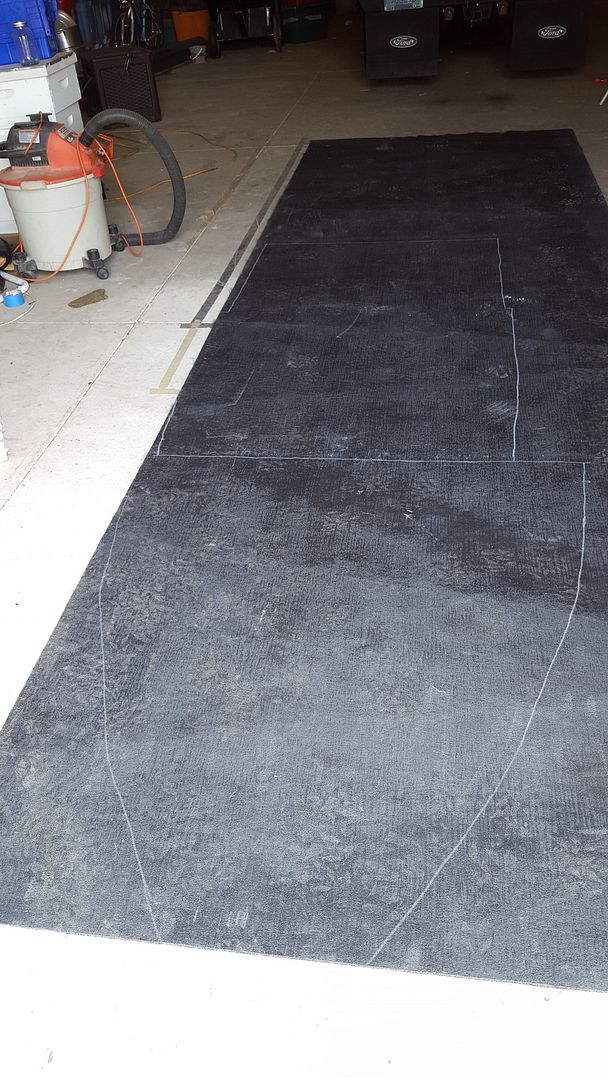
Today I traced the floor profile onto my carpeting and got that all cut as well....It's really starting to look nice.


I got the flooring screwed in using 1 1/4" sheet metal screws....Note to self (next time I'll buy the self tappers"....I ended up having to screw pilot holes for all of the screws.


Capet laying upside down....I traced the flooring profile using the finished plywood as a template.....I left roughly a 1/4 inch of overhang at the edges to tuck.


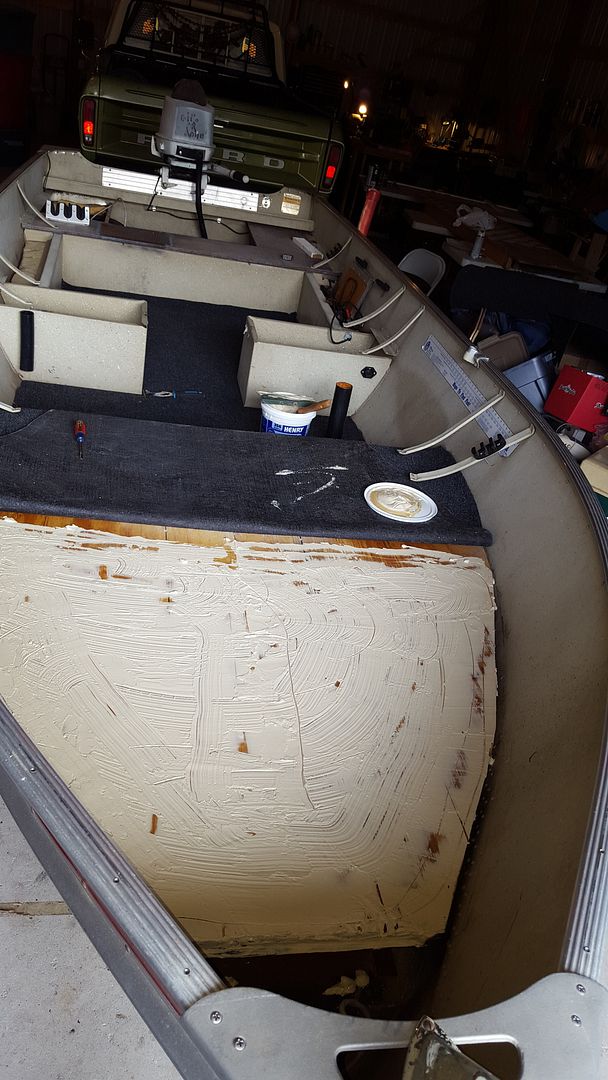
Then finally...I cut and fit the carpeting. It fits just right....I started throwing some Henry's Carpet Adhesive down and I got the casting deck finished today. I forgot to take pictures of the completed casting deck. But I have a few of the carpet adhesive....Nasty stuff.
No!!!....Reallly it's nasty.......I spread the adhesive fairly thick about 2 inches shy of the edges...Then used a makeshift rolling-pin to squeeze the excess out to the edges. I'll need to go back and apply some more adhesive the the edges of the plywood so I can tuck the carpeting around the sides.


Frey0357

Petty Officer 1st Class
Joined
Mar 13, 2014
Messages
313
FGuy, Great Progress! Looks good, how close to the sides of the boat does the flooring go? Does it butt right up or did you leave a small gap? If it goes tight against the sides of the boat, did you seal it with 4200 or something? Just wondering, I'm still planning my flooring and thought I would ask...I need to stop planning and start doing!!!;)

Frey
 
Top