1982 Starcraft Center Console 18' Rebuild

SHSU

Lieutenant Junior+Starmada Splash Of The Year 2019
Joined
Mar 8, 2017
Messages
1,741
I had similar pitting like that in mine. I cleaned it out really good and prepped it for JB Weld. Skimmed it over and sanded smooth as well.

As for the hole, yep a properly sized rivet with 5200 will do the trick.

Also, do you have a couple pop rivets holding your Knee Brace and transom together? If so, might want to think about replacing those with a solid rivet. Pop rivets aren't designed for the forces that can be exerted.

SHSU
 

Mikesta

Petty Officer 3rd Class
Joined
Mar 15, 2018
Messages
86
I had similar pitting like that in mine. I cleaned it out really good and prepped it for JB Weld. Skimmed it over and sanded smooth as well.

As for the hole, yep a properly sized rivet with 5200 will do the trick.

Also, do you have a couple pop rivets holding your Knee Brace and transom together? If so, might want to think about replacing those with a solid rivet. Pop rivets aren't designed for the forces that can be exerted.

SHSU

I’m not really to sure. I haven’t really looked at it good enough yet to see what kind of rivets are holding it together. I plan on taking the knee brace out anyways and putting a drain in behind it so it will be put back together with solids. Also just started reading your resto thread, only a few pages into it so can’t comment on the finish product yet but I’m enjoying learning from it
 

Watermann

Starmada Splash of the Year 2014
Joined
Jan 12, 2013
Messages
13,794
What did starcraft use for the framing? that front deck was definitely rebuild at some point, i can tell just from looking at the "hatch" they had in it.

All aluminum supports is all I've seen used by the factory but I have seen them use a 2x4 as support under fuel tanks so I guess it's possible they used it under there too.
 

Mikesta

Petty Officer 3rd Class
Joined
Mar 15, 2018
Messages
86
It's been slow going the last week or two but I finally got some more work done. Funny how you don't have anything going on until you start a boat restoration project and then all of a sudden you're swamped. Anyways I cleaned up most of the inside and got the majority of the bondo off, some of it though was stuck under the ribs so i think i will be taking those off to get the rest of the bondo out. I don't have any pics of it with the bondo removed. After that i touched up the areas under where the bondo was with the nylon wire wheel, I honestly just kind of skimmed over it because i can get to the rest of it later.

I got the boat off the trailer by myself and had my dad come over to help me flip her over. I couldn't get the bow rails off because the screws are completely seized, i broke 2 philips head bits trying to get them to budge. So those will be getting cut off when the boat it right side up again.

Now the fun stuff.....I blasted all the flex seal off the bottom of the hull with the pressure washer which turned out way easier than I thought, it took about an hour to hit the entire bottom.

Here's the before shot of the bottom with flex seal still on
View attachment 16.jfif

And here is the after, you can see the marks from where the boat sits on the rollers, i'll be switching the trailer to bunks now that the boat is off of it. Also the red stuff I think is more bondo. I don't think its original to the boat but i'm sure one of you can answer that. Its not all over the bottom just mainly along the three supports beam (not sure what they're called) and a few other spots covering up dents i believe
View attachment 17.jfif

A whole bunch more rivet heads popped off from the pressure washing which has me worried about the sturdiness when trying to flip it back over, I don't any good pics of the rivet heads that were blasted off but you can see them in the pics below...the silver spots. You can also see the countless rivet holes that don't even have rivets in them! this is just along the transom, It's a miracle this thing even floated before and it also answers my questions about all the bondo and the flex seal...a poor repair job instead of the correct way to do it
View attachment 14.jfif

View attachment 15.jfif

There's about 3 different types of fasteners holding the knee brace on, which you can see is not the prettiest of areas on the boat, tomorrow I'm hoping to start stripping the remaining paint which should come off pretty easy as that bottom layer of paint is all cracked and wore already so the stripper should cut right through it no problem. Game plan is strip the paint and then flip her back over and start replacing rivets, probably start at the front or back and pull each rib off and clean under them and finish getting the bondo out. At the rate this has been going that will probably take a solid month if not more
 

Mikesta

Petty Officer 3rd Class
Joined
Mar 15, 2018
Messages
86
Also it looks like a lot corrosion in those pictures but its not, its just the way some of the paint came off from pressure washing, I didn't really see any corrosion on the bottom
 

SHSU

Lieutenant Junior+Starmada Splash Of The Year 2019
Joined
Mar 8, 2017
Messages
1,741
I had rivets integrity issues as well. Your's looks very similar. I opted to rerivet the entire boat. I had an admiral that was willing to help and it took us 6 months. Mind you, we had no idea how to rivet and I had to go through several iteration of tools before we became fluent at it. Would I do it again.... I don't know, but I will say that the next restore I do will have a very close inspection of all the rivets (I glanced at them and severely, severely, severely underestimated the integrity). I will say though, Admiral and I are very proud of the boat and all the work we put into it together.

SHSU
 

Mikesta

Petty Officer 3rd Class
Joined
Mar 15, 2018
Messages
86
Started stripping some paint tonight. Turns out that red bondo I was talking about in the previous post was actually a layer of red paint.....there is bondo all over though. I bought "Citrustrip" because it was relatively cheap compared to most other strippers at home depot. I was skeptical but it actually melted right through the top layer of white paint exposing the red and green paint underneath. I think the green was the original paint from the factory but not 100% sure on that...I cant imagine someone would willingly paint their boat that color. I only hit the easy to reach places tonight so I could test out the citrustrip to see if I worked before I put the effort in to get the hard to reach places.

Followed the directions and used a paint brush to paint it on and then let it sit for a while. Went out after dinner with the power washer and it blasted the majority of the white paint off no problem and only took me 5 minutes or so to do. Power washing the paint stripper off will definitely be how I do the rest.

Here's the before stripper pics

View attachment 17.jfif

And here is the after, you can see I only did up each side and across the transom....like I said, the easy to reach places
View attachment 18.jfif

Not to bad for all of 15-20 minutes worth of work

Question for you guys.....I'm thinking about leaving the blue and white paint on the gunnels alone because its still adhered VERY well to the boat and not cracked at all like the bottom. If i just take a wire wheel to the areas where I will be installing new rivets an then kind of sand it smooth do you think it would be ok to paint over? I'm not sure what kind of paint the blue paint is but it's definitely quality paint
 

Mikesta

Petty Officer 3rd Class
Joined
Mar 15, 2018
Messages
86
Did some more stripping and blasting today, here is what she looks like as of right now
View attachment 22.jfif

The stripper definitely works best where it went on thicker but I'm still totally happy with how its working. Ran out just shy of being able to hit the whole bottom.
Some pics below you can see the bondo patches they did over the holes where the rivets popped out, an obnoxiously big philips head screw plugging a rivet and a good size ding from a previous owner hitting something on the main beam that runs down the middle of the boat, not sure what its called.
View attachment 19.jfif

View attachment 21.jfif

View attachment 20.jfif
 

SHSU

Lieutenant Junior+Starmada Splash Of The Year 2019
Joined
Mar 8, 2017
Messages
1,741
I used the Citrius stripper as well, it worked well for what it was inteded. As I knew I was going to be rerivting I opted to just pay a guy to Media Blast the hull. It saved a lot of time/effort, but I didn't have the room or pressure washer you have.

My keel also had similar damage, the OP though looked like he used PT wood for his bunks so it ate through in an area where it just sat. You can create a patch to go over the area or build up with JB Water Weld epoxy sticks. Also looks like you might be able to punch it out if you are removing the keel to rerivet.

SHSU
 

Watermann

Starmada Splash of the Year 2014
Joined
Jan 12, 2013
Messages
13,794
I wonder if that thick layer of off red paint was an ablative bottom paint that should never be used on an AL boat due to it's high copper content which will cause corrosion.

The thing running down the center of the hull bottom is referred to here as a keel strip but more accurately in boat parlance it's the keel strake. :joyous:

On the rivet / good paint question, yeah removing the paint from around the hole and feathering it for repainting is a good idea, especially if you dread stripping well stuck paint as most guys do. ;)
 

Mikesta

Petty Officer 3rd Class
Joined
Mar 15, 2018
Messages
86
I wonder if that thick layer of off red paint was an ablative bottom paint that should never be used on an AL boat due to it's high copper content which will cause corrosion.

The thing running down the center of the hull bottom is referred to here as a keel strip but more accurately in boat parlance it's the keel strake. :joyous:

On the rivet / good paint question, yeah removing the paint from around the hole and feathering it for repainting is a good idea, especially if you dread stripping well stuck paint as most guys do. ;)

Thanks for answering the keel question...I thought it was called a keel but I didn't want to be wrong and look like a dummy :fish:

I don't really dread stripping the good paint off because its so easy to brush the citrus strip on and power wash it off. It takes more time pulling out the power washer and getting it set up than it does to actually remove the paint.

I hit it again tonight and on the flat surfaces I'm mostly down to bare metal, just some patchy red and green spots and then I'm like 50% metal on the keel and the the two other supports on either side of the keel. I did a test section on the white abd blue paint on the gunnels that i thought about leaving, It didn't come off quite as good as the bottom but I also didn't goop it on there to heavy because I didn't want it to run everywhere

There's also not a lot of corrosion on the bottom, if you'd even call it that. I can see where the metal is still factory fresh and shiny and where its just dull. It's not pitted at all like the inside. It reminds me of an old dirt bike I had that had a nice polished aluminum frame until I washed it with straight purple power one day, the frame no longer that nice polished look after that.

I'm absolutely dumbfounded at the amount of rivets that are missing and even more so about how many heads blasted off from power washing because they were corroded. It's got me incredibly nervous about getting her right side up and on the trailer again. I picture a scene out of a cartoon where i'll lift her up and start flipping and then it just falls completely apart in my hands. Told my dad i was going to need a hand with a few rivets....He's not going to be happy when he see how many there are and how long its going to take especially while putting 5200 on each one
 

SHSU

Lieutenant Junior+Starmada Splash Of The Year 2019
Joined
Mar 8, 2017
Messages
1,741
I'm absolutely dumbfounded at the amount of rivets that are missing and even more so about how many heads blasted off from power washing because they were corroded. It's got me incredibly nervous about getting her right side up and on the trailer again. I picture a scene out of a cartoon where i'll lift her up and start flipping and then it just falls completely apart in my hands. Told my dad i was going to need a hand with a few rivets....He's not going to be happy when he see how many there are and how long its going to take especially while putting 5200 on each one

My admiral was the same way....

lol

SHSU
 

Mikesta

Petty Officer 3rd Class
Joined
Mar 15, 2018
Messages
86
Not a whole lot going on this past week, overtime at work should be slowing down some until the snow starts flying so I should be able to get some stuff done to the boat. I did a little bit more stripping, I've mostly just been trying to strip the bottom so I can get flipped back over and start riveting. I can finish stripping the sides once she's right side up. Here is a pic of the bottom currently, heated the bondo up with a torch and it scraped right off, just have to hit a couple spots with some more stripper and she'll be ready for the flip

View attachment 23.jfif

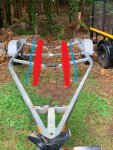
I'm starting to work on the trailer too before I put the boat back on it, I'm trying to switch it from rollers to bunks because the rollers were all seized up. I bought some brackets for the bunks today but I'm not sure if I want to go with 2 bunks or 4 bunks. I think 4 might be hard to align on the boat without hitting and of the rails on the bottom. I think two 2x6 bunks should be plenty and will be a ton more surface contact than the rollers. The red marks I made represent the bunks and the blue marks represent the rails that run down the boat (side keel?) not sure what to call them. If I can squeeze another set of bunks between the fenders and those rails I will but I'll have to wait until the boat is on the trailer to measure. Any input on this would be appreciated

25.jpg
 

Watermann

Starmada Splash of the Year 2014
Joined
Jan 12, 2013
Messages
13,794
Yeah 2 of the 2x6 bunks will be just fine, that's what I have on my new to me galvanized trailer for my 18' SS with 2 keel rollers and it's a pretty heavy boat.

y4mstkzJuZAphkpRPP-gFRgubsHBkRRDTMq4Qvyz7FixBMPuwrdS0TwTOfv53gRhpHyua5GeC5JMNNU5AdTVTeQ6Vk773vI22xjknA5x2g5pYTs9pVu_NeZAtTJFucDfgUo4WBJUVsvpZtpGypqcbzp0xKW2PTCQVtrn0HU-78h8jQQZmt9SjLZYm1OonF5HlyVIAz8x303Bfwclq-P3talHA
 

SHSU

Lieutenant Junior+Starmada Splash Of The Year 2019
Joined
Mar 8, 2017
Messages
1,741
When I did mine, had bunks that were to wide for loading. They worked great storing the boat and hauling, but if you tried to load with any kind of current or wind, the hull wouldn't catch on the bunks until you were more then 1/2 way in. So I had a lot of sideways loading that had to be backed off and tried again. I installed two additional bunks further up a month or two ago. They are much narrower and helped engage the keel much earlier so now I don't worry about having sideways loading.

What Watermann has is a much better setup then what I had initially installed.

SHSU
 

Watermann

Starmada Splash of the Year 2014
Joined
Jan 12, 2013
Messages
13,794
If you're floating over the bunks then the trailer is too deep, I back all the way in and get the bunks wet and the pull the trailer out some leaving a couple feet of bunk out of the water. I've seen some Lund trailers with those forward V short bunks and they do center the boat well on the main bunks.

You have a Y bow stop, those are a pain, I'd opt for a roller up there for the bow stop.

I didn't want to worry about the 2x6 bunks sagging under my heavy SS so they got some beef added. Also I would seal up the wood first, way easier than replacing water damaged bunks that have warped or started to decay with your boat riding on them.

y4mld5XbKidcdi1qPW-r8ql_LCfBWlBW7yxN5Bc0TA9AcGzMVHzZwK89MRUdIStRX6mA4u0cygKoq-gX5WEyg_UgKfFsR7IPKAnUweQ6F71uxFUo67LIIC7RkzwuzgnhORGg2ixXHcVpG9pf5DmcziNmWDuCfuRP3WtG23xXHqu0S60vQ7GOLYhdik4nJRoPFyS-jQstgreCiB4cH-Feih1Cw
 
Last edited:

Mikesta

Petty Officer 3rd Class
Joined
Mar 15, 2018
Messages
86
Are those 4x4's under the 2x6's? I like that idea a lot. Did you just carpet the 2x6 and leave the bottom piece exposed? Also what did you seal the wood with? I cant't quite read the can in the picture lol

What are the side bunks called? i planned on doing this to my trailer later on towards the end of the build, just want to get the boat put on it for now
 

Mikesta

Petty Officer 3rd Class
Joined
Mar 15, 2018
Messages
86
I have the carpet for my bunks on order, they'll be here friday. In the mean time I am starting to sand down the interior panel to get them ready for paint.

Pretty much every post I've read says to use zinc chromate for a primer. Where do I get that from? I see Moeller makes it in spray cans but its over $20 a can on amazon. Are there any other alternatives? I tried searching for the Rustoleum zc but all that came up was the gallons no spray cans
 

BWR1953

Admiral
Joined
Jan 23, 2009
Messages
6,195
I have the carpet for my bunks on order, they'll be here friday. In the mean time I am starting to sand down the interior panel to get them ready for paint.

Pretty much every post I've read says to use zinc chromate for a primer. Where do I get that from? I see Moeller makes it in spray cans but its over $20 a can on amazon. Are there any other alternatives? I tried searching for the Rustoleum zc but all that came up was the gallons no spray cans

A lot of us have used Rust-Oleum self etching primer. It works well.
 

HypnoCraft

Petty Officer 3rd Class
Joined
Aug 30, 2018
Messages
94
I have the carpet for my bunks on order, they'll be here friday. In the mean time I am starting to sand down the interior panel to get them ready for paint.

Pretty much every post I've read says to use zinc chromate for a primer. Where do I get that from? I see Moeller makes it in spray cans but its over $20 a can on amazon. Are there any other alternatives? I tried searching for the Rustoleum zc but all that came up was the gallons no spray cans

I ended up using the rustoleum marine paint line. I used their roll on metal primer. I haven't had the paint on long, but it feels very strong and its difficult to scratch off. I made sure to do a lot of prep. Sanded the whole surface with 320 grit, washed with water, scrubbed with cleaning vinegar and a scotch brite pad, rinsed, washed down with dewax-degreaser, and immediately applied the primer once the metal was dry.

The rustoleum marine primer may also be a self etch, I am not sure.
 
Top