1978 Starcraft 22 ft SS v5 restore

Status
Not open for further replies.

bob johnson

Rear Admiral
Joined
Feb 25, 2009
Messages
4,304
Yes Admiral! (Sorry, that's my over 22 year AF career coming out in me:)

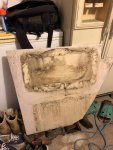
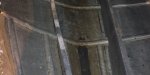
The one in the middle is mine. I just saw the crack above that I need to fix. That must have been from the factory like that. I'll check that one tonight.

Rivets are going in good now that I got my process down. I was planning on getting them all done yesterday, but had some rain move in so I got held up for a few hours.

I'll have to do it today and tomorrow, then I should be able to leak test it.

Thanks for the encouragement and keeping me on track. I'm a new-by so I'll need a little coaching.

Ciao!

ha...its SIR....YES SIR!!!!!!!!!!! ha ha ha ha....keep at it!........i say even when bucking solid rivets..a coating of 5200 cant hurt! just wipe away all the extra....so it doesnt cause a large no stick area for the paint
 

mojoso72

Petty Officer 3rd Class
Joined
Aug 15, 2017
Messages
83
ha...its SIR....YES SIR!!!!!!!!!!! ha ha ha ha....keep at it!........i say even when bucking solid rivets..a coating of 5200 cant hurt! just wipe away all the extra....so it doesnt cause a large no stick area for the paint

Ah, great tip! I've been putting it on there, but not been wiping too clean. Thanks!
 

mojoso72

Petty Officer 3rd Class
Joined
Aug 15, 2017
Messages
83
Did about 75 more rivets tonight. All was going well. I had both my sons in on it. A bit of a learning curve for my younger son. But, he did really well!

Tomorrow I'll pick up my new front cushions. I'm super excited about getting them back. The picture looks amazing.
See post above.

I have a lot of work ahead of me and I'm a little concerned about making my Scout trip with this boat. It's next weekend (1-3 Jun) :scared: Gonna keep pushing forward, yet I don't want to shortcut anything. If I have to I'll see about a rental for the trip...we'll see.

Once I'm in rebuild mode I should be able to crank it out. Might have to burn the midnight oil next week.
Wish me luck!
 

mojoso72

Petty Officer 3rd Class
Joined
Aug 15, 2017
Messages
83
One of my nighttime jobs is rewiring this tangled mess. I have a new switch panel and fuse box to install to protect and neaten up the boat wiring. The main wire to the fuse block called for 2/0 AWG when I sized it up on www.newboatbuilders.com
The wire is going to travel about 30' round trip. It seems big, but with everything is running the fuse box could be up to 100 amps. Does that sound like too much of a draw?

I also need to recut and cover these seat backs with some additional material I'm picking up tomorrow.

Just a few more tasks to pass the time:)
 

Attachments

  • photo291052.jpg
    photo291052.jpg
    596 KB · Views: 8
  • photo291053.jpg
    photo291053.jpg
    495.4 KB · Views: 8
  • photo291054.jpg
    photo291054.jpg
    452.2 KB · Views: 8

Watermann

Starmada Splash of the Year 2014
Joined
Jan 12, 2013
Messages
13,753
My 24v Terrova has a 50 amp breaker, what are you wiring up a garage or a boat? :lol:

Homes have 20 amp circuits. I ran fused 12 ga primary wire (20 amp) for power and ground to my fuse panel that runs all my accessories from a dedicated deep cycle battery. Nothing in my fuse block has over a 5 amp fuse.
 

baldwibr

Petty Officer 2nd Class
Joined
Sep 1, 2017
Messages
128
The important thing is to make sure each power line is protected with the appropriate fuse within a foot of the power source- especially the wire that feeds the fuse panel from the battery.

If you need to, run separate wires with an inline fuse on your large amperage items directly from the battery (as opposed to through the fuse panel) so you don't have to spend big money on large awg wiring.

c0c2c61d59b93c79f6cc4846e4651be7.jpg
 

mojoso72

Petty Officer 3rd Class
Joined
Aug 15, 2017
Messages
83
The important thing is to make sure each power line is protected with the appropriate fuse within a foot of the power source- especially the wire that feeds the fuse panel from the battery.

If you need to, run separate wires with an inline fuse on your large amperage items directly from the battery (as opposed to through the fuse panel) so you don't have to spend big money on large awg wiring.


That is one of the charts I used too. I'm into overkill, so I went with the 3%:) Thanks for sharing that resource! Glad others have used this too. I'm sure I could have went with the 10% and been fine. Nothing too critical, except the bilge pump:)

Attached is the new panel I went with. Pre-wired and ready to install. This is gonna be a major upgrade as the boat only had 3 switches before. I loved the look of the toggle switched, but this was way easier to get and looks very professional.

Tonight, more rivets! Ciao
 

Attachments

  • photo291187.jpg
    photo291187.jpg
    426.5 KB · Views: 4
  • photo291188.jpg
    photo291188.jpg
    285.4 KB · Views: 4

mojoso72

Petty Officer 3rd Class
Joined
Aug 15, 2017
Messages
83
So I've had to slow down a bit. Not going to meet my deadline date, but that's ok. Scout plans changed and we didn't need a 3rd boat for the trip. Kind of glad, because now I can focus on getting all the rivets replaced that need it and take more time doing it.

I had to order some longer rivets for a few spots that go through 4 layers of aluminum so that was a show stopper for me. I didn't want to take any short cuts on structural areas. another 1/8 inch on a few rivets will make me feel better:)

Also, I have all the materials I need and I just need to finish sealing the rest of the wood. Once I get the rivets done this should go pretty fast. I hope:D Yet, in the back of my mind I know different. Something always pops up to slow ya down. Oh well, I'll deal with that as it comes.
 

mojoso72

Petty Officer 3rd Class
Joined
Aug 15, 2017
Messages
83
On a positive note, I've been getting a lot of interest from my neighbors wondering how it's coming and saying they can't wait to see it when I get finished. That's a good thing, as I live in an area with an HOA and I've been doing everything I can to function within the guidelines of the HOA.

I'll get back at it this week and hope to finish the rivets by next weekend. Summer is coming and I can't wait tog et back on the water!

Thanks for all the help so far!
 

BWR1953

Vice Admiral
Joined
Jan 23, 2009
Messages
5,865
Hey, removing deadlines and slowing down can be a good thing. Removes a lot of pressure and stress. Sounds like you're making progress and that's always good!
 

mojoso72

Petty Officer 3rd Class
Joined
Aug 15, 2017
Messages
83
Where are there 4 layers of AL?

Great question. Not sure of the proper terminology of the hull anatomy, but here goes. Pictures would help and I can get them tomorrow in the daylight.

There is a couple spots where an outside rib, hull, inside longitude and lateral ribs come together. That's 4 sheets of aluminum. It's only maybe a dozen places, but I want to make sure I get all the layers in the rivet.

A picture I'm sure would man-splain it better.
 

mojoso72

Petty Officer 3rd Class
Joined
Aug 15, 2017
Messages
83
Where are there 4 layers of AL?
Not a great picture(It's an older one), but I'm headed out with the Scouts this weekend and wanted to show the area.

If you see where the rib line from front to back, left to right come together you can see 3 layers just on the inside because those ribs are on top of each-other. Then there is a rib on the outside making 4. Again, looking at it, there's only about 24 spots, but I'd rather do it right and not worry about it. In fact, the factory rivets was only through 3 layers in some of them. Me knowing about this would make me think about it at some point:eek: Probably not that big a deal, but...

I really like how y'all make me think about things and offer advice. Keep it coming!

Ciao
 

Attachments

  • photo291894.jpg
    photo291894.jpg
    782.9 KB · Views: 42

Watermann

Starmada Splash of the Year 2014
Joined
Jan 12, 2013
Messages
13,753
The spray rail that is longer than most is riveted on the outside. I see.

fetch
 

mojoso72

Petty Officer 3rd Class
Joined
Aug 15, 2017
Messages
83
Well, I'm back at it...FINALLY! Me and the boys have the time again to get back at this. We've had a lot going on in our lives, but now it's time to get it done. Looking forward to leaning on y'alls experience again:D
 

mojoso72

Petty Officer 3rd Class
Joined
Aug 15, 2017
Messages
83
I need to replace the supports and face of the bow cover area. Had anyone done it with Aluminum instead of wood? Any pro's/con's?

Thanks for the help!
 

mojoso72

Petty Officer 3rd Class
Joined
Aug 15, 2017
Messages
83
So the plan (right now) is to get it in the water this summer. The biggest obstacle I have is where I work on the boat. I don't have a garage big enough for the boat, and my driveway is slanted. So on the street it is. It works fine and I put out cones. Thankfully it's a pretty quiet neighborhood and the traffic is not bad.

Anyway, we're working on the rivets on the bottom. I need to get them done before I can move on. The trailer is in the way for getting to the back half of the boat and I was thinking about building some supports or just lifting up each side so I can access it to replace rivets. Any proven ideas on how to do this safely?
 

classiccat

"Captain" + Starmada Splash Of The Year 2020
Joined
Dec 20, 2010
Messages
3,405
Welcome back mojoso72 ! I can imagine that you're testing your HOA's patience at this point...or handed-out fishing trip vouchers to every single neighbor! :lol:

I personally haven't seen anyone use aluminum for bow supports. Some add a 3/4" PLY panel (to help reinforce bow-mount TM's). I doubled-up my bow planks by making a "T" for strength.
CWuEAbV.jpg


To work on the bottom rivets, have you considering removing the motor and flipping it?. It's great for not only rivet work but also sealing the double seam at the outer chine & prep/paint the bottom.

If you decide to elevate the boat off of the trailer, obviously exercise extreme caution; an empty V5 hull with a mounted V4 outboard is still probably pushing 3/4 ton.
 

mojoso72

Petty Officer 3rd Class
Joined
Aug 15, 2017
Messages
83
@classiccat Thanks for the pic's. that looks good and I'll probably reinforce it too. Wood is probably what I'll go with since I was thinking of maybe mounting speakers up there too. We'll see...

As for flipping it, I just don't have the space to do that. When I paint it I'll have someone else do it. Painting is going to wait until the winter. Here is Texas it's plenty warm to paint. Plus at that point I'll pull the engine so I can replace the transom. Believe it or not, it's still solid! We never left it in the water and kept is covered all the time since my dad bought it new in 1978.

I'm thinking of just propping it up on the trailer one side at a time so I can get to it. Of course blocking it all along so it's safe...don't want to get crushed by that thing!
 

mojoso72

Petty Officer 3rd Class
Joined
Aug 15, 2017
Messages
83
One step forward...4 steps back:grumpy:. The fun continues. The boys and I have been having fun doing rivets this morning. It's great to have 3 people doing it...1 blocker, 1 riveting, 1 sizing & putting on the 5200. Sure makes it easier!
 

Attachments

  • photo334266.jpg
    photo334266.jpg
    1.9 MB · Views: 14
Status
Not open for further replies.
Top