1978 Islander 22 I/O

66Holiday924

Chief Petty Officer
Joined
Aug 21, 2017
Messages
567
Moving right along!!! Really like how the hull looks on the new trailer.
Thanks! I think it's going to be a great trailer for the boat!

The motor mounts look like they will last a lifetime with what you are doing. Keep up the nice work!!
I'm very happy with how they are coming out so far. However, I just realized that there is going to be a conflict with the Y pipes and a piece of the bell housing and I'm going to have to cut out a bunch of material. My big concern right now is that the aft studs might be in the way, which will require a more serious modification.
 

66Holiday924

Chief Petty Officer
Joined
Aug 21, 2017
Messages
567
Yesterday I installed a cross member for my engine mount. It's mahogany and the brackets are 316 stainless. I got the cross member installed and then I modified the stringers to accommodate the Y-pipes. I was nervous about the modification because it was unforeseen, but I didn't end up having to hack out too much material and it seems like it's going to work great.

Today I'm going to clean up the aluminum in the bilge area and get some final sanding done on the stringers. I have a drum sanding bit for my drill that I'm going to sand some notches in the bottom of the stringers with, so they kind of hug the ribs. My plan is to tie the back of the stringer mounts into the transom with the aluminum angles (see in the picture), and then install the thru-hull angle mounts that will tie the stringers to the bottom of the boat. The plan is to chop the original stringers so that I can reinstall, and my stringers will basically replace that part of the original, tie them together with aluminum angle. I'm going to caulk the countersink holes on top of my stringers with silicon to keep water from getting in and pooling. The silicon will be easy to remove if it needs to be.

So far, so good. The width and height are right where I planned on. I just hope it works the way I'm assuming it does, that the measurements off the bottom of the keyhole, from the donor boat will transfer over.
 

Attachments

  • 20240930_202320858_iOS.jpg
    5 MB · Views: 4
  • 20240930_202435418_iOS.jpg
    6.8 MB · Views: 5
  • 20240930_211703420_iOS.jpg
    4.1 MB · Views: 6
  • 20240930_215725676_iOS.jpg
    4.9 MB · Views: 6
  • 20240930_215657972_iOS.jpg
    4.9 MB · Views: 6
Last edited:

SHSU

Lieutenant Junior+Starmada Splash Of The Year 2019
Joined
Mar 8, 2017
Messages
1,713
That is some nice work and pretty wood. Almost a shame to have to cover it with a motor, but guessing it look just as good

SHSU
 

66Holiday924

Chief Petty Officer
Joined
Aug 21, 2017
Messages
567
I got the engine mount installed yesterday. Now I can only hope and pray it works out. I'm pretty confident in everything except the height. It might be too tall. If it is, it'll still work but it'll mean potentially a lot of sanding. I was going to silicon caulk the countersink holes at the top of the engine mount to prevent water from pooling in them, I decided to try plugs instead. First I got some rubber plugs but didn't like them, then got cork. After I installed the plugs I hit them with some leftover Old Timer's Formula. I ended up applying it to the tops of the stringers and the mahogany brace.

The aluminum angle brackets tie each stringer mount into the transom and through the hull of the boat. I had to use 3/8" 18-8 stainless thru-bolts to go through the hull. I could not find 316 stainless with the truss head. Each got a healthy dose of 5200 and I smeared the ends of the bolts in the bilge with the 5200 to add water proofing protective layer to help with corrosion. Usually, rivets are used in this application, but I've only installed a handful of rivets in my life and wanted to use something I'm comfortable with here. I know I can, and did, torque the bolts down very tight.
 

Attachments

  • 20241001_143901489_iOS.jpg
    20241001_143901489_iOS.jpg
    2.7 MB · Views: 5
  • 20241001_181246035_iOS.jpg
    4.6 MB · Views: 3
  • 20241001_184830575_iOS.jpg
    4.8 MB · Views: 3
  • 20241001_192054658_iOS.jpg
    20241001_192054658_iOS.jpg
    2.9 MB · Views: 5
Last edited:

66Holiday924

Chief Petty Officer
Joined
Aug 21, 2017
Messages
567
I'm happy with how my mount turned out. I think it's enough. I don't build boats for a living, but I think it should be good.

I remember being surprised how the 3.0L MerCruiser mounts in my Holiday. It mounts to the transom assembly and one forward mount screwed into one rib. So, going over the numbers, the internet says it weighs 635lbs., divided equally, that's 317.5lbs on the transom and forward mount and rib, and 158.75lbs per bolt.

MerCruiser says my 4.3 weighs 763lbs. It mounts to the transom and on the stringers. I think the amount of weight on the transom is probably negligible. So, assuming all 763lbs are on the stringers, the bulk of the weight would be on the two ribs that the feet mount between, and the thru-bolts. Altogether, each one side has two points of contact and 4 thru-bolts that hold 381.5 lbs. If everything is loaded equally, assuming the transom and third rib under the mount aren't carrying anything (which isn't the case), each bolt or point of contact on the rib would be holding 63.58 lbs., which is a lot less than the 158.75lbs per bolt on my Holiday.
 

66Holiday924

Chief Petty Officer
Joined
Aug 21, 2017
Messages
567
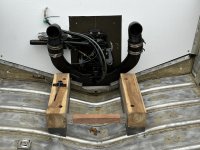
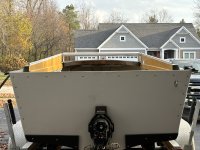
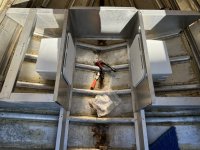
Well, not exactly the best news to report today. The boat's been in the shop to have the engine installed for the past week and a half or so. He finally got to my boat yesterday, but my mount was 2" too tall. So, if you've read my earlier posts, I described how I came up with the height taking measurements in relation to the donor boat's keyhole, that method didn't work. The only reason that comes to mind is that the transom on the donor boat might have had a different angle. Nonetheless, it didn't work and now I know it needs to come down two inches. He did say the width and length worked fine.

So, I went home, disassembled and proceeded to mutilate my timber with my table saw... You have to make two passes with a timber that thick. Now, I have a new 3x5 inch timber on order, and I feel pretty good about getting it put back together once it gets here, and, according to the mechanic this height change should do the trick, about three weeks for delivery.

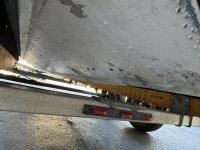
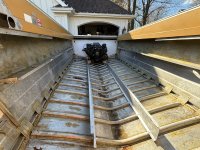
Meanwhile, trying not to lose what little time is left to work on it this year, I've shifted focus to bilge ventilation (which needs to go in before decking does) and I ground down some rivets on the top of the cabin that will eventually be in the way when I install the new windshield.

So not the best news. I feel like I did what I could, everything I know to do, so it's not bothering me too much that the mount wasn't the right height. I gave it my best but it still sucks being out a $250, chunk of teak...
 

Attachments

  • 20241015_142942574_iOS.jpg
    3.6 MB · Views: 2
  • 20241015_142949054_iOS.jpg
    3.1 MB · Views: 2
  • 20241015_143237797_iOS.jpg
    3.5 MB · Views: 2
  • 20241015_144609935_iOS.jpg
    3.2 MB · Views: 2
  • 20241015_144614709_iOS.jpg
    3.3 MB · Views: 2
Top