1976 Tom Boy Boat, 1976 40 HP Johnson Outboard and who knows what Trailer

kcassells

Fleet Admiral
Joined
Oct 16, 2012
Messages
8,720
A good air gun remedy the issue. They are nasty !!! rats.

CZ-452-Ultra-Lux-Squirrel.jpg
 
Last edited:

archbuilder

Vice Admiral
Joined
Sep 12, 2009
Messages
5,697
Heidi, the German Shepherd keeps them "exercised" here. the slow or dumb ones seem to have "heart attacks".......she always tries to give them mouth to mouth....but it doesn't seem to work lol!
 

gm280

Supreme Mariner
Joined
Jun 26, 2011
Messages
14,604
A good air gun remedy the issue. They are nasty !!! rats.

[IMG2=JSON]{"data-align":"none","data-size":"full","src":"http:\/\/squirrelhuntingjournal.com\/wp-content\/uploads\/2014\/06\/CZ-452-Ultra-Lux-Squirrel.jpg"**[/IMG2]

Nice rifle. I am guessing the squirrel doesn't think so... :D

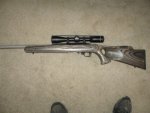
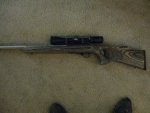
I attached a picture of one of my squirrel getters. I have quite a few. But this rifle has been with me for decades...not in that style setup though. It has a 1 inch stainless steel fluted custom barrel with a custom trigger, reworked and polished receiver and a custom stock. It has a very nice Variable Burris scope and makes for easy pick'ns in the woods for tree rats. Problem is, I don't want to be shooting 22 rim fire in the neighborhood and have a through and through keep going to who knows where. So I won't be using that game getter.

Today has been raining and overcast. So I decided to do some welding on the shrinker/stretcher body I am making. I used the TIG welder because I really need to get some experience with it. I could have easily welded it up with the MIG. But I need to get used to the TIG setup. And thick steels are not easy to blow through, so I decided to get some practice using it. It is coming out pretty nice but I stopped when I welded up the inside supports to allow it to cool off. I like being able to slowly weld or speed up with the TIG. MIG you are basically set via the wire feed and voltage settings. However, I like both types and can find needs for each. I'll post pre-paint picture when I get to that stopping point.

rifle (1).JPG

rifle (2).JPG
 

kcassells

Fleet Admiral
Joined
Oct 16, 2012
Messages
8,720
Very nice. I was promoting a pump/air rifle. I've knocked those roaches out at 30' - 50' feet. Lead pellets, rest just bounce off them grey rats. When they start getting into your attack/boat or climbing on your little girls screen window...no mercy at that point!
 

gm280

Supreme Mariner
Joined
Jun 26, 2011
Messages
14,604
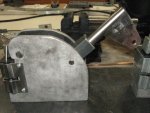
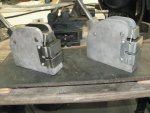
Okay, as promised, here are the pre-paint/finish pictures of my stretcher/shrinker body build.
It is the closest I will ever get to body-building, that's for sure... :laugh:

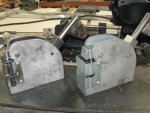
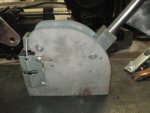
I am showing both the factory version and my version. See if you can figure out which is which? And now after finishing these two units, one being blue and the other red so I can differentiate which is the shrinker, and which is the stretcher, I can further the transom project again.

I am using blue for the shrinker model, and red for the stretcher. I guess that makes sense. .

And I used the TIG welder for 98% of the welding. I used some MIG as fill in for some divots, but so little is wasn't much. Since I couldn't reach some really far in welds with TIG , the MIG worked for those welds. But again so little it wasn't much at all. And using the TIG was so nice to weld with for an actual project. I can see me using TIG a lot more now. Just good to have both options available.

The TIG machine is capable of stick welding, at least up to 225 amps. But I haven't even thought of stick for anything. Maybe I should at least give it a try too...

I'll post the finished models when I finish them. The stand was already built to accommodate two units, so little modification to the stand.

Shrinker-stretcher  (1).JPG

Shrinker-stretcher  (2).JPG

Shrinker-stretcher  (3).JPG

Shrinker-stretcher  (4).JPG

Okay, the one on the left in both shrinker/stretcher dual pictures is my version...
 

archbuilder

Vice Admiral
Joined
Sep 12, 2009
Messages
5,697
Looks good, I guess correctly lol! The lack of galvanizing on the sheet metal was the give away to me. Very nice job! You should start a tool company!
 

gm280

Supreme Mariner
Joined
Jun 26, 2011
Messages
14,604
Looks good, I guess correctly lol! The lack of galvanizing on the sheet metal was the give away to me. Very nice job! You should start a tool company!

I appreciate the kind words from everyone. I have to admit, I never built anything like this, so it was a challenge to make...but fun as well. Some times I get an idea about making things, and then have to prove it to ME that I can...

Yes, they used mere steel plate. I used stainless steel because I had it on hand (disassembled an old wore out gas grill). In fact that cover over the jaws was probably the hardest part to make. The raised section was interesting to do. So I made the plate flat and measured where that raised portion(s) should go and used a ~16 penny nail and a press to form it. Could have used a bench vice, but since I have a 20 ton press, why not. Then I bent the 90 degree angle after cutting the slot and drilling the attachment holes. The sequence was the key to making such a cover. I think it came out pretty good. And now I have the ability to shrink or stretch the metal without swapping jaws. Doesn't sound like much until you have to do it so many times depending what you are working on.

I think I am going to powder coat them so the coating will last as long as possible. I will post the end results! Now on to the next issue...
 

Baylinerchuck

Commander
Joined
Jul 29, 2016
Messages
2,726
I echo everyone else’s sentiments. Nice work sir. Now I need to see pics of these in action so I wrap my head around what they’ll be used for. Lol.
 

gm280

Supreme Mariner
Joined
Jun 26, 2011
Messages
14,604
I echo everyone else’s sentiments. Nice work sir. Now I need to see pics of these in action so I wrap my head around what they’ll be used for. Lol.

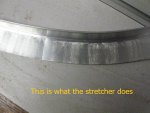
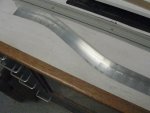
Let me see if I can explain what these things do.

If you are working on a piece of angle metal but need to bent it one direction or the other without cutting the metal, you use either a shrinker or a stretcher to do that bend. In other words, you can stretch the flat metal to make it bent around a corner without cutting it.

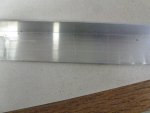
The first picture is the straight angle aluminum I bought. It is 1" x 1" x 1/16" thick.

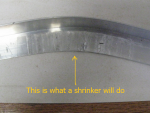
The second picture shows how you can use a "Shrinker" to bent the angle aluminum one direction.

The third picture shows how a "Stretcher" bends the aluminum in the other direction.

And the last picture shows how you can use both to bent the angle aluminum as you want.

You can see the marks on the metal. But they are very easily faired or buffed out and it looks like it was made that way from a vendor.

You can use this on light gauge sheet steel and angle metals and a little heavier with aluminum and angle aluminum as well. A lot of auto body places use these two tool to form replacement parts for vehicles. In capable hands, there is no limit to what you can do with out cutting any metal...

I now have two bodies to allow me to use the two sets of jaws, one shrinking and the other stretching... Hope that explains it a little more.

I am using these two tools to form a transom cap for the boat project to help seal the end grains of the transom plywoods even though the grain is sealed with polyester resins and fiberglass clothes.

deminstration ss on metal (1).JPG

deminstration ss on metal (2).png

deminstration ss on metal (3).png

deminstration ss on metal (4).JPG
 

kcassells

Fleet Admiral
Joined
Oct 16, 2012
Messages
8,720
So how do you get rid of the compression marks? For instance to bring up the sheen or to paint if need be.
The process is amazing is all I have to say. Awesome work!
Do you sand and polish out.
 

gm280

Supreme Mariner
Joined
Jun 26, 2011
Messages
14,604
So how do you get rid of the compression marks? For instance to bring up the sheen or to paint if need be.
The process is amazing is all I have to say. Awesome work!
Do you sand and polish out.

Yes, the marks are not hard to fair out or polish. You can just sand them with some fine sand paper or a scotch brite disk. They look worst then they really are. In both situations, in order for the shrinker/stretcher to work, they grab the metal very securely and then stretch it or shrink it. Kind of amazing to see how the jaws work to grab and open or grab and close the metal. And you don't try to do either operation in one step. You gradually work with it in little steps.

The body part that the jaws set in actually is a high compound press to grab the metals first, and then spread the metal or squeeze the metal, depending which one you are doing. I don't know how much actual force is applied, but it is a lot...
 

Baylinerchuck

Commander
Joined
Jul 29, 2016
Messages
2,726
I’m in industrial maintenance and controls, we always joke around about needing a wire stretcher. Actually sent a few new folks back to the shop to look for one, ha ha. Never seen a press like this before. That’s really neat. Thanks for the explanation and sample bends.
 

gm280

Supreme Mariner
Joined
Jun 26, 2011
Messages
14,604
Thanks to everyone for your nice responses. These are used in auto body shops and even in the aircraft industries.

Sometimes you need specially bent metals for an unusual application and these type shrinker/stretchers come in to solve those issues.

I just wanted to make a transom cap without any cuts so that the metal keeps water out better then any other method. But honestly, I really enjoy working in all types of hobbies and materials, whether metal, wood, electronics, cranking wrenches, boat, auto body work, reloading ammo, making my own bullets, or even yard and house projects. There so many things a person can do, it all depends on what you like.

I will post the powder coating of these two units once I get the red powder coat powder in. I had to order the red powder. I thought I had the red and needed the blue. But checking the supplies, it was the other way around. I usually buy most powders from Eastwood. They have a pretty good selection of colors.
 

Baylinerchuck

Commander
Joined
Jul 29, 2016
Messages
2,726
I love the idea of powder coating. Wish I had the space for an extra oven to sit around. I have a brush bar/ light bar I’m fabricating for my snow mobile. Perhaps someday....
 

gm280

Supreme Mariner
Joined
Jun 26, 2011
Messages
14,604
I love the idea of powder coating. Wish I had the space for an extra oven to sit around. I have a brush bar/ light bar I’m fabricating for my snow mobile. Perhaps someday....

Actually you can get started pretty easy with a yard sell toaster oven and the powder coat system. No you can't put a auto bumper in the toaster oven, but you can do smaller hobby shop projects and then either make a cheap large oven or find a used kitchen oven to use. I have a kitchen oven and a toaster oven for my coating needs. NO, not our kitchen oven, a used one given to me.

I have seen some guys buy a tall metal coat type cabinet from a used office supply type store, and then turn it into a large oven with a couple oven heating elements and the controller unit and line the inside with heat resistant fiberglass materials. And you can put a bumper in that type setup. Just an idea.

And the powder coat systems are coming down on their costs now since so many have gone that route even for hobby work. Lots are powder coating brake calibers, wheels and lots of auto custom parts. Really is fun powder coating as long as you don't touch the item you are coating with the gun on/spraying (electrostatic setup). You will get a pretty good shock. Nothing dangerous, but it is an eye opener all the same. Like getting a shock from a spark plug on a lawn mower. I hope I got my shock out of the learning curve now... :eek:

I am using the Eastwood system and it seems to work pretty well and easy too. Clean up is a breeze without any chemicals involved. Give it a try... The final finish is remarkably scratch resistance and wears forever. No other painting method can compare for scratch resistance, gas and oil resistance and even chemical resistance...at least I haven't found anything. And I have used high quality finishes of a lot of different types too. :D
 

gm280

Supreme Mariner
Joined
Jun 26, 2011
Messages
14,604
A couple days ago, I decided to powder coat the factory version of the shrinker/stretcher body part. Took a little time setting up everything because I haven't powder coated in a while. But once I had everything setup, the actual powder coating time was a mere minute or so. The managing it from the coating to the toaster oven was the pain.

That thing is pretty heavy and getting it into the oven without touching any of the powder coat was interesting to see. I did get it in and then set the temp at 450 degrees until the matt coating turned glossy. Then reduced the temp to 400 degrees for 20 minutes to cure per the powder coating instructions..

It took quite a long time getting that cast iron to heat up to 450 degrees to gloss over. But it finally got there and then cured. Yesterday, I took it out of the oven allowing it to cool down over night, and it looked amazing. I never get tired seeing how well powder coating looks after curing. I did have two little areas that will need to be recoated but I will do that in the big oven this time. It will be easier to transfer after touch up.

I am waiting for the red powder to be delivered. Then my version gets its coating. So I started on other things. I was drilling a piece of metal on the drill press and a screw dropped on the plate. Looking around to where that came from, I saw it was out of the on/off switch unit. So I got a screw driver and tried to screw it back in place. It just spun around not tightening. So I tried to tighten the upper screw, and that one was stripped as well...or so I thought.

I unplugged the drill press to see what was going on with the on/off switch assembly and found out all the screws tabs holding it tight were broken. They were plastic and time took its toll. So I found the replacement unit online for a mere $20 dollars and order one. The only part that bothers me is how well the entire Jet 16 speed drill press was made but with a plastic switch housing. Since that drill press gets used most everyday, I guess a few dollars isn't Earth shattering... Always something different everyday... Life is so interesting!

Once I get the red powder coating in and the other body coated, I'll post those pictures. If you ever want a painting system that will be there forever, you have to powder coat. I am sure you will love the finishes...
 

archbuilder

Vice Admiral
Joined
Sep 12, 2009
Messages
5,697
I have replace the switch on my Delta twice now. It just quits working, Chinese quality!
 
Top